Salta al contenuto principale

Google Pixel XL Rear Facing Camera Replacement

Cosa ti serve

  1. Google Pixel XL Rear Facing Camera Replacement, SIM Card Tray: passo 1, immagine 1 di 3 Google Pixel XL Rear Facing Camera Replacement, SIM Card Tray: passo 1, immagine 2 di 3 Google Pixel XL Rear Facing Camera Replacement, SIM Card Tray: passo 1, immagine 3 di 3
    • Insert a SIM eject tool, SIM eject bit, or a paperclip into the small hole on the left edge of the phone, near the top.

    • Press to eject the tray.

  2. Google Pixel XL Rear Facing Camera Replacement, Display Assembly: passo 2, immagine 1 di 3 Google Pixel XL Rear Facing Camera Replacement, Display Assembly: passo 2, immagine 2 di 3 Google Pixel XL Rear Facing Camera Replacement, Display Assembly: passo 2, immagine 3 di 3
    • Heat an iOpener and apply it to the top edge of the display for two minutes.

    • A hair dryer, heat gun, or hot plate may also be used, but be careful not to overheat the phone—the display and internal battery are both susceptible to heat damage.

    • Take note of the following regions before you begin prying:

    • Thin adhesive lined against the display panel

    • Thick adhesive

    • The OLED display panel, which is very prone to damage

    • The display cable, which can be damaged during prying

  3. Google Pixel XL Rear Facing Camera Replacement: passo 3, immagine 1 di 3 Google Pixel XL Rear Facing Camera Replacement: passo 3, immagine 2 di 3 Google Pixel XL Rear Facing Camera Replacement: passo 3, immagine 3 di 3
    • Once the edge is warm to the touch, apply a suction cup close to the edge.

    • Lift on the suction cup, and insert an opening pick into the gap.

    • Do not insert the pick more than 13 mm (0.5 inches), or you will damage the display assembly.

    • If you have trouble creating a gap, reheat the edge and try again.

    • You can also try to use a playing card instead of an opening pick to help make the initial entry.

  4. Google Pixel XL Rear Facing Camera Replacement: passo 4, immagine 1 di 3 Google Pixel XL Rear Facing Camera Replacement: passo 4, immagine 2 di 3 Google Pixel XL Rear Facing Camera Replacement: passo 4, immagine 3 di 3
    • Slide the opening clip across the top edge to slice through the adhesive.

    • Be sure not to cut deeper than 13 mm (0.5 inches) or you will damage the display.

    • There's a mesh covering the earpiece speaker on the top edge of the screen. If you don’t have a replacement mesh, take care not to damage or lose this component.

    • Leave an opening pick in the edge to prevent the adhesive from resealing.

  5. Google Pixel XL Rear Facing Camera Replacement: passo 5, immagine 1 di 3 Google Pixel XL Rear Facing Camera Replacement: passo 5, immagine 2 di 3 Google Pixel XL Rear Facing Camera Replacement: passo 5, immagine 3 di 3
    • Heat an iOpener and apply it to the right edge of the phone for two minutes.

    • Insert an opening pick near the top edge of the phone, where you have already sliced the adhesive.

    • Slowly guide the pick around the right corner.

    • Carefully slide the pick down the right edge of the phone to slice through the adhesive.

    • Do not insert the pick more than 1 mm (1/32") along the edge, or you will damage the display assembly.

    • Repeat the step for the left edge of the phone.

  6. Google Pixel XL Rear Facing Camera Replacement: passo 6, immagine 1 di 2 Google Pixel XL Rear Facing Camera Replacement: passo 6, immagine 2 di 2
    • Heat the bottom edge with an iOpener for two minutes.

    • Insert a pick near the right edge where you have already loosened the adhesive.

    • Carefully guide the pick around the corner.

    • Slide the pick along the bottom edge to slice through the adhesive.

    • Do not slice deeper than 8.5 mm (1/3") or you will damage the display cable.

  7. Google Pixel XL Rear Facing Camera Replacement: passo 7, immagine 1 di 1
    • Once you have sliced around the perimeter of the phone, carefully lift the display assembly up slightly by the right corners.

    • Do not attempt to remove the display assembly. It is still attached by a flex cable.

    • Use an opening pick to slice through any remaining adhesive.

  8. Google Pixel XL Rear Facing Camera Replacement: passo 8, immagine 1 di 3 Google Pixel XL Rear Facing Camera Replacement: passo 8, immagine 2 di 3 Google Pixel XL Rear Facing Camera Replacement: passo 8, immagine 3 di 3
    • Lift the display assembly from the top end and swing it around such that it rests upside down on the frame.

    • Be careful not to strain the flex cable when you swing the assembly around.

  9. Google Pixel XL Rear Facing Camera Replacement: passo 9, immagine 1 di 2 Google Pixel XL Rear Facing Camera Replacement: passo 9, immagine 2 di 2
    Attrezzo utilizzato in questo passaggio:
    Magnetic Project Mat
    $19.95
    Compra
    • Remove the two 4 mm T5 screws securing the display cable bracket.

    • Throughout this repair, keep track of each screw and make sure it goes back exactly where it came from.

    • Remove the display cable bracket.

  10. Google Pixel XL Rear Facing Camera Replacement: passo 10, immagine 1 di 2 Google Pixel XL Rear Facing Camera Replacement: passo 10, immagine 2 di 2
    • Use the point of a spudger to pry up and disconnect the display cable from its connector.

    • To re-attach press connectors like this one, carefully align and press down on one side until it clicks into place, then repeat on the other side. Do not press down on the middle. If the connector is misaligned, the pins can bend, causing permanent damage.

  11. Google Pixel XL Rear Facing Camera Replacement: passo 11, immagine 1 di 3 Google Pixel XL Rear Facing Camera Replacement: passo 11, immagine 2 di 3 Google Pixel XL Rear Facing Camera Replacement: passo 11, immagine 3 di 3
    • Remove the display assembly.

    • For comprehensive instructions on how to reinstall the Pixel XL display, follow this guide.

    • If your replacement display did not come with a speaker grille, use tweezers to gently peel the adhesive grille from your old display, and transfer it to the replacement.

    • Before installing a new display, be sure to remove all traces of adhesive from the frame. Use a spudger or an opening tool to scrape it off, and use high-concentration isopropyl alcohol to remove any residue.

    • If you are reinstalling the same display assembly, be sure to remove all adhesive residue from the panel and the frame before applying new adhesive.

    • Be sure to turn on your phone and test your repair before installing new adhesive and resealing the phone.

    • During the boot-up process after reassembly, the screen will go through a calibration sequence. Do not touch the screen during this process, as it could result in improper touch calibration and create touch issues.

  12. Google Pixel XL Rear Facing Camera Replacement, Google Pixel XL Opening Procedure: passo 12, immagine 1 di 1
    • Remove the following screws that secure the midframe to the back:

    • Seven black 4 mm T5 screws

    • Two silver 3 mm T5 screws

  13. Google Pixel XL Rear Facing Camera Replacement: passo 13, immagine 1 di 1
    • The midframe is held tightly in place by plastic clips which push into the edge of the back case.

  14. Google Pixel XL Rear Facing Camera Replacement: passo 14, immagine 1 di 3 Google Pixel XL Rear Facing Camera Replacement: passo 14, immagine 2 di 3 Google Pixel XL Rear Facing Camera Replacement: passo 14, immagine 3 di 3
    • Find the small notch in the bottom left corner of the frame and insert an opening pick.

    • Slide the opening pick along the bottom edge of the phone towards the bottom right corner and leave it there.

  15. Google Pixel XL Rear Facing Camera Replacement: passo 15, immagine 1 di 3 Google Pixel XL Rear Facing Camera Replacement: passo 15, immagine 2 di 3 Google Pixel XL Rear Facing Camera Replacement: passo 15, immagine 3 di 3
    • Insert a separate opening pick into the right edge of the phone, near the bottom.

    • Slowly push the pick upwards along the seam until the first clip pops free.

    • Due to the tight tolerances, this may be difficult, requiring a substantial amount of force. If you are having trouble, try inserting and sliding a playing card.

    • Once you've released the clip, leave the opening pick in place to prevent the midframe from resealing.

  16. Google Pixel XL Rear Facing Camera Replacement: passo 16, immagine 1 di 2 Google Pixel XL Rear Facing Camera Replacement: passo 16, immagine 2 di 2
    • Insert an opening pick into the right edge of the phone and slide it upwards towards the top right clip.

    • You do not need to insert the pick more than 2 mm into the edge. If you insert the pick all the way in, you may risk damaging flex cables.

    • Slowly slide the pick past the clip to disengage it from the frame.

    • At this point, the right edge of the midframe should be free from the case. If it isn't, slide an opening clip up and down along the right edge.

  17. Google Pixel XL Rear Facing Camera Replacement: passo 17, immagine 1 di 3 Google Pixel XL Rear Facing Camera Replacement: passo 17, immagine 2 di 3 Google Pixel XL Rear Facing Camera Replacement: passo 17, immagine 3 di 3
    • Grasp the right edge of the midframe by the corners and slowly hinge the edge up.

    • When the left edge feels loose, stop hinging and lift the midframe upwards.

    • Remove the midframe.

    • To reinstall the midframe, align it to the case, then squeeze around the perimeter until all the clips snap back into position. When properly done, the midframe should lie flat.

  18. Google Pixel XL Rear Facing Camera Replacement, Motherboard: passo 18, immagine 1 di 3 Google Pixel XL Rear Facing Camera Replacement, Motherboard: passo 18, immagine 2 di 3 Google Pixel XL Rear Facing Camera Replacement, Motherboard: passo 18, immagine 3 di 3
    • Use the point of a spudger to pry up and disconnect the battery connector.

    • Bend the battery flex cable slightly so that it will not accidentally touch the motherboard.

  19. Google Pixel XL Rear Facing Camera Replacement: passo 19, immagine 1 di 2 Google Pixel XL Rear Facing Camera Replacement: passo 19, immagine 2 di 2
    • Use the point of a spudger to pry up and disconnect the button strip connector.

    • If the button strip's metal clip falls out during the repair, align the clip and push it back into its groove.

  20. Google Pixel XL Rear Facing Camera Replacement: passo 20, immagine 1 di 2 Google Pixel XL Rear Facing Camera Replacement: passo 20, immagine 2 di 2
    • Use tweezers to peel up the tape at the top of the interconnect cable.

  21. Google Pixel XL Rear Facing Camera Replacement: passo 21, immagine 1 di 2 Google Pixel XL Rear Facing Camera Replacement: passo 21, immagine 2 di 2
    • Use the point of a spudger to pry up and disconnect the interconnect cable from the motherboard.

  22. Google Pixel XL Rear Facing Camera Replacement: passo 22, immagine 1 di 3 Google Pixel XL Rear Facing Camera Replacement: passo 22, immagine 2 di 3 Google Pixel XL Rear Facing Camera Replacement: passo 22, immagine 3 di 3
    • Use the point of a spudger to disconnect the black antenna cable from the motherboard, near the front facing camera module.

    • Route the antenna cable out of its retaining clip.

  23. Google Pixel XL Rear Facing Camera Replacement: passo 23, immagine 1 di 2 Google Pixel XL Rear Facing Camera Replacement: passo 23, immagine 2 di 2
    • Use the point of a spudger to pry up and disconnect the white antenna cable from the motherboard, near the rear facing camera module.

    • Route the antenna cable out of its retaining clip.

  24. Google Pixel XL Rear Facing Camera Replacement: passo 24, immagine 1 di 1
    • Remove the two 3 mm T5 screws securing the motherboard to the frame.

    • During reinstallation, be sure that both camera modules and the headphone jack module are seated properly in their sockets before screwing down the motherboard.

  25. Google Pixel XL Rear Facing Camera Replacement: passo 25, immagine 1 di 3 Google Pixel XL Rear Facing Camera Replacement: passo 25, immagine 2 di 3 Google Pixel XL Rear Facing Camera Replacement: passo 25, immagine 3 di 3
    • Use the point of a spudger to pry up and loosen the front facing camera module from its socket.

  26. Google Pixel XL Rear Facing Camera Replacement: passo 26, immagine 1 di 2 Google Pixel XL Rear Facing Camera Replacement: passo 26, immagine 2 di 2
    • Insert the point of a spudger into the headphone jack port and pry upwards to loosen the port from its socket.

  27. Google Pixel XL Rear Facing Camera Replacement: passo 27, immagine 1 di 2 Google Pixel XL Rear Facing Camera Replacement: passo 27, immagine 2 di 2
    • Be sure that you have ejected the SIM card tray before performing this step.

    • Use the flat end of a spudger to pry the bottom edge of the motherboard up slightly, loosening it from its recess.

    • Do not try to remove the motherboard yet. It is still connected by a flex cable.

  28. Google Pixel XL Rear Facing Camera Replacement: passo 28, immagine 1 di 2 Google Pixel XL Rear Facing Camera Replacement: passo 28, immagine 2 di 2
    • Locate the fingerprint sensor cable attached to the underside of the motherboard, near the bottom edge.

    • Use the point of a spudger to pry and release the fingerprint sensor cable from its socket.

    • Peel the cable away from the motherboard.

  29. Google Pixel XL Rear Facing Camera Replacement: passo 29, immagine 1 di 2 Google Pixel XL Rear Facing Camera Replacement: passo 29, immagine 2 di 2
  30. Google Pixel XL Rear Facing Camera Replacement, Rear Facing Camera: passo 30, immagine 1 di 2 Google Pixel XL Rear Facing Camera Replacement, Rear Facing Camera: passo 30, immagine 2 di 2
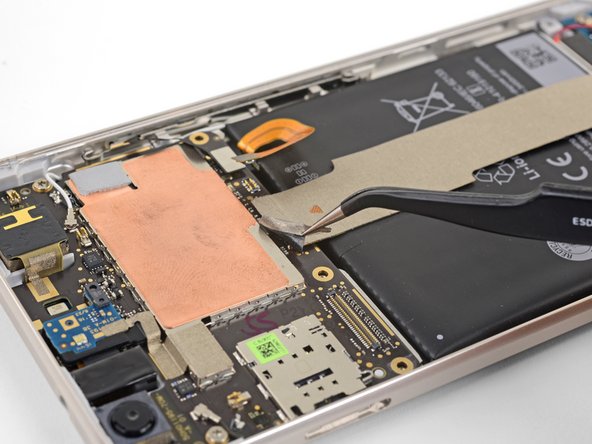
    • Flip the motherboard such that the underside is facing up.

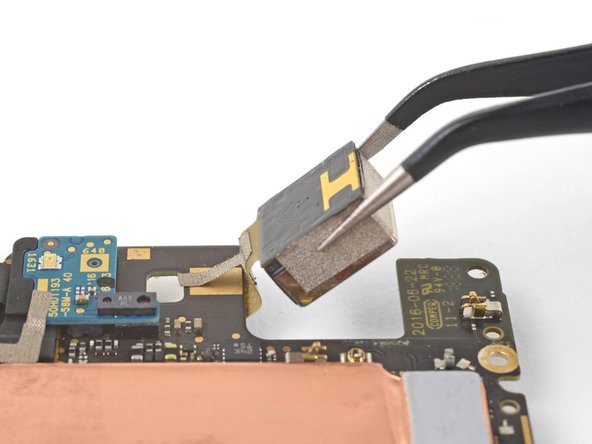
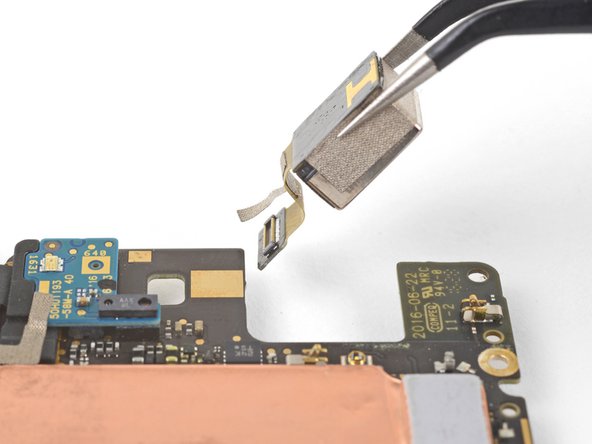
    • Use the point of a spudger to pry up and disconnect the rear facing camera connector from its socket.

  31. Google Pixel XL Rear Facing Camera Replacement: passo 31, immagine 1 di 3 Google Pixel XL Rear Facing Camera Replacement: passo 31, immagine 2 di 3 Google Pixel XL Rear Facing Camera Replacement: passo 31, immagine 3 di 3
    • Flip the motherboard such that the backside is facing down.

    • Pivot the camera module out of its recess and slowly pull it out, lifting the adhesive tape in the process.

    • Remove the rear camera module.

Conclusione

To reassemble your device, follow these instructions in reverse order.

Repair didn’t go as planned? Check out our Google Pixel XL Answers community for troubleshooting help.

Altre 6 persone hanno completato questa guida.

Arthur Shi

Membro da: 01/03/18

248.412 Reputazione

503 Guide realizzate

Team

iFixit Membro di iFixit

Staff

136 Membri

16.561 Guide realizzate

5 Commenti

Where can I get the replacement camera

Caleb - Replica

https://www.witrigs.com/oem-rear-camera-...

This is one of other only places I could find to get a replacement camera module.

Eric Tackaberry -

iFixit sells the replacement part here. It looks like new camera modules are out of stock, but used and fully tested ones are still in stock as of May 15, 2018.

Google Pixel/Pixel XL Rear Camera

Erik Swan -

A helpful tip: before you re-assemble the phone, shine a bright light through the back glass and check that there is no dust or debris on the inside of the back glass or the camera lens.

Also, this may be obvious to some, but you will need replacement adhesive for the display in order to re-attach it to the phone. I didn’t even think about this until I had already started the repair and taken the display off.

Erik Swan - Replica

Do you think that if I put a Pixel 3 camera in there, it would still work?

Have any of you tried to up the storage capacity on one of these things?

Jeremy Sing - Replica

Aggiungi Commento

Visualizza Statistiche:

Ultime 24 Ore: 1

Ultimi 7 Giorni: 1

Ultimi 30 Giorni: 10

Tutti i Tempi: 4,323