Questa versione può contenere modifiche errate. Passa all'ultima istantanea verificata.
Cosa ti serve
-
Questo passaggio è privo di traduzione. Aiuta a tradurlo
-
Insert a SIM eject tool, SIM eject bit, or a paperclip into the small hole on the left edge of the phone, near the top.
-
Press to eject the tray.
-
-
-
Scalda un iOpener ed appoggialo al bordo superiore dello schermo per due minuti.
-
Prendi nota delle seguenti aree prima di iniziare a fare leva:
-
Adesivo sottile allineato contro il pannello dello schermo
-
Adesivo spesso
-
Il pannello OLED dello schermo, che è molto delicato
-
Il cavo dello schermo, che può essere danneggiato mentre fai leva
-
-
-
Scalda l'iOpener ed appoggialo al bordo destro del telefono per due minuti.
-
Infila un plettro vicino al bordo superiore del telefono, dove hai già tagliato l'adesivo.
-
Fai scorrere lentamente il plettro attorno all'angolo destro.
-
Fai scorrere attentamente il plettro sotto il bordo destro del telefono per tagliare l'adesivo.
-
Ripeti i passaggi precedenti per il bordo sinistro dello schermo.
-
-
-
-
Svita le seguenti viti che fissano il telaio intermedio al retro:
-
Sette viti T5 nere da 4 mm
-
Due viti T5 argento da 3 mm
-
-
-
Infila un altro plettro sotto il bordo destro del telefono, vicino a quello inferiore.
-
Spingi lentamente il plettro verso l'alto lungo la fessura finché il primo gancio non viene rilasciato.
-
Dopo aver rilasciato il gancio, lascia il plettro infilato per evitare che il telaio intermedio si richiuda.
-
-
Questo passaggio è privo di traduzione. Aiuta a tradurlo
-
Use the point of a spudger to pry up and disconnect the battery connector.
-
Bend the battery flex cable slightly so that it will not accidentally touch the motherboard.
-
-
Questo passaggio è privo di traduzione. Aiuta a tradurlo
-
Use the point of a spudger to pry up and disconnect the button strip connector.
-
-
Questo passaggio è privo di traduzione. Aiuta a tradurlo
-
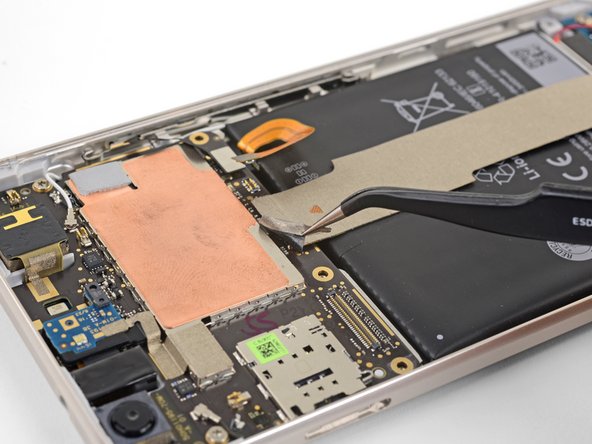
Use tweezers to peel up the tape at the top of the interconnect cable.
-
-
Questo passaggio è privo di traduzione. Aiuta a tradurlo
-
Use the point of a spudger to pry up and disconnect the interconnect cable from the motherboard.
-
-
Questo passaggio è privo di traduzione. Aiuta a tradurlo
-
Use the point of a spudger to disconnect the black antenna cable from the motherboard, near the front facing camera module.
-
Route the antenna cable out of its retaining clip.
-
-
Questo passaggio è privo di traduzione. Aiuta a tradurlo
-
Use the point of a spudger to pry up and disconnect the white antenna cable from the motherboard, near the rear facing camera module.
-
Route the antenna cable out of its retaining clip.
-
-
Questo passaggio è privo di traduzione. Aiuta a tradurlo
-
Remove the two 3 mm T5 screws securing the motherboard to the frame.
-
-
Questo passaggio è privo di traduzione. Aiuta a tradurlo
-
Use the point of a spudger to pry up and loosen the front facing camera module from its socket.
-
-
Questo passaggio è privo di traduzione. Aiuta a tradurlo
-
Insert the point of a spudger into the headphone jack port and pry upwards to loosen the port from its socket.
-
-
Questo passaggio è privo di traduzione. Aiuta a tradurlo
-
Use the flat end of a spudger to pry the bottom edge of the motherboard up slightly, loosening it from its recess.
-
-
Questo passaggio è privo di traduzione. Aiuta a tradurlo
-
Locate the fingerprint sensor cable attached to the underside of the motherboard, near the bottom edge.
-
Use the point of a spudger to pry and release the fingerprint sensor cable from its socket.
-
Peel the cable away from the motherboard.
-
-
Questo passaggio è privo di traduzione. Aiuta a tradurlo
-
Hold the motherboard by the corners and maneuver it out of its recess, being careful not to snag any cables.
-
Bend the fingerprint sensor cable slightly so that it bows upward near the connector.
-
Stand the motherboard up and position it such that the connector rests against the socket.
-
Use your finger to carefully align the connector and press it into the socket. Do not use excessive force! If done correctly, the socket should hold the connector securely.
-
-
Questo passaggio è privo di traduzione. Aiuta a tradurlo
-
Position your thumb over the fingerprint sensor and push firmly until the sensor pops out of its indention.
-
-
Questo passaggio è privo di traduzione. Aiuta a tradurlo
-
Remove the fingerprint sensor.
-
Align the fingerprint sensor's connector to the motherboard socket, which is located on the underside near the battery edge.
-
Use your finger to press the connector into the socket. Do not use excessive force! The connector should click into position if done correctly.
-
-
Questo passaggio è privo di traduzione. Aiuta a tradurlo
-
Move the motherboard into position near its recess.
-
Use your finger to press the fingerprint sensor down into its indentation.
-
Be sure that the sensor is properly aligned in the indentation.
-
Continue with the reassembly.
-


Annulla: non ho completato questa guida.
Altre 6 persone hanno completato questa guida.

