Salta al contenuto principale

Google Pixel 3a Rear Facing Camera Replacement

Cosa ti serve

  1. Google Pixel 3a Rear Facing Camera Replacement, Screen: passo 1, immagine 1 di 3 Google Pixel 3a Rear Facing Camera Replacement, Screen: passo 1, immagine 2 di 3 Google Pixel 3a Rear Facing Camera Replacement, Screen: passo 1, immagine 3 di 3
    • Take note of the two seams on the phone:

    • Screen seam: This seam separates the screen from the rest of the phone. This is where you should pry.

    • Frame seam: This is where the plastic frame meets the back cover. It is held in place by screws. Do not pry at this seam.

    • Before you begin prying, note the following areas on the screen:

    • Screen flex cable: Do not pry deeper than instructed, or you risk damaging this cable.

    • Adhesive perimeter: Prying beyond the narrow perimeter without angling the pick will damage the display panel.

  2. Google Pixel 3a Rear Facing Camera Replacement: passo 2, immagine 1 di 1
    • Heat an iOpener and apply it to the right edge of the display for a minute.

    • You can choose to skip this step since the Pixel 3a's screen adhesive is not very strong. Heating it, however, will decrease the chance of cracking the screen.

  3. Google Pixel 3a Rear Facing Camera Replacement: passo 3, immagine 1 di 3 Google Pixel 3a Rear Facing Camera Replacement: passo 3, immagine 2 di 3 Google Pixel 3a Rear Facing Camera Replacement: passo 3, immagine 3 di 3
    • Place a suction cup near the right edge of the screen.

    • Pull on the suction cup with strong steady force.

    • Insert the pick into the gap, no more than 1 mm.

  4. Google Pixel 3a Rear Facing Camera Replacement: passo 4, immagine 1 di 3 Google Pixel 3a Rear Facing Camera Replacement: passo 4, immagine 2 di 3 Google Pixel 3a Rear Facing Camera Replacement: passo 4, immagine 3 di 3
    • This step shows how to insert the pick without damaging the OLED panel. Do this before you slice either long edges of the phone.

    • With the pick 1 mm in the gap, pivot the pick upwards to a steep angle.

    • At this angle, carefully push the pick into the gap about 1/4" (6 mm). The pick should slide in below the OLED panel.

    • Stop if you feel the point of the pick hitting a ridge. The pick may be pressing against the edge of the OLED panel. Angle the pick and try again.

  5. Google Pixel 3a Rear Facing Camera Replacement: passo 5, immagine 1 di 3 Google Pixel 3a Rear Facing Camera Replacement: passo 5, immagine 2 di 3 Google Pixel 3a Rear Facing Camera Replacement: passo 5, immagine 3 di 3
    • Slide the pick along the right edge, slicing through the adhesive.

    • Do not insert the pick more than 1/4" (6 mm), or you may damage the screen's flex cable.

    • Leave a pick in place to prevent the adhesive from resealing.

  6. Google Pixel 3a Rear Facing Camera Replacement: passo 6, immagine 1 di 3 Google Pixel 3a Rear Facing Camera Replacement: passo 6, immagine 2 di 3 Google Pixel 3a Rear Facing Camera Replacement: passo 6, immagine 3 di 3
    • As you slice around the bottom edge of the phone, do not insert the pick more than 1/4" (6 mm).

    • Slide the pick around the bottom right corner to slice through the adhesive.

    • If the corner feels hard to slice, apply a heated iOpener to the corner for a minute and try again.

    • Continue slicing along the bottom edge of the phone and around the left corner.

  7. Google Pixel 3a Rear Facing Camera Replacement: passo 7, immagine 1 di 3 Google Pixel 3a Rear Facing Camera Replacement: passo 7, immagine 2 di 3 Google Pixel 3a Rear Facing Camera Replacement: passo 7, immagine 3 di 3
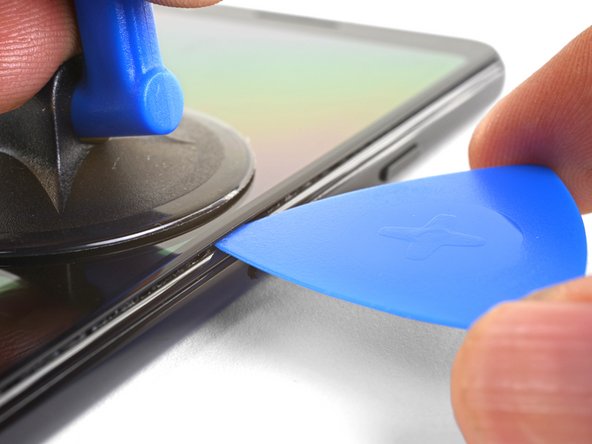
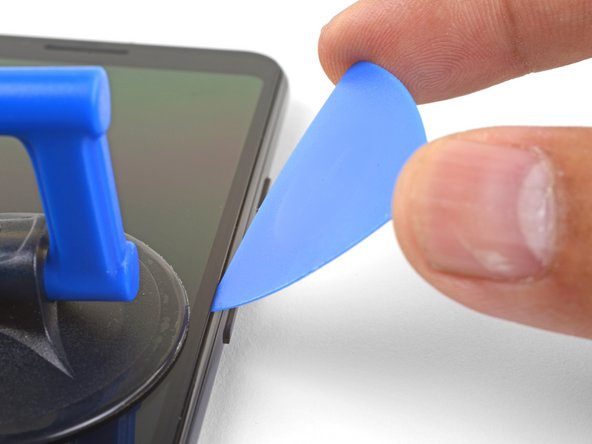
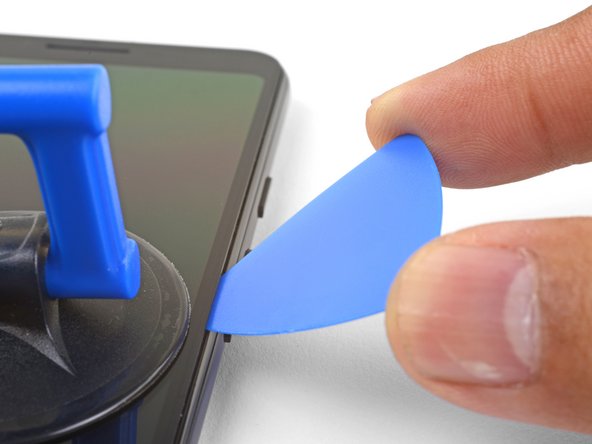
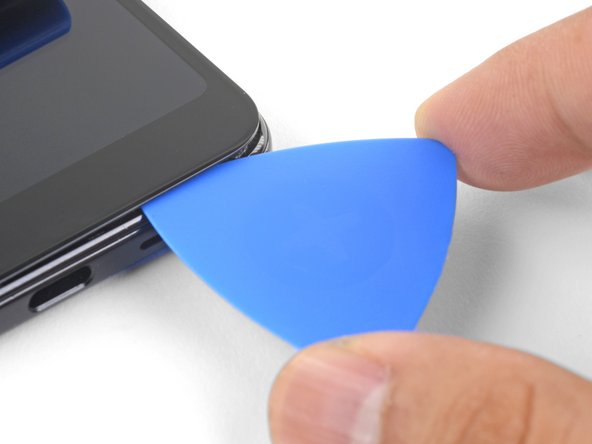
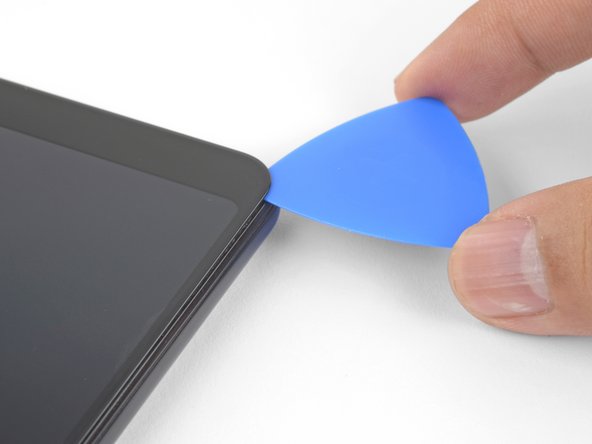
    • Slice through the left edge of the phone, making sure to properly angle the pick below the OLED panel and insert it in no more than 1/4" (6 mm).

    • To angle the pick below the OLED panel, insert the point of the pick no more than 1 mm in, angle the pick upwards, and then slowly push the pick in 1/4".
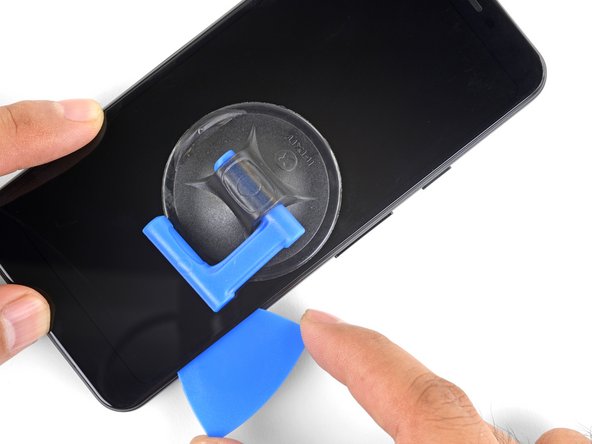
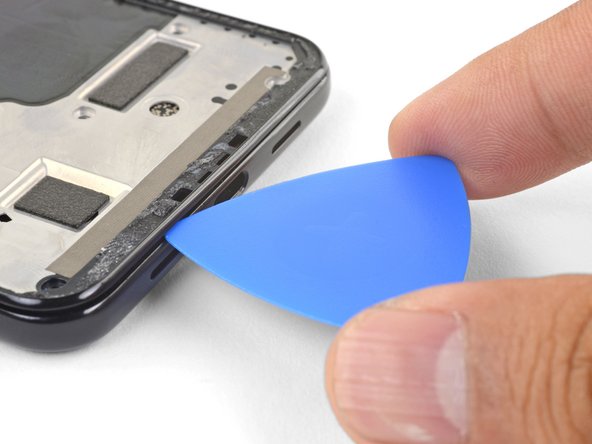
  8. Google Pixel 3a Rear Facing Camera Replacement: passo 8, immagine 1 di 3 Google Pixel 3a Rear Facing Camera Replacement: passo 8, immagine 2 di 3 Google Pixel 3a Rear Facing Camera Replacement: passo 8, immagine 3 di 3
    • Slice along the top edge while keeping the pick no more than 5/16" (8 mm) in.

  9. Google Pixel 3a Rear Facing Camera Replacement: passo 9, immagine 1 di 2 Google Pixel 3a Rear Facing Camera Replacement: passo 9, immagine 2 di 2
    • With all of the edges cut, carefully hinge open the right edge of the screen.

    • Do not remove the screen. It is still attached to the phone by a flex cable near the left edge.

    • Use an opening pick to carefully cut through any remaining adhesive.

  10. Google Pixel 3a Rear Facing Camera Replacement: passo 10, immagine 1 di 3 Google Pixel 3a Rear Facing Camera Replacement: passo 10, immagine 2 di 3 Google Pixel 3a Rear Facing Camera Replacement: passo 10, immagine 3 di 3
    • With all of the adhesives cut, flip the attached screen glass side down and rest it on top of the phone. The screen flex cable should be loosely arched.

  11. Google Pixel 3a Rear Facing Camera Replacement: passo 11, immagine 1 di 3 Google Pixel 3a Rear Facing Camera Replacement: passo 11, immagine 2 di 3 Google Pixel 3a Rear Facing Camera Replacement: passo 11, immagine 3 di 3
    • Carefully peel the black tape covering the screen connector bracket.

    • If it is in good condition, you can re-use this tape during reassembly. Otherwise, replace it with a piece of electrical tape.

    • Remove the two 4.4 mm long T3 screws securing the screen connector bracket.

    • Remove the screen connector bracket.

  12. Google Pixel 3a Rear Facing Camera Replacement: passo 12, immagine 1 di 2 Google Pixel 3a Rear Facing Camera Replacement: passo 12, immagine 2 di 2
    • Use the point of a spudger to pry up and disconnect the screen flex cable.

    • When you disconnect connectors like these, be careful not to dislodge the small surface-mounted components surrounding the socket.

    • To re-attach press connectors like this one, carefully align and press down on one side until it clicks into place, then repeat on the other side. Do not press down on the middle. If the connector is misaligned, the pins can bend, causing permanent damage.

  13. Google Pixel 3a Rear Facing Camera Replacement: passo 13, immagine 1 di 3 Google Pixel 3a Rear Facing Camera Replacement: passo 13, immagine 2 di 3 Google Pixel 3a Rear Facing Camera Replacement: passo 13, immagine 3 di 3
    • Remove the screen.

    • Carefully compare your replacement screen with your original part. You may need to transfer additional components (such as the speaker mesh) to the new part.

    • To reinstall the screen:

    • Follow this guide if you are using custom-cut adhesives.

    • If you are using double-sided tape such as Tesa tape, follow this guide.

    • During the boot-up process after reassembly, the screen will go through a calibration sequence. Do not touch the screen during this process, as it could result in improper touch calibration and create touch issues.

  14. Google Pixel 3a Rear Facing Camera Replacement, Plastic Midframe: passo 14, immagine 1 di 1
    Attrezzo utilizzato in questo passaggio:
    Magnetic Project Mat
    $19.95
    Compra
    • Remove the fourteen T3 screws of the following lengths securing the plastic midframe:

    • Twelve 4.3 mm silver T3 screws

    • Two 4.3 mm black T3 screws

    • Throughout this repair, keep track of each screw and make sure it goes back exactly where it came from.

  15. Google Pixel 3a Rear Facing Camera Replacement: passo 15, immagine 1 di 3 Google Pixel 3a Rear Facing Camera Replacement: passo 15, immagine 2 di 3 Google Pixel 3a Rear Facing Camera Replacement: passo 15, immagine 3 di 3
    • The midframe is still held in place by plastic clips.

    • Insert an opening pick into frame seam at the bottom of the phone. This seam sits between the plastic midframe and the back cover.

    • Slide the pick along the seam to release the clips holding the plastic midframe.

  16. Google Pixel 3a Rear Facing Camera Replacement: passo 16, immagine 1 di 3 Google Pixel 3a Rear Facing Camera Replacement: passo 16, immagine 2 di 3 Google Pixel 3a Rear Facing Camera Replacement: passo 16, immagine 3 di 3
    • Slide the opening pick along the left and right edges of the phone to release the midframe clips.

    • Lift the bottom edge of the plastic midframe up but do not remove the midframe. The midframe is still tethered to the phone by the fragile proximity sensor cable at the top edge.

    • To reinstall the plastic midframe, align the midframe to the back cover, and squeeze the perimeter of the phone with your fingers to snap the clips back into position.

  17. Google Pixel 3a Rear Facing Camera Replacement: passo 17, immagine 1 di 3 Google Pixel 3a Rear Facing Camera Replacement: passo 17, immagine 2 di 3 Google Pixel 3a Rear Facing Camera Replacement: passo 17, immagine 3 di 3
    • Use the point of a spudger to carefully pry up and disconnect the proximity sensor connector from the motherboard.

    • Your proximity sensor connector may have automatically disconnected itself when you lifted the midframe.

    • Remove the plastic midframe.

  18. Google Pixel 3a Rear Facing Camera Replacement: passo 18, immagine 1 di 3 Google Pixel 3a Rear Facing Camera Replacement: passo 18, immagine 2 di 3 Google Pixel 3a Rear Facing Camera Replacement: passo 18, immagine 3 di 3
    • This step shows how to reconnect the proximity sensor during re-assembly.

    • Align the top edge of the plastic midframe with the phone.

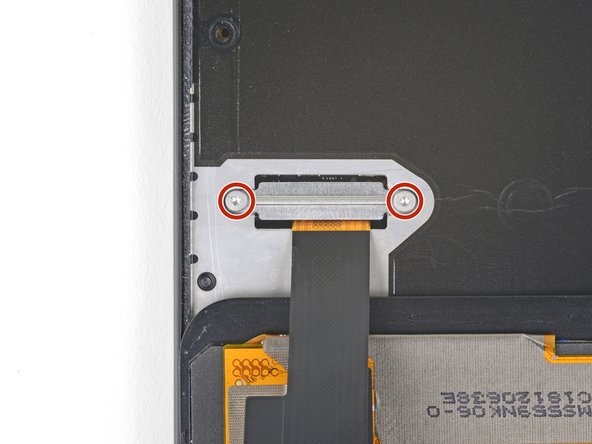
    • Use the point of a spudger to carefully align and push the proximity sensor connector onto the motherboard socket.

    • This takes a bit of patience and finesse. Once you have the connector in place, you can also use a finger to gently press the connector onto the socket.

    • Alternatively, you can remove the proximity sensor from the midframe to reattach it to the motherboard first.

    • Use the point of a spudger to carefully pry the proximity sensor out of its recess on the midframe. The sensor is lightly adhered to the midframe.

    • Remove the sensor from the midframe. Attach the sensor connector onto its motherboard socket.

    • Thread the sensor cable through the midframe and reposition the sensor in the recess. Press down with your finger to adhere the sensor back onto the midframe.

  19. Google Pixel 3a Rear Facing Camera Replacement, Google Pixel 3a Battery Disconnect: passo 19, immagine 1 di 3 Google Pixel 3a Rear Facing Camera Replacement, Google Pixel 3a Battery Disconnect: passo 19, immagine 2 di 3 Google Pixel 3a Rear Facing Camera Replacement, Google Pixel 3a Battery Disconnect: passo 19, immagine 3 di 3
    • Use the point of a spudger to pry up and disconnect the battery connector from its motherboard socket.

    • Bend the battery flex cable slightly so that it will not accidentally make contact with the socket.

  20. Google Pixel 3a Rear Facing Camera Replacement, Rear Facing Camera: passo 20, immagine 1 di 3 Google Pixel 3a Rear Facing Camera Replacement, Rear Facing Camera: passo 20, immagine 2 di 3 Google Pixel 3a Rear Facing Camera Replacement, Rear Facing Camera: passo 20, immagine 3 di 3
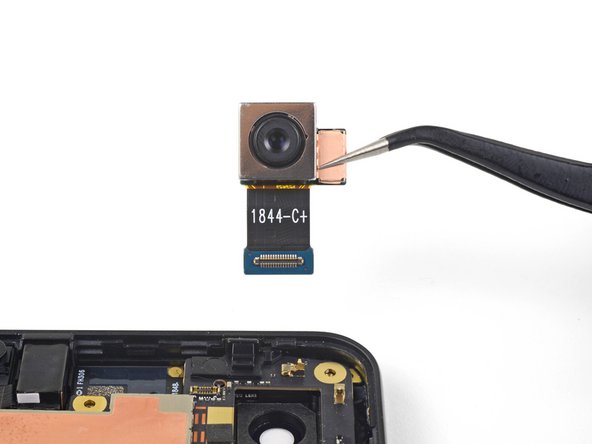
    • Use the point of a spudger to pry up and disconnect the rear facing camera connector from its motherboard socket.

    • Remove the rear facing camera.

Conclusione

To reassemble your device, follow these instructions in reverse order.

Repair didn’t go as planned? Check out our Google Pixel 3a Answers community for troubleshooting help.

Altre 4 persone hanno completato questa guida.

Arthur Shi

Membro da: 01/03/18

248.412 Reputazione

503 Guide realizzate

Team

iFixit Membro di iFixit

Staff

136 Membri

16.562 Guide realizzate

5 Commenti

Do you think it’s still worth attempting this repair if I have a 2” crack at the bottom of my glass? The LCD is still intact. Looks like there’s a spot/scratch on my camera sensor, and I’d like to replace it, but I suppose I’d rather have the screen intact than the camera repaired.

Thomas Domingo - Replica

Hi Thomas,

I think that if you attempt to remove the screen, the top glass will crack significantly more. You can get the top glass replaced, but due to the fragility of the LCD panel, I would suggest a repair shop for that kind of work.

Arthur Shi -

Would it be possible to carefully use heat-gun instead of the IOpener? Or do you think it would be too risky over heating and damaging the display or other component of the phone? I want to do the fix myself with IFixits essential tool kit, I already have the heat gun. Thanks for your advice!

Nathan Travanti - Replica

Hey Nathan,

You can definitely use a heat gun. Be very careful as the OLED panel is susceptible to heat damage.

Arthur Shi -

Whew. That was a challenge. But I now have a working rear camera on my 3A. Thanks to iFixit for making this possible.

Assembling step 11, I forgot to apply the tape over the screen connector. Everything works tho, at least for now...

Paul Kube - Replica

Aggiungi Commento

Visualizza Statistiche:

Ultime 24 Ore: 0

Ultimi 7 Giorni: 3

Ultimi 30 Giorni: 38

Tutti i Tempi: 3,936