Introduzione
Use this guide to access the vibration motors on DualShock 3 controllers. The two vibration motors are slightly different and thus are non-interchangeable.
Cosa ti serve
-
-
Remove the five 7.2 mm Phillips screws securing the rear cover to the controller.
-
-
-
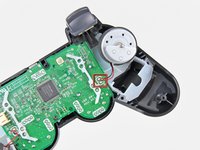
Press on the rear cover between the analog sticks and slightly lift the lower edge of it away from the rest of the controller.
it’s not very clear but for this step you need to push where the yellow dot is shown on the picture. it’s rather tough. you kind of have to move the whole back plate a bit for it to work.
I’m stuck at this step because I can’t for the life of me undo the clip
Yeah I’m lost here too. I’m pushing where the dot is but nothing is happening. What am I trying to accomplish by pushing there? Is there a clasp on the inside I’m trying to undo or something? I really don’t want to break the controller by using too much force or opening it the wrong way.
Could it be that the sixaxis I have is constructed differently? Or is this just a difficult step?
Adding: I ended up getting the shell off but ended up breaking off a small piece which I'm guessing was securing the front and back shells together. The trigger buttons and pieces remained intact on one of my two controllers which is what I was worried about, though I did have to fit the small trigger pieces back in.
The one controller seemed to fit back together just fine without the small piece that broke off, and buttons seemed to feel and work fine too.Joe -
-
-
-
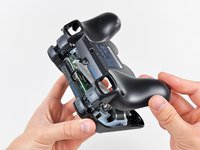
Push the rear cover slightly toward the top edge of the controller to clear the front edge of the #2 triggers.
-
Pull the rear cover away from the rest of the controller, being careful not to pop off the #2 triggers.
the "trigger button guide" link links back to this page :o
I accidentally popped a trigger off, and both L1 and R1, because I skimmed and didn't read this step. Fortunately it's not hard. The tricky part with the triggers is that there's a little spring on them. You have to press the side of the spring that's pointing away from the trigger against the sloped surface of the controller (look at the other trigger for reference, if you only popped one off). Then you just slide the trigger on until the "handlebar" bits near the center click into place.
The reset button – a small mostly-rectangular rubberized piece – fell out as I removed the rear cover. It covers the hole near the middle screw and has a post that presses SW1 on the motherboard.
-
-
-
-
Lift the battery off the motherboard for enough clearance to access the battery connector.
-
-
Attrezzo utilizzato in questo passaggio:Tweezers$4.99
-
Carefully pull the battery connector away from its socket on the motherboard.
To safely remove the connector, you can slide a thin screwdriver inside two slots that can be found on top of the connctor housing (the beige colored one), which allow you to push on the connector. Do this slowly, prying first through one slot, then through the other, until the connector is out. This will allow you to remove the connector without pulling by accident on the wires.
Thanks Adriana. Good advice. My local battery replacement guy will not touch PS3 controllers.
Hi Adriana,
I have to say, that tip really saved me. I was pulling on the wires (this is my first time doing this) and wasgoing nowhere.
Thank you!
I highly, HIGHLY recommend that if anyone bought the protect toolkit, that they use the SIM bit as that is extremely helpful for this step!
Take note: The PS3 remote controller in this guide has some white plastic spacers shaped like ( and ) on the board which keep the battery from touching the chip. The PS3 remote controller I disassembled has no spacers on the board but rather the board has 6 holes - 4 small square corner alignment holes and two rectangular retaining holes. The battery was an LIP1472 but the battery pack casing had 4 alignment pins and 2 retaining tabs to fit into the board and hold the battery away from the chip. Why does it matter? It may or may not matter, however the fact that all designs include separation indicates that it might matter. Possible reasons are that the battery might touch the chip and cause electrostatic damage, the battery might touch the chip and not allow the chip to dissipate heat properly, or the battery might simply rattle a bit. I can not find any replacement batteries with pins and tabs. It may be necessary to create some standoffs from plastic similar to those shown above and attach to board.
My controllers new battery (ordered from ifixit) doesn’t have connectors on it like my dead battery. Help?
Its literally completely flat (the battery)
What's the battery's voltage?
The battery is 3.7 voltage 610 mAH from Sony's LIP1359 battery. Max charging is 4.2 V and 0.4A, but I found a better one from Digikey. It is still required to modify the battery's connector.
My new battery for the PS3 controller.
Yes, yes, yes brilliant suggestion! I broke the wires to the battery trying to wiggle the connector off using needle-nose pliers, but pushing through those slots on the top saved the day even after that little fiasco. Yay.
-
-
-
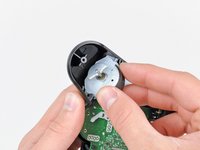
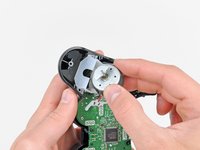
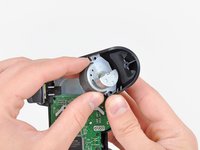
Pull the vibration motor out of its plastic frame, being careful not to strain the wires connecting it to the motherboard.
-


To reassemble your device, follow these instructions in reverse order.
To reassemble your device, follow these instructions in reverse order.
Annulla: non ho completato questa guida.
Altre 17 persone hanno completato questa guida.

7 Commenti
That is not how the innards of a European Model DS3 controller are. Wrong guide. Not useful at all
Just because the internals are different and it doesn’t match what you own, it doesn’t mean you need to discredit him…
Davide -
I know this comment is almost a decade old but its still quite sad that you’re giving this guy flack for not showing the differences between the EUR and USA controller models when they’re basically the exact same and it’s a guide that is completely free.
f1pp3r -
My DS3’s rumble motor died out after 8 years of use so i went out and came to know that there’re many such motors available on market,so i wanna know exact specifications of the rumble motors (both left and right ones) on Dualshock 3 controller,like Voltage,RPM,Dimensions,weight and so.
Please can you provide me the required info ?
Will my controller still work if I remove the two motors completely?
The controler should work normaly scince a lot of recent controlers have spots for thease motors but that arent put
you might want to check the resistance of the motor with a multimeter, depending on the resistance you might put a resitor of about that amount. but , if they don't work leave them or see what hapens if you just remove them completly assumingly for battery life conserns.
My left motor black cable connected to( Bm-1 ) solder pad are melted, anyone know where i connect that points to?
I have 2 controllers I'd like to fix, and both have at least one stripped screw in them. Any tips for removing them?
Joe - Replica
For me the PH #0 had too much play. I ended up using the PH #1 which was a perfect fit.
Yokocapolo - Replica