Questa traduzione potrebbe non riflettere gli aggiornamenti più recenti dalla guida originale. Aiuta ad aggiornare la traduzione o visualizza la guida d'origine.
Introduzione
Questa guida mostra come smontare la scocca di una cassa JBL Charge. Smontarne la scocca sarà utile per riparare danni da liquidi e/o sostituire la batteria. Questa guida non richiede abilità speciali, a parte delle conoscenze di base sull'utilizzo di strumenti di uso comune.
Cosa ti serve
-
-
Assicurati che il dispositivo sia spento prima di cominciare lo smontaggio.
-
Rimuovi la guarnizione dallo speaker usando uno spudger in metallo o un "Jimmy".
 Chiedi a FixBot
-
-
-
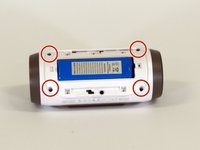
Usa il cacciavite PH1 per rimuovere le cinque viti da 6 mm dalla cover della batteria.
-
Rimuovi la cover della batteria e mettila da parte.
-
-
-
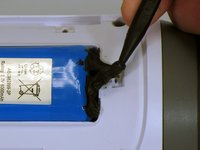
Usa uno spudger per rimuovere con attenzione il nastro isolante liquido che tiene la batteria ferma nel suo alloggiamento.
-
-
-
-
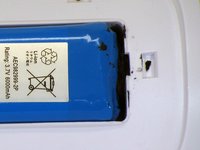
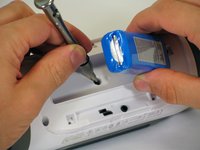
Usa uno spudger per alzare la batteria dal dispositivo.
-
Alza il lato della batteria che non ha i cavi attaccati e rimuovi la vite PH2 da 16 mm sotto la batteria
-
-
-
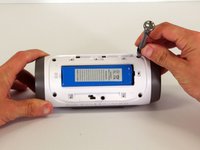
Rimuovi le quattro viti da 16 mm dal case in plastica bianca con il cacciavite PH2.
-
-
-
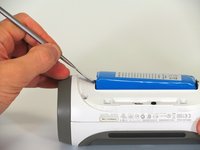
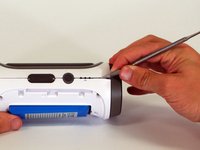
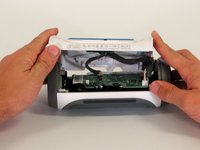
Partendo da un angolo del dispositivo dove il case e il lato si incontrano, usa uno spduger di metallo per allontanare le due parti, vincendo la forza adesiva della colla.
-
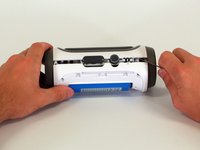
Fai scorrere lo spudger di metallo lungo il lato per separare il case posteriore dal resto dello speaker.
-
-
-
Quando il case posteriore si apre, disconnetti i tre cavi bianchi dalla scheda madre.
-
Rimuovi il case superiore.
-


Per rimontare il dispositivo, segui le istruzioni nell'ordine inverso.
Annulla: non ho completato questa guida.
Altre 36 persone hanno completato questa guida.
Un ringraziamento speciale a questi traduttori:
90%


Questi traduttori ci stanno aiutando ad aggiustare il mondo! Vuoi partecipare?
Inizia a tradurre ›

Team

Cal Poly, Team 12-4, Lancaster Spring 2015 Membro di Cal Poly, Team 12-4, Lancaster Spring 2015
CPSU-LANCASTER-S15S12G4
2 Membri
20 guide realizzate
11Commenti sulla guida
Breaking apart the halves takes patience. Took 30 minutes. Mine was glued together like a tank, and it was not easy at all to separate the halves. Maybe JBL saw this post and doubled the glue to dissuade DIY fixes. Once I separated the halves, it was easy, but be prepared to get moderately frustrated in doing so. Also, don't get angry and try to force them apart, because from my experience, I do believe there is a high risk potential of cracking either halve if attempting to brute force the issue. Remember, patience is a virtue here. Lastly, you can get a good set of spudger tools at Harbor Freight Tools for cheap. They are actually called Wax Carving tools made in India of stainless steel. Excellent set to complete this fix, and I can see that they will be very useful in the future if needed. 10/10 for the author for the breakdown instructions. Cheers!
Follow these directions, Do not deviate from the path and you shall find Success awaits at journey's end.
one essential moment. when you're trying to disasemble a cover there is also one bolt under the battery socket! it not shown on step 5!