Salta al contenuto principale
Unisciti alla Community delle riparazioni - Crea un account

Astro Mixamp USB Port Replacement

Cosa ti serve

    1. Astro Mixamp USB Port Replacement, Panel Dial: passo 1, immagine 1 di 2 Astro Mixamp USB Port Replacement, Panel Dial: passo 1, immagine 2 di 2
      • Grip the dial tightly and pull straight off the device.

      • Repeat for the second dial

      Chiedi a FixBot

      Aggiungi Commento

    2. Astro Mixamp USB Port Replacement: passo 2, immagine 1 di 2 Astro Mixamp USB Port Replacement: passo 2, immagine 2 di 2
      Strumento utilizzato in questo passaggio:
      Tweezers
      $4.99
      • Using tweezers, remove the spacer nuts and washers from each dial post.

      Chiedi a FixBot

      Aggiungi Commento

    1. Astro Mixamp USB Port Replacement, Outer Casing: passo 3, immagine 1 di 2 Astro Mixamp USB Port Replacement, Outer Casing: passo 3, immagine 2 di 2
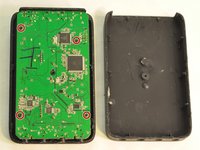
      • Before opening your device, ensure the device is not on or connected to the charging cable.

      • Insert a plastic opening tool into the seam between the rubber foot and plastic casing.

      • Pull the rubber foot free of the plastic casing.

      Chiedi a FixBot

      Aggiungi Commento

    2. Astro Mixamp USB Port Replacement: passo 4, immagine 1 di 1
      • Use a screwdriver to remove the screw from the rear casing.

      Chiedi a FixBot

      Aggiungi Commento

    3. Astro Mixamp USB Port Replacement: passo 5, immagine 1 di 1
      • Gently lift the rear casing from the device.

      Chiedi a FixBot

      Aggiungi Commento

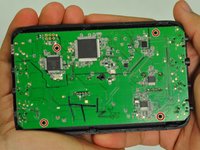
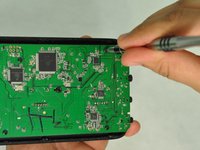
    1. Astro Mixamp USB Port Replacement, Motherboard: passo 6, immagine 1 di 3 Astro Mixamp USB Port Replacement, Motherboard: passo 6, immagine 2 di 3 Astro Mixamp USB Port Replacement, Motherboard: passo 6, immagine 3 di 3
      • Remove the four screws that hold the motherboard in place.

      • Only touch the edges of the motherboard. Touching the surface can damage the motherboard.

      Chiedi a FixBot

      Aggiungi Commento

    2. Astro Mixamp USB Port Replacement: passo 7, immagine 1 di 1
      • Gently pull the motherboard from the front cover.

      Chiedi a FixBot

      Aggiungi Commento

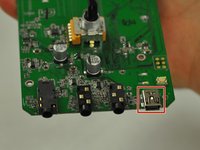
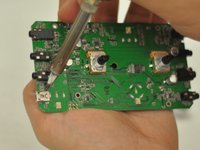
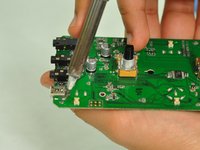
    1. Astro Mixamp USB Port Replacement, USB Port: passo 8, immagine 1 di 3 Astro Mixamp USB Port Replacement, USB Port: passo 8, immagine 2 di 3 Astro Mixamp USB Port Replacement, USB Port: passo 8, immagine 3 di 3
      • Press the tip of a hot soldering iron to the USB connection to melt the solder.

      • Use a nylon spudger to lift the USB from the solder.

      • Repeat for each of the four USB connections.

      • For more help on soldering, refer to this guide: Come saldare e dissaldare componenti elettrici

      Chiedi a FixBot

      Aggiungi Commento

Conclusione

To reassemble your device, follow these instructions in reverse order.

Annulla: non ho completato questa guida.

Altre 2 persone hanno completato questa guida.

Hope Burns

Membro da: 10/29/16

769 Reputazione

5 guide realizzate

4Commenti sulla guida

What port is used as a replacement?

jonescoleman1738 - Rispondi Condividi

Did you ever identify an appropriate replacement port?

Lepec - Rispondi Condividi

something was broken out of the port of the USB connection

MoreZemtor - Rispondi Condividi

Will this method work with the 2015 tr mixamp?

jeffreyalvarez9 - Rispondi Condividi

Aggiungi Commento

Visualizza statistiche:

Ultime 24 ore: 3

Ultimi 7 giorni: 17

Ultimi 30 giorni: 64

Tutti i Tempi: 8,834