Salta al contenuto principale

ASUS D550MA-DS01 Wireless Network Card Replacement

Cosa ti serve

  1. ASUS D550MA-DS01 Wireless Network Card Replacement, Keyboard Module: passo 1, immagine 1 di 2 ASUS D550MA-DS01 Wireless Network Card Replacement, Keyboard Module: passo 1, immagine 2 di 2
    • Before you begin, be sure to turn off your laptop and unplug it from the outlet.

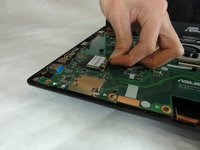
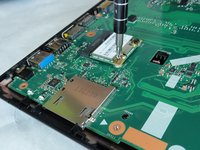
    • Use a Philips #1 screwdriver to remove the nine screws from the back cover.

  2. ASUS D550MA-DS01 Wireless Network Card Replacement: passo 2, immagine 1 di 1
    • Turn the laptop over and open the display.

    • Insert the flat edge of the spudger into the crease of the keyboard cover.

    • While the spudger is in the crease, carefully pry open the casing by sliding the spudger along the edge.

    • Do not use excessive force to pry open the lid. You should hear each plastic clip snap open as you run the spudger along the edge.

  3. ASUS D550MA-DS01 Wireless Network Card Replacement: passo 3, immagine 1 di 2 ASUS D550MA-DS01 Wireless Network Card Replacement: passo 3, immagine 2 di 2
    • Make sure that the entire cover has been released from the plastic clips.

    • Slowly lift the cover open from the front of the laptop, but do not completely remove it.

    • Note the locations of the three white and blue data cables connecting to the keyboard to the computer's main board.

  4. ASUS D550MA-DS01 Wireless Network Card Replacement: passo 4, immagine 1 di 1
    • If you are only replacing the battery, you can skip this step and the next. Shift the keyboard module away from the display and set it such that the fragile flex cables are not strained.

    • Disconnect the three data cables from the motherboard.

    • To unlock a ZIF connector, use the tip of a spudger or your fingernail to flip up the small, hinged locking flap. Carefully slide the unlocked cable out of the socket.

  5. ASUS D550MA-DS01 Wireless Network Card Replacement: passo 5, immagine 1 di 1
    • Remove the fully disconnected keyboard module from the laptop.

  6. ASUS D550MA-DS01 Wireless Network Card Replacement, Wireless Network Card: passo 6, immagine 1 di 3 ASUS D550MA-DS01 Wireless Network Card Replacement, Wireless Network Card: passo 6, immagine 2 di 3 ASUS D550MA-DS01 Wireless Network Card Replacement, Wireless Network Card: passo 6, immagine 3 di 3
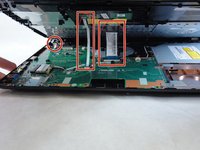
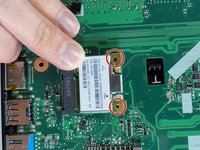
    • Locate the Network Interface Card (NIC) on the motherboard.

    • Note the orientation of the white and black wires on your NIC. The may connection differ from the picture.

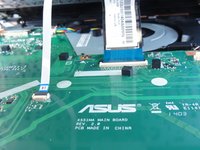
    • Gently disconnect the white and black wires by pulling it off of the NIC card. These wires should come off easy.

    • If you are following these steps for the prerequisite to remove the motherboard, you do not need to completely remove the NIC. Just remove the wires. The proceeding step can be skipped.

  7. ASUS D550MA-DS01 Wireless Network Card Replacement: passo 7, immagine 1 di 2 ASUS D550MA-DS01 Wireless Network Card Replacement: passo 7, immagine 2 di 2
    • Remove the screws that are holding down the wireless network card with the Phillips #1 screwdriver.

    • After removing the screws, the NIC will lift up in a spring action.

  8. ASUS D550MA-DS01 Wireless Network Card Replacement: passo 8, immagine 1 di 1
    • Gently pull out the NIC.

    • Do not use excessive force or wiggle the card out. The NIC should slide out easily.

Conclusione

To reassemble your device, follow these instructions in reverse order.

Un'altra persona ha completato questa guida.

Team

IUPUI, Team 1-2, Baechle Fall 2015 Membro di IUPUI, Team 1-2, Baechle Fall 2015

IUPUI-BAECHLE-F15S1G2

3 Membri

8 Guide realizzate

0 Commenti

Aggiungi Commento

Visualizza Statistiche:

Ultime 24 Ore: 1

Ultimi 7 Giorni: 3

Ultimi 30 Giorni: 11

Tutti i Tempi: 1,370