Salta al contenuto principale
Unisciti alla Community delle riparazioni - Crea un account

iPhone 4S Battery Replacement

Cosa ti serve

  1. iPhone 4S Battery Replacement, Pentalobe Screws: passo 1, immagine 1 di 1
    • Remove the two bottom Pentalobe screws next to the 30-Pin connector.

    • It is recommended that you use a small 5-Point screwdriver for this process.

    • Remember to make sure your iPhone is fully turned off before commencing this process, to prevent serious injury to the phone.

    Chiedi a FixBot

    Aggiungi Commento

  2. iPhone 4S Battery Replacement, Back Panel Removal: passo 2, immagine 1 di 2 iPhone 4S Battery Replacement, Back Panel Removal: passo 2, immagine 2 di 2
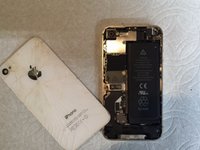
    • Push the back panel towards the top of the iPhone. Doing this should allow the back panel to slide off safely.

    • Do not apply too much pressure to the back. Especially if your phone has a cracked back panel.

    • Do not rush it! Time is key.

    Chiedi a FixBot

    Aggiungi Commento

  3. iPhone 4S Battery Replacement, Battery Screws: passo 3, immagine 1 di 1
    • Remove these two screws that are securing the battery connector to the Logic Board.

    • Beware of unscrewing the battery connector, as your screwdriver does have the possibility to slip and pierce the battery.

    • For the bottom screws, it is recommended that you use a 1.5 mm screw bit, and a 1.7 mm for the top screw.

    Chiedi a FixBot

    Aggiungi Commento

  4. iPhone 4S Battery Replacement, Battery Strip: passo 4, immagine 1 di 1
    • Locate and pull the plastic tab to pull out the battery. Make sure to pry up on the outside of the battery on all sides.

    • Do not pull on the plastic tab too hard, as it can easily rip, making the battery removal process harder.

    Chiedi a FixBot

    Aggiungi Commento

  5. iPhone 4S Battery Replacement, Battery Removal: passo 5, immagine 1 di 1
    • Carefully remove the battery.

    • Remember, if you are replacing your battery, remember to preform a hard reset on your iPhone by holding on both the home and power button for a few seconds once the repair is all finished.

    Chiedi a FixBot

    Aggiungi Commento

Conclusione

To reassemble your device, follow these instructions in reverse order.

Annulla: non ho completato questa guida.

Altre 64 persone hanno completato questa guida.

Cole Anello

Membro da: 11/01/16

2.070 Reputazione

Una guida realizzata

1Commento della guida

la olum bunu benim 1 yaşında kızım da biliyo

ahmetceylanbm - Rispondi Condividi

Aggiungi Commento

Visualizza statistiche:

Ultime 24 ore: 6

Ultimi 7 giorni: 51

Ultimi 30 giorni: 221

Tutti i Tempi: 25,783