Salta al contenuto principale
Unisciti alla Community delle riparazioni - Crea un account

MacBook Pro 13" Unibody Late 2011 Fan Replacement

Cosa ti serve

    1. MacBook Pro 13" Unibody Late 2011 Fan Replacement, Lower Case: passo 1, immagine 1 di 1
      • Remove the following ten screws:

      • Three 14.4 mm Phillips #00 screws

      • Three 3.5 mm Phillips #00 screws

      • Four 3.5 mm shouldered Phillips #00 screws

      • When replacing the small screws, align them perpendicular to the slight curvature of the case (they don't go straight down).

      Chiedi a FixBot

      Aggiungi Commento

    2. MacBook Pro 13" Unibody Late 2011 Fan Replacement: passo 2, immagine 1 di 2 MacBook Pro 13" Unibody Late 2011 Fan Replacement: passo 2, immagine 2 di 2
      • Use your fingers to pry the lower case away from the body of the MacBook near the vent.

      • Remove the lower case.

      Chiedi a FixBot

      Aggiungi Commento

    1. MacBook Pro 13" Unibody Late 2011 Fan Replacement, Battery Connection: passo 3, immagine 1 di 2 MacBook Pro 13" Unibody Late 2011 Fan Replacement, Battery Connection: passo 3, immagine 2 di 2
      • Use the edge of a spudger to pry the battery connector upwards from its socket on the logic board.

      • It is useful to pry upward on both short sides of the connector to "walk" it out of its socket. Be careful with the corners of the connectors, they can be easily broken off.

      Chiedi a FixBot

      Aggiungi Commento

    2. MacBook Pro 13" Unibody Late 2011 Fan Replacement: passo 4, immagine 1 di 1
      • Bend the battery cable slightly away from its socket on the logic board so it does not accidentally connect itself while you work.

      Chiedi a FixBot

      Aggiungi Commento

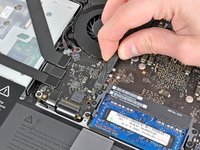
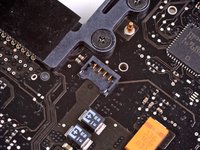
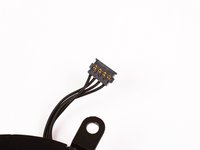
    1. MacBook Pro 13" Unibody Late 2011 Fan Replacement, Fan: passo 5, immagine 1 di 3 MacBook Pro 13" Unibody Late 2011 Fan Replacement, Fan: passo 5, immagine 2 di 3 MacBook Pro 13" Unibody Late 2011 Fan Replacement, Fan: passo 5, immagine 3 di 3
      • Use the edge of a spudger to gently pry the fan connector up and out of its socket on the logic board.

      • It is useful to twist the spudger axially from beneath the fan cable wires to release the connector.

      • The fan socket and the fan connector can be seen in the second and third pictures. Be careful not to break the plastic fan socket off the logic board as you use your spudger to lift the fan connector straight up and out of its socket. The layout of the logic board shown in the second picture may look slightly different than your machine but the fan socket is the same.

      Chiedi a FixBot

      Aggiungi Commento

    2. MacBook Pro 13" Unibody Late 2011 Fan Replacement: passo 6, immagine 1 di 1
      • Remove the following three screws securing the fan to the logic board:

      • One 7.2 mm T6 Torx screw

      • Two 5.3 mm T6 Torx screws

      Chiedi a FixBot

      Aggiungi Commento

    3. MacBook Pro 13" Unibody Late 2011 Fan Replacement: passo 7, immagine 1 di 1
      • Lift the fan out of its recess in the logic board, minding its cable that may get caught.

      Chiedi a FixBot

      Aggiungi Commento

Conclusione

To reassemble your device, follow these instructions in reverse order.

Annulla: non ho completato questa guida.

Altre 79 persone hanno completato questa guida.

0Commenti sulla guida

Aggiungi Commento

Visualizza statistiche:

Ultime 24 ore: 2

Ultimi 7 giorni: 10

Ultimi 30 giorni: 56

Tutti i Tempi: 40,991