Salta al contenuto principale
Unisciti alla Community delle riparazioni - Crea un account

Huawei Watch GT Battery Replacement

Cosa ti serve

  1. Huawei Watch GT Battery Replacement, How to open the Huawei Watch GT: passo 1, immagine 1 di 1
    • Before you begin, take your watch off the charger and power it down.

    • Remove the watch band.

    Chiedi a FixBot

    Aggiungi Commento

  2. Huawei Watch GT Battery Replacement: passo 2, immagine 1 di 1
    • Remove the four Torx T3 screws (3.65 mm length).

    Chiedi a FixBot

    Aggiungi Commento

  3. Huawei Watch GT Battery Replacement: passo 3, immagine 1 di 3 Huawei Watch GT Battery Replacement: passo 3, immagine 2 di 3 Huawei Watch GT Battery Replacement: passo 3, immagine 3 di 3
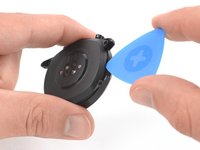
    • Insert an opening pick into the notch at the top edge of the back cover.

    • Do not insert the opening pick deeper than 1 cm (1/3rd of an inch) to avoid damage to other components.

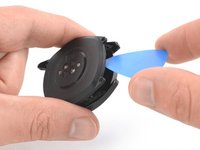
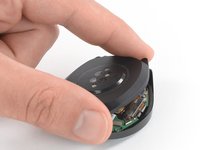
    • Use the opening pick to pry up the back cover of the Huawei Watch GT.

    • Do not remove the back cover assembly all the way yet—it's still connected to the mainboard.

    Chiedi a FixBot

    Aggiungi Commento

  4. Huawei Watch GT Battery Replacement: passo 4, immagine 1 di 2 Huawei Watch GT Battery Replacement: passo 4, immagine 2 di 2
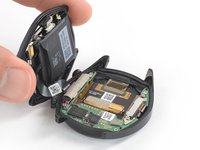
    • Carefully fold the back cover assembly to the side of the two watch crowns.

    Chiedi a FixBot

    Aggiungi Commento

  5. Huawei Watch GT Battery Replacement, Battery: passo 5, immagine 1 di 1
    • It's not required to separate the front and back cover assemblies of the Huawei Watch GT to remove the battery. However, it's an easy procedure and we recommend doing so to make the battery removal easier. In case you feel confident without separating the parts, you can jump to step 8.

    • Remove the Phillips #00 screw (2.9 mm length).

    Chiedi a FixBot

    Aggiungi Commento

  6. Huawei Watch GT Battery Replacement: passo 6, immagine 1 di 2 Huawei Watch GT Battery Replacement: passo 6, immagine 2 di 2
    Strumento utilizzato in questo passaggio:
    Tweezers
    $4.99
    • Use a pair of tweezers to remove the metal shield which covers the flex connector of the distribution cable.

    Chiedi a FixBot

    Aggiungi Commento

  7. Huawei Watch GT Battery Replacement: passo 7, immagine 1 di 2 Huawei Watch GT Battery Replacement: passo 7, immagine 2 di 2
    • Use a spudger to pry up and disconnect the distribution cable connector.

    Chiedi a FixBot

    Aggiungi Commento

  8. Huawei Watch GT Battery Replacement: passo 8, immagine 1 di 1
    • Remove the two Phillips #00 screws (2.6 mm length).

    Chiedi a FixBot

    Aggiungi Commento

  9. Huawei Watch GT Battery Replacement: passo 9, immagine 1 di 2 Huawei Watch GT Battery Replacement: passo 9, immagine 2 di 2
    • Use a pair of tweezers to remove the metal shield which secures the battery connector.

    Chiedi a FixBot

    Aggiungi Commento

  10. Huawei Watch GT Battery Replacement: passo 10, immagine 1 di 2 Huawei Watch GT Battery Replacement: passo 10, immagine 2 di 2
    • Use a spudger to pry up and disconnect the battery flex connector.

    Chiedi a FixBot

    Aggiungi Commento

  11. Huawei Watch GT Battery Replacement: passo 11, immagine 1 di 1
    • Apply a heated iOpener to the rear side of the back cover assembly to loosen the adhesive which is holding the battery in place. Apply the iOpener for at least two minutes.

    Chiedi a FixBot

    Aggiungi Commento

  12. Huawei Watch GT Battery Replacement: passo 12, immagine 1 di 3 Huawei Watch GT Battery Replacement: passo 12, immagine 2 di 3 Huawei Watch GT Battery Replacement: passo 12, immagine 3 di 3
    • Insert a spudger between the top edge of the battery and the back cover.

    • Use the spudger to pry the battery out of its recess.

    • Remove the battery.

    • Do not reinstall a damaged or deformed battery, as doing so is a potential safety hazard.

    Chiedi a FixBot

    Aggiungi Commento

Conclusione

To reassemble your Huawei Watch GT follow these instructions in reverse.

For optimal performance, calibrate your newly installed battery: Charge it to 100% and keep charging it for at least 2 more hours. Then use your device until it shuts off due to low battery. Finally, charge it uninterrupted to 100%.

Take your e-waste to an R2 or e-Stewards certified recycler.

Repair didn’t go as planned? Check out our Answers community for troubleshooting help.

Annulla: non ho completato questa guida.

Altre 16 persone hanno completato questa guida.

Team

iFixit Membro di iFixit

Staff

122 Membri

25.947 guide realizzate

6Commenti sulla guida

Vielen Dank für die super ausführliche und sehr gut verständliche Anleitung. Habe keine 30 Minuten als absoluter Anfänger gebraucht, um den Akku der smartwatch zu tauschen 👍

killer-kitty - Rispondi Condividi

I have a GT2 46mm . It looks a little different inside . Have you maybe instructions for these too?

εφη αραμπατζη - Rispondi Condividi

Sehr schön, dass der Akku hier so einfach tauschen lässt. Meiner hält noch locker zwei Wochen durch, obwohl die Uhr schon einige Jahre auf dem Buckel hat.

Alexander Ehne - Rispondi Condividi

Hi there. I would like to replace my battery at my gt3 42". Is the gt2 battery compatible? If not, where can i find one?

Thank you in advance

SEVASTH GIANNAKH - Rispondi Condividi

Super Anleitung ich werde einen neuen Akku bestellen und dann ran an den Speck Quatsch an den Akku ;-)

Dietmar Derbort - Rispondi Condividi

Aggiungi Commento

Visualizza statistiche:

Ultime 24 ore: 24

Ultimi 7 giorni: 194

Ultimi 30 giorni: 732

Tutti i Tempi: 33,527