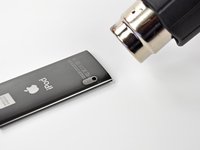
Salta al contenuto principale

iPod Nano 5th Generation Display Replacement

Cosa ti serve

  1. iPod Nano 5th Generation Display Replacement, Glass Panel: passo 1, immagine 1 di 3 iPod Nano 5th Generation Display Replacement, Glass Panel: passo 1, immagine 2 di 3 iPod Nano 5th Generation Display Replacement, Glass Panel: passo 1, immagine 3 di 3
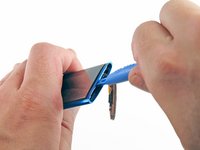
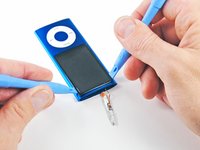
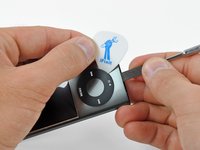
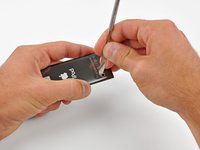
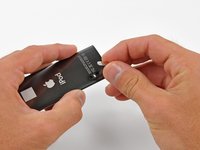
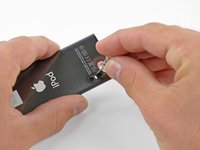
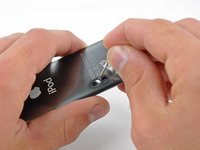
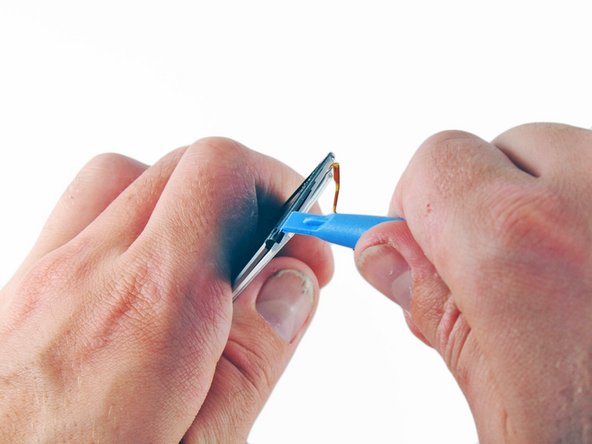
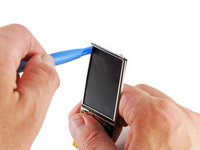
    • Insert an iPod opening tool between the outer case and top bezel near the screen.

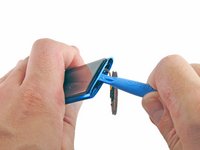
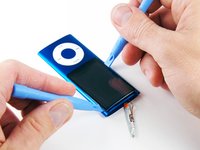
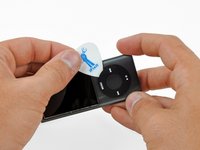
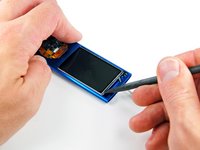
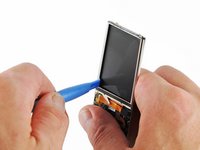
    • Lifting up on the iPod opening tool, gently pry the top panel off of the device.

    • The bezel is attached with adhesive, and may require some force to remove.

  2. iPod Nano 5th Generation Display Replacement: passo 2, immagine 1 di 1
    • Use an iPod opening tool to pry the hold switch button off of the hold switch plate.

  3. iPod Nano 5th Generation Display Replacement: passo 3, immagine 1 di 1
    • Remove the two 3.2 mm screws.

    • These screws are angled toward the outer case and are also very small. Use a sharp screwdriver and be careful not to strip the screws.

  4. iPod Nano 5th Generation Display Replacement: passo 4, immagine 1 di 1
    • Insert an iPod opening tool between the outer case and the metal hold switch plate near the top of the screen .

    • While slightly lifting up on the iPod opening tool, pull the hold switch plate out of the iPod.

    • The hold switch plate is still attached to iPod by a very thin, very fragile ribbon cable. Be careful not to break it.

  5. iPod Nano 5th Generation Display Replacement: passo 5, immagine 1 di 2 iPod Nano 5th Generation Display Replacement: passo 5, immagine 2 di 2
    • The glass panel is held in place by adhesive on all four sides. In the following steps, work carefully to avoid cracking the glass.

    • Insert an iPod opening tool between the display and the glass panel at the top of the device.

    • Rotate the iPod opening tool towards the rear of the device, slightly lifting the top of the glass out of the outer case.

    • The glass panel does not raise very far. Do not attempt to completely remove the panel yet, or you are likely to break the display screen.

  6. iPod Nano 5th Generation Display Replacement: passo 6, immagine 1 di 1
    • While lifting the screen up with one iPod opening tool, insert a second iPod opening tool in between the outer case and the top left edge of the glass panel.

    • Remove the first iPod opening tool from between the glass and LCD in the top of the device.

  7. iPod Nano 5th Generation Display Replacement: passo 7, immagine 1 di 2 iPod Nano 5th Generation Display Replacement: passo 7, immagine 2 di 2
    • Prying up slightly on the iPod opening tool, insert a second iPod opening tool in between the front glass and the outer case, on the right side of the screen.

    • Slide the second iPod opening tool along the right edge of the panel to remove the adhesive.

  8. iPod Nano 5th Generation Display Replacement: passo 8, immagine 1 di 2 iPod Nano 5th Generation Display Replacement: passo 8, immagine 2 di 2
    • With one iPod opening tool still between the glass and outer case, insert a second iPod opening tool in between the front glass and outer case, on the left side.

    • Slide the second iPod opening tool toward the bottom of the device to remove the adhesive.

  9. iPod Nano 5th Generation Display Replacement: passo 9, immagine 1 di 1
    • Lifting the glass from the side nearest the top of the iPod, remove the glass panel from the Nano.

  10. iPod Nano 5th Generation Display Replacement, Click Wheel: passo 10, immagine 1 di 2 iPod Nano 5th Generation Display Replacement, Click Wheel: passo 10, immagine 2 di 2
    • Use a heat gun to soften the adhesive underneath the plastic bezel at the bottom of the iPod.

    • Use a low heat setting and do not hold the heat gun in place for too long to avoid melting the plastic bezel.

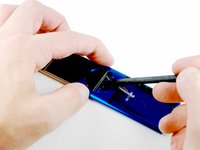
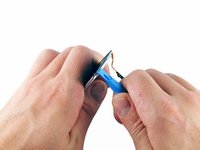
    • Use a plastic opening tool to pry the bezel from the case of the iPod and remove it.

  11. iPod Nano 5th Generation Display Replacement: passo 11, immagine 1 di 3 iPod Nano 5th Generation Display Replacement: passo 11, immagine 2 di 3 iPod Nano 5th Generation Display Replacement: passo 11, immagine 3 di 3
    • Unscrew three screws from the bottom of the iPod:

    • Two 4.4 mm angled Phillips screws

    • One 5.4 mm Phillips screw.

    • These screws may not come out on their own, so be sure not to lose them when removing the retainer.

    • Use a plastic opening tool to pry the metal retainer out from the bottom of the iPod and remove it.

  12. iPod Nano 5th Generation Display Replacement: passo 12, immagine 1 di 2 iPod Nano 5th Generation Display Replacement: passo 12, immagine 2 di 2
    • Insert a metal spudger into the slot at the bottom of the iPod just above the dock connector.

    • Use the metal spudger to pry up the bottom edge of the click wheel.

  13. iPod Nano 5th Generation Display Replacement: passo 13, immagine 1 di 2 iPod Nano 5th Generation Display Replacement: passo 13, immagine 2 di 2
    • Place a guitar pick between the click wheel and the case of the Nano and remove the metal spudger.

    • Pry up the edges of the click wheel with the guitar pick until the click wheel comes free from the case.

    • Do not try to completely remove the click wheel yet, as it is still held in place by a ribbon cable.

  14. iPod Nano 5th Generation Display Replacement: passo 14, immagine 1 di 2 iPod Nano 5th Generation Display Replacement: passo 14, immagine 2 di 2
    • Lift the click wheel out of the way with one hand and use a plastic opening tool to pry the click wheel ribbon cable connector off its socket on the logic board.

    • Remove the click wheel.

  15. iPod Nano 5th Generation Display Replacement, Logic Board Assembly: passo 15, immagine 1 di 3 iPod Nano 5th Generation Display Replacement, Logic Board Assembly: passo 15, immagine 2 di 3 iPod Nano 5th Generation Display Replacement, Logic Board Assembly: passo 15, immagine 3 di 3
    • Use a heat gun to soften the adhesive underneath the camera/microphone cover.

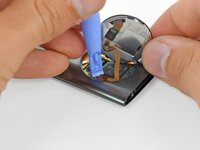
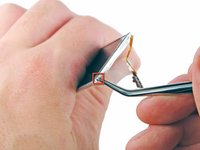
    • Pry the camera/microphone cover off the case with a metal spudger and remove it.

    • It is extremely difficult, if not impossible, to avoid damaging the iPod case near the camera. While this will not affect the iPod's functionality, it will hurt its cosmetic appearance.

    • You can try this alternative method for removing the cover:

    • Use a hot glue gun to apply a bead of glue across the cover.

    • Move the nozzle in the glue for 20 seconds to heat the lens adhesive holding the lens in place.

    • Press a spudger into the hot glue and hold it in place until the glue cools and hardens.

    • Pull on the spudger with firm steady force, while using a fingernail to pry on the cover edge.

  16. iPod Nano 5th Generation Display Replacement: passo 16, immagine 1 di 1
    • From the top of the iPod, insert a metal spudger between the outer case and the battery to remove the adhesive that holds the battery in place.

    • Be extremely careful not to poke or puncture the battery itself, as this may cause the battery to combust.

  17. iPod Nano 5th Generation Display Replacement: passo 17, immagine 1 di 3 iPod Nano 5th Generation Display Replacement: passo 17, immagine 2 di 3 iPod Nano 5th Generation Display Replacement: passo 17, immagine 3 di 3
    • There is a small white retainer between the camera and microphone that keeps the inner components from sliding around.

    • Insert a push pin into the hole at the corner of the retainer and lift it out of the case.

  18. iPod Nano 5th Generation Display Replacement: passo 18, immagine 1 di 1
    • Once the retainer has been pushed past its hole in the outer case, the spudger used to depress it is no longer necessary.

    • Using gentle but steady force, push on the top of the LCD to slide the logic board assembly out of the bottom of the iPod.

    • Do not push on the battery, as this may puncture it and cause it to combust.

    • Constantly mind the hold switch plate, making sure it doesn't snag on an edge and tear the ribbon cable.

  19. iPod Nano 5th Generation Display Replacement: passo 19, immagine 1 di 2 iPod Nano 5th Generation Display Replacement: passo 19, immagine 2 di 2
    • Continue to push the logic board assembly through the outer case of the iPod with a spudger.

    • Tolerances inside the Nano are extremely tight. Be very patient and go slowly when removing the logic board assembly, and make sure no components or ribbon cables get caught on the case.

    • To make sure that the hold switch plate does not catch on the housing of the iPod and tear the cable, feed the switch straight down the center of the device, where the opening is the widest.

  20. iPod Nano 5th Generation Display Replacement: passo 20, immagine 1 di 1
    • Once the top of the LCD has cleared the bottom edge of the outer case, remove the logic board assembly from the body of the iPod.

    • Again, be sure to mind the hold switch plate, that it doesn't catch on the bottom of the click wheel hole.

  21. iPod Nano 5th Generation Display Replacement, Display: passo 21, immagine 1 di 1
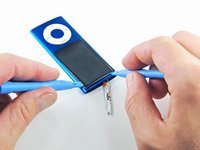
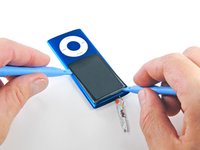
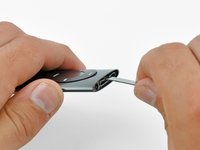
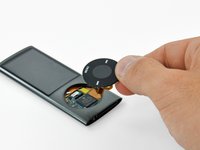
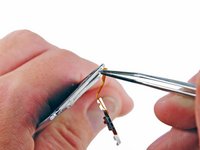
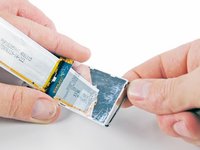
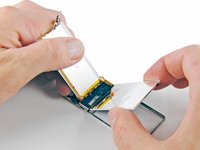
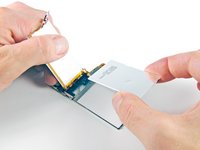
    • Use an iPod opening tool to pry the display connector off its socket on the logic board.

  22. iPod Nano 5th Generation Display Replacement: passo 22, immagine 1 di 2 iPod Nano 5th Generation Display Replacement: passo 22, immagine 2 di 2
    • Use a pair of tweezers to bend back the metal clips at the top of the display.

  23. iPod Nano 5th Generation Display Replacement: passo 23, immagine 1 di 2 iPod Nano 5th Generation Display Replacement: passo 23, immagine 2 di 2
    • The display panel of the iPod Nano is held to the frame by an adhesive. In the following steps, work slowly and carefully to avoid damaging your device.

    • Insert an iPod opening tool between the top of the display and the metal frame.

    • Lift the iPod opening tool to carefully pry the top of the display off the metal frame.

  24. iPod Nano 5th Generation Display Replacement: passo 24, immagine 1 di 2 iPod Nano 5th Generation Display Replacement: passo 24, immagine 2 di 2
    • Turn the iPod so the front of the display is facing you.

    • Insert an iPod opening tool between the front of the display and the metal frame on the right side of the display.

    • Slide the iPod opening tool down the right side of the display, freeing it from the metal frame.

  25. iPod Nano 5th Generation Display Replacement: passo 25, immagine 1 di 2 iPod Nano 5th Generation Display Replacement: passo 25, immagine 2 di 2
    • Repeat the procedure above for the left side of the display.

    • The display should now be free from the metal frame.

  26. iPod Nano 5th Generation Display Replacement: passo 26, immagine 1 di 1
    • Turn the entire logic board assembly over so the display is face down.

    • Lift the battery off the back of the display.

  27. iPod Nano 5th Generation Display Replacement: passo 27, immagine 1 di 3 iPod Nano 5th Generation Display Replacement: passo 27, immagine 2 di 3 iPod Nano 5th Generation Display Replacement: passo 27, immagine 3 di 3
    • Use your fingers to push the top of the display out of the metal frame.

    • Lift the top of the display out of the frame.

    • Remove the entire display.

Conclusione

To reassemble your device, follow these instructions in reverse order.

Altre 31 persone hanno completato questa guida.

David Hodson

Membro da: 04/13/10

150.352 Reputazione

127 Guide realizzate

9 Commenti

Re-assembly is kind of the reverse of disassembly, but replacing some of the glue may be required, particularly for the camera/mic cover. Sliding the logic board into the housing is an exercise in considerable care - the display ribbon, the speaker ribbon, various bits of yellow tape, all can snag on the lugs around the clickwheel hole, or the camera/mic holes.

CarlW - Replica

what type of glue would you recommend?

Andrzej Inzynierski -

Help my ribbon for hold switch fell off!!! Will it still work without the hold switch connected?

Cristna007 - Replica

I used a cigarette lighter instead of heat gun and worked like a charm.

Kamil Jopek - Replica

Sadly my ipod was full of glue and it was not possible to replace the display and broke it. :-(

Luigi Falcodicamelot - Replica

Aggiungi Commento

Visualizza Statistiche:

Ultime 24 Ore: 6

Ultimi 7 Giorni: 44

Ultimi 30 Giorni: 196

Tutti i Tempi: 78,088