Questa traduzione è stata generata automaticamente e non è stata ancora revisionata da una persona. Parli questa lingua? Dai un’occhiata.
Introduzione
La batteria non dura a lungo? Sostituiscila.
Cosa ti serve
-
-
-
Prima di aprire il tuo iPod, assicurati che lo switch Hold sia nella posizione di blocco. La barra arancione dovrebbe essere visibile, indicando che il bloccaggio è attivo.
 Chiedi a FixBot
-
-
-
Inserisci uno strumento di apertura il più possibile nella giuntura tra la plastica frontale e il pannello in metallo posteriore, sul bordo destro dell'iPod.
-
Usa lo strumento di apertura per fare leva sul pannello frontale in plastica e rilasciare le cinque linguette di fissaggio (vedi terza foto).
-
Fai scorrere lo strumento di apertura lungo il bordo dell'iPod e continua a far leva per rilasciare le restanti linguette.
-
Dopo che tutte e cinque le linguette sono state rilasciate, il case dovrebbe aprirsi senza troppi sforzi.
-
-
-
Apri il case come se fosse un libro con il connettore dock sulla parte superiore, e fai appoggiare la parte posteriore di fianco la parte frontale dell'iPod.
-
-
-
-
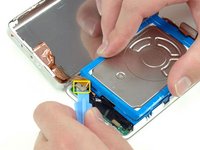
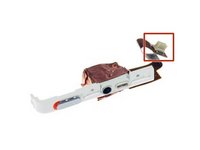
Usando uno strumento di plastica o le unghie, scollega delicatamente il connettore arancione del jack delle cuffie. Assicurati di tirare verso l'alto dal connettore e non dal cavo stesso.
-
-
-
-
-
Solleva l'hard drive con una mano e scollega con attenzione il cavo a nastro dell'hard drive dalla scheda logica.
-
Solleva l'hard drive estraendolo dall'iPod.
-
-
-
Scollega con attenzione il connettore bianco della batteria dalla scheda logica. Assicurati di tirare solo il connettore stesso e non i cavi.
-
-
-
Rimuovi la vite Torx T6 nera vicino al connettore della batteria sulla scheda logica.
-
-
-
Fai passare con attenzione il cavo della batteria attorno all'estremità della scheda logica. Fai attenzione a non sollevare troppo la scheda logica mentre liberi il cavo della batteria.
-
-




Per rimontare il dispositivo, segui queste istruzioni in ordine inverso.
Annulla: non ho completato questa guida.
Altre 333 persone hanno completato questa guida.

20Commenti sulla guida
If you are real careful you don't have to remove the Torx screw to get the battery out.
I found this quite easy. The tools worked great. I agree with Andy, if you push the tool into the groove, then lift or pry it up so the tip of the tool is down inside the back cover, you should be able to slide it across to pop the clips quite easily. Once you get the first two sides open, it goes quick.
I also did this without having to remove the Torx screw. It helped to lift the battery up a bit to give the wires a little slack, and then just feed them around the corner of the motherboard. Putting the new battery in, I just fed the wires around the corner, and used the opening tool to push them the final bit of the way around the corner.
My old iPod is like new now! Hours and hours of battery life, when it would previously die after 5 minutes.
Very simple and clear guide. I managed to replace the battery in the first try and it worked!
I was able to do it without disconnecting the headphone jack and without removing the Torx screw.
I found the replacement battery to be a little thicker than the original battery but there was no issue resealing the case.
