Salta al contenuto principale

iPhone 7 Power and Volume Control Cable Battery Replacement

Solo Prerequisita
Questa guida รจ destinata a essere usata solo come prerequisito per altre guide. Da sola รจ incompleta.

Cosa ti serve

  1. iPhone 7 Power and Volume Control Cable Battery Replacement, Power and Volume Control Cable Battery: passo 1, immagine 1 di 2 iPhone 7 Power and Volume Control Cable Battery Replacement, Power and Volume Control Cable Battery: passo 1, immagine 2 di 2
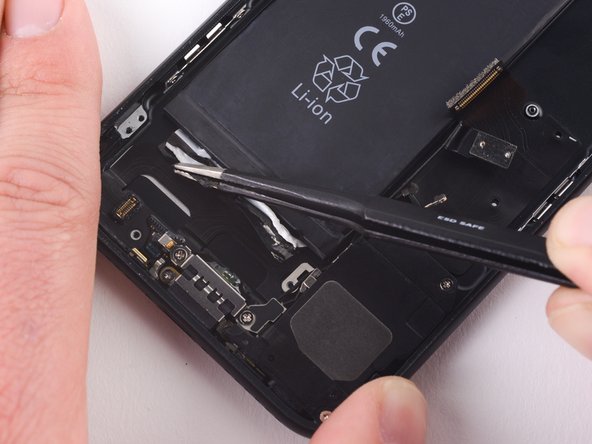
    • Use the flat end of a spudger to disconnect the Taptic Engine connector from its socket on the logic board.

  2. iPhone 7 Power and Volume Control Cable Battery Replacement: passo 2, immagine 1 di 1
    • Remove the three 1.6 mm Phillips screws securing the Taptic Engine to the rear case.

  3. iPhone 7 Power and Volume Control Cable Battery Replacement: passo 3, immagine 1 di 2 iPhone 7 Power and Volume Control Cable Battery Replacement: passo 3, immagine 2 di 2
    • Remove the Taptic Engine.

  4. iPhone 7 Power and Volume Control Cable Battery Replacement: passo 4, immagine 1 di 3 iPhone 7 Power and Volume Control Cable Battery Replacement: passo 4, immagine 2 di 3 iPhone 7 Power and Volume Control Cable Battery Replacement: passo 4, immagine 3 di 3
    • Use a pair of tweezers with blunt tips to peel back one of the adhesive strips on the lower edge of the battery.

  5. iPhone 7 Power and Volume Control Cable Battery Replacement: passo 5, immagine 1 di 2 iPhone 7 Power and Volume Control Cable Battery Replacement: passo 5, immagine 2 di 2
    • Use a pair of tweezers with blunt tips to peel back the other adhesive strip on the lower edge of the battery.

  6. iPhone 7 Power and Volume Control Cable Battery Replacement: passo 6, immagine 1 di 3 iPhone 7 Power and Volume Control Cable Battery Replacement: passo 6, immagine 2 di 3 iPhone 7 Power and Volume Control Cable Battery Replacement: passo 6, immagine 3 di 3
    • Try to keep the strips flat and unwrinkled during this procedure; wrinkled strips will stick together and break instead of pulling out cleanly.

    • Slowly pull one battery adhesive tab away from the battery, toward the bottom of the iPhone.

    • Pull steadily, maintaining constant tension on the strip until it slips out from between the battery and the rear case. For best results, pull the strip at a 60ยบ angle or less.

    • The strip will stretch to many times its original length. Continue pulling and re-grab the strip near the battery if necessary.

  7. iPhone 7 Power and Volume Control Cable Battery Replacement: passo 7, immagine 1 di 1
    • Repeat the previous step for the second strip.

    • Hold down the battery as you remove the second strip, or the strip may fling the battery when it separates from the case.

    • If you removed both adhesive strips successfully, skip the next step.

    • Otherwise, if either of the adhesive strips broke off underneath the battery and could not be retrieved, continue with the next step below.

  8. iPhone 7 Power and Volume Control Cable Battery Replacement: passo 8, immagine 1 di 2 iPhone 7 Power and Volume Control Cable Battery Replacement: passo 8, immagine 2 di 2
    Attrezzo utilizzato in questo passaggio:
    Plastic Cards
    $2.99
    Compra
    • If you successfully removed both adhesive strips, move on to the next step. Otherwise, you will need to pry the battery from the rear case.

    • Prepare an iOpener and apply it to the back of the rear case, directly over the battery. Alternatively, you can apply heat using a heat gun or hair dryer.

    • After about a minute, remove the iOpener, flip the phone over and use a plastic card to break up any remaining adhesive behind the battery.

    • Avoid bending the battery. Damage to the battery may release dangerous chemicals, and could start a fire.

    • Do not pry under the top third of the battery, you may damage the volume button ribbon cable.

  9. iPhone 7 Power and Volume Control Cable Battery Replacement: passo 9, immagine 1 di 1
    • Remove the battery.

    • When installing the battery, refer to this guide to replace your battery's adhesive strips.

Conclusione

To reassemble your device, follow these instructions in reverse order.

Scott Havard

Membro da: 06/27/16

49.663 Reputazione

31 Guide realizzate

0 Commenti

Aggiungi Commento

Visualizza Statistiche:

Ultime 24 Ore: 1

Ultimi 7 Giorni: 7

Ultimi 30 Giorni: 11

Tutti i Tempi: 147