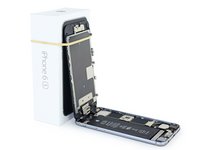
Introduzione
Segui questa guida per sostituire il Taptic Engine del tuo iPhone 6s. Il Taptic Engine è il motorino della vibrazione e del feedback aptico dell'iPhone. Se il tuo telefono non vibra più o emette un crepitio quando lo fa, sostituire il Taptic Engine potrebbe risolvere il tuo problema.
Cosa ti serve
-
-
Rimuovi le due viti Pentalobe P2 da 3,4 mm sul lato inferiore dell'iPhone, su entrambi i lati del connettore Lightning.
-
-
Attrezzo utilizzato in questo passaggio:Clampy - Anti-Clamp$24.95
-
Tira la manopola blu verso la cerniera per sbloccare i bracci dell'Anti-Clamp.
-
Fai scorrere le braccia o sul bordo sinistro o su quello destro del tuo iPhone.
-
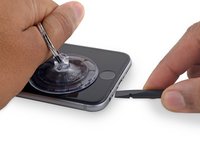
Posiziona le ventose sullo schermo, subito sopra il tasto Home, una davanti e una sul retro.
-
Premi le ventose così che facciano presa sull'area desiderata.
-
-
-
Allontana la manopola blu dalla cerniera per bloccare le braccia
-
Ruota la manopola in senso orario di 360 gradi o finché vedi che la ventosa comincia ad allungarsi.
-
Aspetta un minuto per dare la possibilità all'adesivo di lasciarsi andare e alla parte inferiore dello schermo di aprirsi.
-
Salta i prossimi tre passi.
-
-
Attrezzo utilizzato in questo passaggio:Clampy - Anti-Clamp$24.95
-
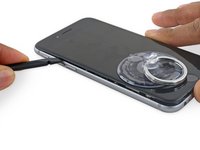
In alternativa, scalda moderatamente il bordo inferiore dell'iPhone usando un iOpener o un asciugacapelli per circa un minuto.
-
-
-
-
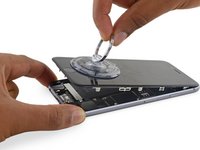
Afferra con delicatezza il gruppo display e sollevalo verso l'alto per aprire il telefono, usando le clip nella parte alta del pannello anteriore come una cerniera.
-
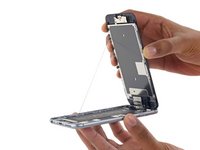
Apri il display a un angolo di circa 90° e appoggialo contro qualche cosa per tenerlo sollevato mentre tu lavori sul telefono.
-
Usa anche un elastico per tenere il display in una posizione sicura mentre lavori. In questo modo eviterai di forzare i cavi del display.
-
Durante il rimontaggio, fermati qui se vuoi sostituire l’adesivo lungo i bordi del display.
-
Durante il rimontaggio, l’estremità della fotocamera del corpo del display deve agganciarsi sotto il bordo del corpo. Le clip del frame del display devono trovarsi sotto il bordo della scocca principale e avvicinate verso l’estremità della fotocamera per chiudere facilmente la cover e farla agganciare correttamente.
-
Queste clip non sono realmente una cerniera, ma fermagli che devono trovarsi sotto il bordo del frame principale del telefono!! In questo modo il display tornerà facilmente alla posizione chiusa, agganciandosi delicatamente al suo posto.
-
Durante il rimontaggio, per far agganciare nuovamente il display nell’ordine inverso, premi lungo il lato destro dall’angolo superiore a quello inferiore. Poi premi sul lato sinistro.
-
-
Attrezzo utilizzato in questo passaggio:Magnetic Project Mat$19.95
-
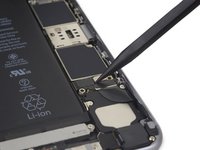
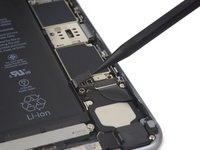
Rimuovi le due viti a croce Phillips che fissano la staffa del connettore della batteria:
-
Una vite da 2,9 mm
-
Una vite da 2,2 mm
-
-
-
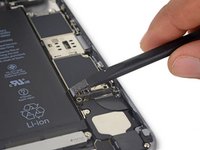
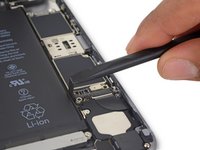
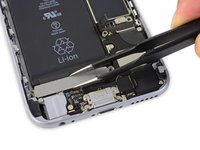
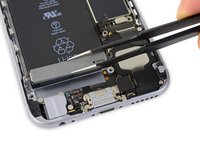
Svita le due viti a croce Phillips da 1,5 mm che tengono fermo il Taptic Engine.
-


Per rimontare il tuo dispositivo, segui le istruzioni in ordine inverso.
Annulla: non ho completato questa guida.
Altre 113 persone hanno completato questa guida.
Un ringraziamento speciale a questi traduttori:
100%
Daniele Carminati ci sta aiutando ad aggiustare il mondo! Vuoi partecipare?
Inizia a tradurre ›

5Commenti sulla guida
Guide very clear and toolset and replacement battery worked just fine. I replaced battery without disconnecting front panel. Both glued strips got broken (I didn’t remove Taptic Engine) but I managed to rescue strips by carefully leveling up battery with the spudger and picking the strips with twezzer. Then it was easy to pull the glued strips thanks to the gap gained between battery and rear panel
Iphone 6s is back to life. Sorry for my poor English writing skills (creo que escribo mejor en Spanish)
Thank you all
A very good clear guide, and my iphone 6s works fine, restored with the new replacement battery. The replacement battery came with a full set of tools, including sucker, screwdrivers, spudgers and even a packet of screws.
I must admit, although the guide was excellent and well illustrated, I found it a bit of a challenge. I don’t know if my age (nearly 80) didn’t help , with a slightly shaky hand! Those tiny, tiny screws that can ping all over the place, and replacing the weenie terminals that could so easily be damaged if you press in the wrong place, I found the worst to cope with. However the guide was very helpful with its warnings, such as when you are getting the old battery out and the danger of damaging the volume button connector if you work too near the top end.
To conclude I think the guide is very good, and thank you.
Excellent source. I was able to repurpose an old iPhone for reuse as a quasi iPod and keep it out of the trash cycle. HINT: when disassembling devices such as this with many tiny screws I use an enlarged screen shot from the directions, tape it to a steel sheet. I lay out tiny magnets on the picture in the exact pattern as the place from which they came before I remove them. For reassembly, I remove them from the magnets one-by-one as used. This way each screw goes back in the place from which it came.
I am not a tech person, and this is the second time I have replaced the battery in my iPhone 6s using your kit and replacement battery. The first time was a year and a half ago, and all was good until that first replacement battery simply stopped charging. It lasted a year and a half, so I think that's pretty good!
The hardest part of the repair for me is getting all those tiny screws back in. Otherwise, easy to follow instructions, photos and tools. You guys do great work -- thank you!