Introduzione
Segui i passaggi in questa guida per sostituire la batteria usurata di un iPad mini 4 Wi-Fi.
Se la tua batteria si è gonfiata, prendi le dovute precauzioni.
Cosa ti serve
-
-
Scalda un iOpener e appoggialo al bordo sinistro per due minuti.
-
-
-
Mentre tieni sollevato il vetro con la ventosa, inserisci la punta di un plettro nella fessura tra il vetro e il corpo dell'iPad.
“Don't insert the opening pick any deeper than the black bezel on the side of the display. Inserting the pick too far may damage the LCD.”
Unfortunately, you only know you have inserted it too far when you have, and you start seeing little bubble veins form between the glass screen and the LCD.
The adhesive can be very stiff/hard, and if pushing through it can result in the pick plunging into the LCD when the adhesive finally gives way.
Take your time, use alot of heat, and if you need to try and push the pick in, try and do so in a slicing motion along the edge, use the wide edge, or hold the pick so that your finger will hit the edge of the screen before the pick tip will pass the bezel.
Adhesive strips are only 1mm wide on sides. Up to 5mm wide top and bottom. I used the Isclack. Screen seemed ok bending without breaking. Worth looking for a photo of the replacement adhesive strips so you know what you have to separate. Be extra careful at the lower right corner where the cables are.
This is a failure of a guide as it doesn’t tell you to insert at a downward angle so you don’t potrude into the LCD… Now I have to spend more money to replace the screen as I pushed adhesive between the LCD and the screen even though I went no farther than a millimeter short of the screen...
can you open the right side if the left is too cracked to use a suction cup on?
This guide needs amending urgently.
You MUST NOT put the pick or whatever you are using more than 2mm under the sides of the screen, or you will cut through the adhesive tape securing the backlight assembly to the LCD glass.
This will push adhesive into the viewable area of the LCD and cause the backlight assembly to no longer be secured against the LCD fully.
I now need a new screen.
This line below from the guide is absolutely INCORRECT and will ruin your expensive display:
”Don't insert the opening pick any deeper than the black bezel on the side of the display.”
The black bezel is 5mm to 6mm wide; you MUST NOT insert anything to that depth or you will destroy your display. 2mm maximum!
thanks. will take this into account for my repair
Adab Abu -
I too damaged my display because of this absolute nonsense (The German version, which I used, still had this INCORRECT portion in it). I can't believe how long it took iFixit to update this, even though people have been reporting this for years on end. Sadly iFixit still haven't updated a variety of other things that are still at the very least high risk instructions. I just messaged them the other day, but they don't seem to care about or understand the remaining issues that this guide has. At least they updated one of the most severe things, but they just plainly told me 'I'm wrong' about the rest. I liked iFixit it so far, and I've worked on a variety of (difficult) repairs - but this experience was a very huge let down.
A few thoughts after opening a number of Mini 4’s.
1) if the display is warm enough you can squeeze the digitizer and LCD back together after a minor incursion with the opening pick and it will reseal.
2) I’ve started going in at the top just to the right of the camera (I use an iFlex to get in then switch to a pick). Then I run down either side with my fingers choked up on the pick so there only a mm or 2 sticking out. Usually after running down one side, I can get the display open enough to get the pick in behind the LCD when I do the other side
-
-
-
Scalda di nuovo e riappoggia l'iOpener sul bordo sinistro per qualche minuto.
If your iPad is cold, consider leaving the iOpener on for longer than 5 minutes. The aluminum housing is a very large thermally dissipating mass and will quickly cool off the glass and make you have to start over and wait the 10 minutes to reheat. There’s a very slim window in which you’re able to insert the pick into the glass adhesive before it solidifies once again. I’ve been fighting with it for like 20 minutes following these instructions and it’s not working. You really need to leave it for longer than just 5 minutes to get the back housing hot too.
Heat is essential. I used a 3d printer’s heated set at 65 degrees. Chris Storer’s stip above saved me as you really need to let it sit for quite a while to soften the adhesive. Since I was doing a battery change, I heated both sides as the aluminum back is a huge heatsink that really sucks up the heat. Don’t try forcing it; if the suction cup isn’t pulling a gap in the screen, leave it on the heater for additional time.
Love the 3d printer idea, I hadn’t thought of that! I have used a heat gun as well but you have to be very careful to not use too much heat. Also watch for inserting the pick too far, it is really easy to delaminate glass from the display!
russ -
-
-
-
Lascia il plettro infilato nell'iPad leggermente dopo la fotocamera.
-
Prendi un secondo plettro ed infilalo a sinistra della fotocamera, dove sei già passato col primo plettro. Fallo scorrere verso l'angolo in alto a sinistra per tagliare del tutto l'adesivo rimasto.
-
Lascia il secondo plettro sotto l'angolo per evitare che l'adesivo si reincolli raffreddandosi.
-
-
-
-
Ruota i due plettri sotto il bordo superiore dell'iPad per separare l'adesivo restante che tiene fermo lo schermo.
-
Solleva lo schermo dal bordo superiore per aprire il dispositivo.
"Twist the two picks at the top edge of the iPadTwist the two picks at the top edge of the iPad "
When I did this twisting motion, and I thought I was being gentle, one of the picks cracked nearly in half. That adhesive is very strong! I probably did not cut into it far enough before applying the twisting to open the screen.
-
-
-
Rimuovi le quattro viti Phillips da 1,2 mm sopra la staffa del connettore della batteria/schermo.
-
-
-
Rimuovi la staffa che copre il cavo della batteria/schermo.
Is it the end of the world if the bracket is not reinstalled, will the device function normally or will it eventually have issues with the connectors coming loose following shock?
-
-
-
Usa la parte piatta dello spudger per scollegare il connettore della batteria dal suo socket sulla scheda logica.
When i was starting to disconnect the lcd to the board i hit the black film and it lit and now even the new display wont display anything how to fix it? The black film near the lcd connector.
-
-
-
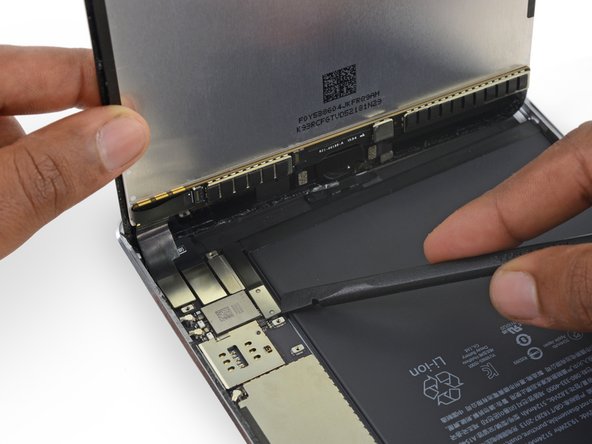
Usa l'estremità appuntita di uno spudger per scollegare il connettore dei dati dello schermo dal suo alloggiamento sulla scheda logica.
-
Usa l'estremità appuntita di uno spudger per scollegare il connettore del digitalizzatore dal suo alloggiamento sulla scheda logica.
-
-
-
Rimuovi il gruppo schermo.
Ich habe eine Bücherstütze benutzt um das Display in senkrechter Position zu halten, während ich die vier Schräubchen gelöst habe.. So zieht man nicht so an den Flexkabeln….!
Because the 3-piece adhesive strips shown in the Display Adhesive Application Guide link were different from iPad Mini 4 Adhesive Strips (item code IF316-013-1), it wasn't easy to figure out the exact location of the bottom adhesive. It would be helpful to include a separate application guide or an additional picture showing the exact location of each strip) on the guide.
-
-
-
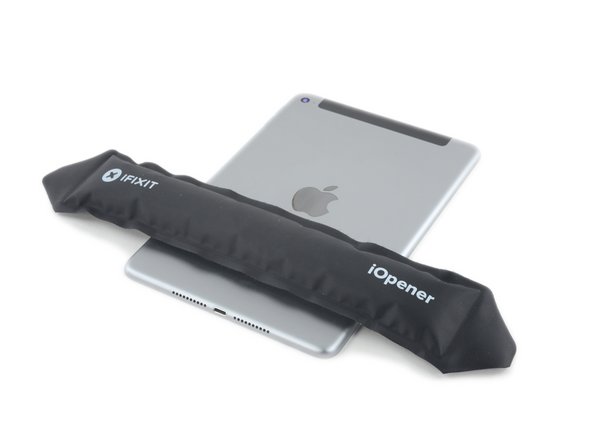
Riscalda il tuo iOpener.
-
Appoggia l'iPad a faccia in giù sulla tua superficie di lavoro ed appoggia l'iOpener sul retro della copertura, dove si trova il bordo inferiore della batteria.
-
-
-
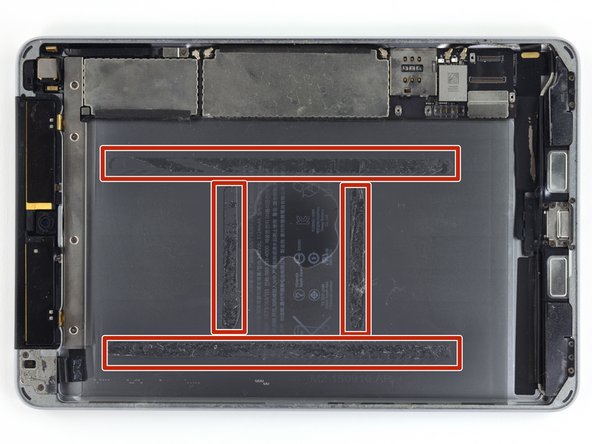
Nei prossimi passaggi dovrai tagliare l'adesivo sotto la batteria e rimuoverla dalla copertura posteriore.
-
L'adesivo è disposto come mostrato in questa immagine: due strisce lungo i bordi lunghi, e due più corte perpendicolari nel centro.
-
Per evitare di danneggiare la batteria, usa degli strumenti in plastica, calore e pazienza. Non forare, piegare, o surriscaldare la batteria.
-
Non fare leva vicino alla scheda madre, o potresti danneggiare il tuo iPad.
The only tape adhesive kit that iFixit sells is incomplete for the cellular model. The are five extra small pieces of tape that go inboard around the cellular antenna. You will need to request another tape kit from iFixit, like I recently did, to cut custom pieces for that section. Amazingly I got pushback on that and was told that their kit is correct for the cellular model too, even after showing clear and obvious closeup photos of the leftover adhesive in those sections. That’s inexcusable for a repair site!
In general the tape of the battery to open is more work and need more head the the Display. The Headsink of the backhousing and batterie itself is big.. I in the end used an big hot air dryer to heat up the backside of the Pad!!
-
-
-
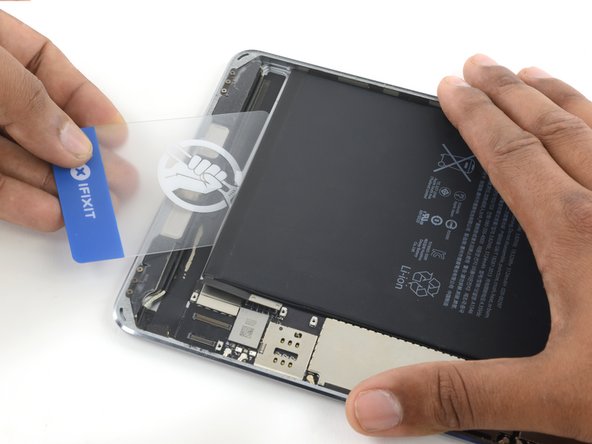
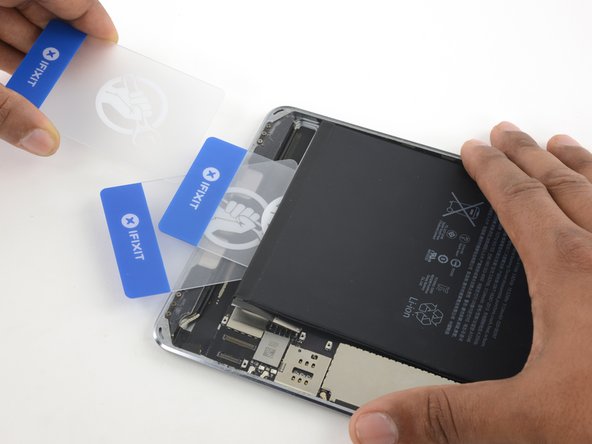
Infila una terza scheda in plastica tra la prima e la seconda, questa volta allineata con il bordo sinistro della batteria.
-
Continua a tagliare l'adesivo sotto la batteria fino a liberarla.
-
Scalda di nuovo e riappoggia il tuo iOpener quando sollevare diventa difficile. Assicurati di aspettare che l'iOpener si raffreddi tra un riscaldamento e l'altro.
The iopener kit only includes 2 cards
That’s what old credit cards are for.
-
-
-
Rimuovi la batteria.
Reassembling it is not simply a matter of following the reverse of the disassembly instructions. You need to clean off all the adhesive tape pieces and residue. That is by far the most time consuming and potentially damaging part of this job. The adhesive will be very difficult to get off in some places. I use a combination of blow dryer with low heat, the pointed end if the plastic prying stick to rub it off, chiseled cut pieces of pencil eraser sticks, to rub it down even more, then finally, and very, very carefully, alcohol to get the residue off. Just wet enough on cotton cloth and cotton swabs to wipe but not to have it seep into delicate areas! Rub along and outboard of the edge of the display only to avoid damaging edge. It you don’t remove all the tape pieces and residue and have a clean and level result for the new tape then the display will not only not sit flush like a new iPad but it will not stick well!
Cellular model users see my important comment about thecelluar model in the beginning of the guide!
One big hint will be first to fix the batterie connector in the socket before You “drope” the battery in place! The new battery is a little bit smaller and if the battery ist fixed on the bottom, You have no chance to connect the plug without any damaging the socket!!!
One more hint conerning the tape which fix the Glass in the frame: I used the old tape and looked only that its “nearly undistroyed”.
A few overstreched pieces i cut away. It works fine!! After fixation in the frame of the Pad I heated up the whole Pad with a Hairdryer and pressed together again! Looks good !
Thanks general for this Documentation - Evan! ……..
For those worrying about glue residue, use pure IPA to soften the glue. Makes it very easy to remove. I also get it behind batteries when trying to remove them, they come unstuck much easier
You can clearly see there are four pieces of Plastic cards. In the kit there are only two. what would help would be a plastic card that is at least three times longer, so that it can be pressed bellow the battery.
You can make really short work of the glue residue by using Goo Gone. Spray it on a cotton cloth first sparingly (not on the device) and wipe it on the glue areas. It will come up very quickly. Then take a dry paper towel to ensure you don't leave any Goo Gone residual.
-


Per riassemblare il dispositivo, segui le istruzioni nell'ordine inverso.
Per riassemblare il dispositivo, segui le istruzioni nell'ordine inverso.
Annulla: non ho completato questa guida.
Altre 72 persone hanno completato questa guida.
Un ringraziamento speciale a questi traduttori:
100%


Questi traduttori ci stanno aiutando ad aggiustare il mondo! Vuoi partecipare?
Inizia a tradurre ›

22 Commenti
This guide is great for disassembly. I’ve just successfully removed the battery from my device by following these instructions. However, it does not provide any guidance for applying the new adhesive strips before assembling the screen. For that reason, this guide seems incomplete.
[can’t edit the guide]
Cleaningoff the old adhesive:
Remove the old adhesive from underside of the glass and the edges of the case. This was the most time consuming part. Took 2-3 hours, because the original adhesive was really gummy and i didn’t want to damage any parts with harsh solvents. (I used a series of methods": citrus oil adhesive remover, methylated spirits, sticky tape stick and lift off.)
Making sure the edges of the glass and case are spotless ensures a good result when applying the new adhesive strips. New strips can be gently applied, peeled back and reapplied to make 100% sure they are in the right place. If adhesive residue is still present the new strips could get stuck in the wrong place and be impossible to reposition.
[can’t edit the guide]
Reassembly:
Replacement double sided adhesive strips are applied to the case first. Figure which strips go top, bottom and sides. Start with the top or bottom corner. Apply the side strips last so you can figure which side is which.
Make sure the front camera and its window are clean. Use a strong magnifying glass and air duster. You won’t be able to get any dirt out unless you have more adhesive strips to use.
When you are ready to assemble, peel the backing off the double sided adhesive.
Support the screen at 90deg to case. Reattach cable connectors. Attach new battery connector then carefully position new battery with exposed adhesive into position in the case.
Attach connector clamp plate with 4 screws.
Carefully position the screen in case starting from the bottom edge. When it fits all the way around, press firmly round the edges to seal.
The guide is rated at a medium difficulty, which is out of step with a few iPhone battery replacement guides that are at a hard difficulty. Compared to the iPhone, the iPad is significantly more difficult to service. Even though there are few steps, it’s far easier to damage the device.
I’d rate it the hardest repair in earth!
cheongi -
I’d like to chime in an idea when assembling the glass back on. I always like to place it upside down so the glass is on a flat surface. Then press down on the edges of the metal case backing.
This will ensure that you’re not pressing unevenly on the glass when assembling which can sometimes crack it. Possibly not so much with this glass, since it seems to be a little flexible. But I’ve learned the hard way with other devices it’s a bad idea to be pressing on glass. With this method the glass is always on a flat surface and should greatly minimize a possible crack.
Hi Thomas, like above written - I used the old Tape and looked that it more or less flat on Glass and the Metal frame then I only soft pressed the glass in the housing and warmed up the “sandwich” again….
But - You are right - only soft and not unevenly…..!
Really good guide, and make sure you follow it carefully otherwise you’ll damage the device. The part I almost missed was that you should be opening the device at the camera side, and only to 90 degrees before disconnecting the power and display cables.
As noted above above, there are no instructions for the adhesive reassembly, I ended up reusing what was left there, but for the more pedantic types there is a guide to apply new adhesive to the display assembly here.
Also, while I commend iFixit for their efforts to conserve, it feels like pushing products like the “iOpener”, “Spudger” or “iFixit Opening Picks set of 6” seems wasteful. You can easily make a heating pad with some rice and a sock, you will need a guitar pick, and then use some plastic cards. For the spudger use a needle and a small flathead screw driver.
I do recommend getting a set of their tools, if you’re planning on fixing more than one thing, it’s the best way to deal with Apple’s inane attempts to thwart our attempts of fixing things. :)
Starting the removal of the screen in the middle may not be as safe as starting the removal near the top corner. Not sure what caused it (likely I inserted pick too far) but I ended up with small blemish/glue under the screen near the starting point. Thankfully, its minor and barely noticeable after the repair. The hardest part was keeping the data and power cables aligned/attached while re-attaching the plate and 4 tiny screws. But with a little patience, I was able to re-assemble it.
I found no need to clean existing adhesive residue other than just pulling out the old adhesive strips. For the most part, installing the new adhesive strips was actually pretty easy but just a bit tedious. There should be a note about how to re-apply the strips. As long as you are careful with slowly re-applying while pulling off the protective plastic and face them the right way (it would have been nice to have some instructions on this).
In the end, the repair worked went very well and a new battery!
This does look difficult and tedious. Steps showing adhesive removal and re-application would be quite helpful. My iPad mini 4 (A1538) battery is showing signs of age but I think I would wait quite a bit longer based on the riskiness of damage at various stages that I read here. Still, given the cost from Apple ($300) to repair this sucker for me I think I would eventually give it a try regardless, but maybe with the hair dryer method for adhesive softening. Battery replacement cost from Apple is close to what the entire device originally cost!
Last battery was a Nohon battery. Lasted about 18 months. Then the “won’t start up past apple logo” problem. Others have said there was a fix for this bug, but the correct fix appears to be a new battery. New adhesive strips used different adhesive which wasn’t so gummy and was partly unstuck and screen was slightly loose. Disassembled easily using suction cup (Isclack) with extreme care at lower right or avoid this area where all the cables are. Old non-oem strips easily removed. New adhesive strips were different design. Figuring out which goes where is easier lining up with the base features, but strip backing made it easier to apply to the screen. With adhesive strips and intact backing on the screen side, iPad can be assembled for testing prior to final stick down later. Much easier repair this time than with original gummy adhesive.
I bought the battery kit and the iOpener kit. Very professionally packaged and presented. The iOpener heating sausage is really slick. I followed the instructions on my iPad as I was operating on my wife’s iPad mini 4 (no pressure). The most time consuming part is cleaning up the old adhesive in the case back and the screen edges. This is not for the timid, you have to be comfortable with taking stuff apart. Using the hot sausage often made the process of opening go well. I was pleased when i plugged it in to charge, everything lit up normally. Thanks for a great kit. Peter
This is way harder than thought. I broke my LCD. I assume the original iOpener I used to repair the iPad does either not get hot enough in 30s using a 800W microwave oven or is just not sufficient in heating. I think one may get better results by just using a hot air gun. More heat = less bent on the display.
I bought the battery/repair kit; took me 2 days. Ultimately I damaged the display - cracks, delamination, backlight on but no image. Waste of time and money.
The steps in the procedure don’t indicate - in a place-specific way - just how far you have to shove those opening picks underneath the glass to cut through the adhesive. You’re warned in Step 3 to not insert the pick more than 2mm but there are places where the adhesive continues in about 1cm or more. In Step 22 you’re supposed to twist those last two picks to fully dislodge the display from the case, but nowhere near enough adhesive had actually been released and apparently that’s when I did the damage. Alcohol wasn’t useful in getting the old adhesive off; it took Goof-Off and a few hours.
I thought the iOpener was pretty clever but it proved excessively challenging to keep it at a usable temperature. It was useless on the battery removal step; had to use a heat gun on low.
I have fixed mine twice now. See my comments above. For others daring to try, recommend to study teardown photos to see exactly where the adhesive is and cables are. iSclack or similar highly recommended and suggest to start in the middle of the short side where the cables are not - like opening an iphone. Use heat and finesse rather than force to weaken adhesive. Don’t use solvents to open case - i messed my iPhone 6s by partially delaminating touchscreen.
cheongi -
Just be very careful, when trying to remove the screen. I managed to get to far inside and also did cut into the scree controller. This is just one millimeter difference before destroying your screen.
Another successful battery replacement using this guide. Thank you! IMO, the estimated "1-2 hour" completion time is overly optimistic, especially for a first-timer (mine was more on the order of 5-6 hours, thanks to old adhesive removal 😉). As mentioned many times over, be patient, and use lots of heat, rather than force (I used a combo of iOpener and heat gun). Look at replacement adhesive strips (if available), and the pictures included with the guide, to determine how deep to go with the picks. Good luck!
What is iFixit thinking here, labelling this with "medium difficulty"? It's absolutely out of step and others mentioned it already: It is extremely easy to damage the screen of the iPad during this procedure, and the instructions are doing a horrible job indicating how truly difficult the procedure is. I repaired iPhones and Macbooks with the help of iFixit before, and have never damaged anything. But now, thanks to this poor guide, I too, just like others, have damaged the screen of the iPad I worked on. Absolutely disappointing to say the very least. I usually always stray away from using those pointy opening picks. I was stupid enough to use them this time, thanks to this guide, and what did it get me...? To make this even more infuriating, is the fact that new LCD screens come WITHOUT the home button, which you have to swap out from the old device with magnetic sensor flex cable, which requires micro soldering. People complained about this years ago. This's just bad, no no, I'm mailing support about this.
I just used this guide to replace a battery and everything seems to work. It is hard though and I had to improvise putting it back together, since it is not just following the guide in reverse order. It would be useful to show the adhesive layout on the backside of the screen (like you do with the battery), so it is easier to assess how deep to push the picks in.
I followed the instructions. Cleaned the old gum. Re-assembled after checking all the connectors were in place. Plugged in to charge. Nothing. Press and hold the on button. Nothing. Does it need to charge before it will turn on?
I can even see charge flowing on the charger display.
Just need to know if this is normal before I try to take it all apart again.
Took apart, all connectors firmly in place, but no life. Could it be a duff battery?