Introduzione
Segui questa guida per sostituire la batteria PRAM in un iMac da 21.5" con schermo Retina 4K di fine 2015. La batteria PRAM si trova sul retro della scheda logica, quindi sostituirla richiede prima la rimozione della scheda logica.
Cosa ti serve
-
-
Prima di iniziare a lavorare sull'iMac, scollega il computer dall'alimentazione e tieni premuto il pulsante di alimentazione per 10 secondi per scaricare i condensatori dell'alimentatore.
-
-
-
A partire dall'angolo superiore destro dell'iMac, inserire una scheda di plastica fra il display e il telaio.
-
-
-
Mantieni lo schermo con uno mano mentre con l'altra stacchi il cavo di alimentazione dello schermo .
-
-
-
-
Rimuovi le seguenti cinque viti a croce Phillips che tengono in posizione la staffa di supporto inferiore:
-
Quattro viti da 3,2 mm
-
Una vite da 1,7 mm
-
-
-
Tira delicatamente il connettore del cavo dell'altoparlante verso il basso e rimuovilo dalla sua presa sulla scheda logica.
-
-
-
Rimuovi le seguenti viti Torx T10 che tengono ancorato il supporto del'hard drive sull'iMac:
-
Due viti da 21 mm
-
Una vite da 9 mm
-
Una vite da 27 mm
-
-
-
Usa la punta di uno spudger per spingere su un lato alla volta del connettore del cavo del tasto di accensione e scollegalo lentamente dalla sua presa.
-
-
-
Estrai delicatamente il connettore del cavo della ventola dal connettore presente sulla scheda logica.
-
-
-
Solleva l'hard drive dal lato più vicino alla scheda madre e tiralo leggermente fuori dal suo alloggio.
-
-
-
Svita la vite Torx T8 da 7,3 mm che fissa il supporto dell'unità alla scocca posteriore.
-
-
-
Rimuovi delicatamente il cavo dell'altoparlante sinistro dalla sua presa sulla scheda logica.
-
-
-
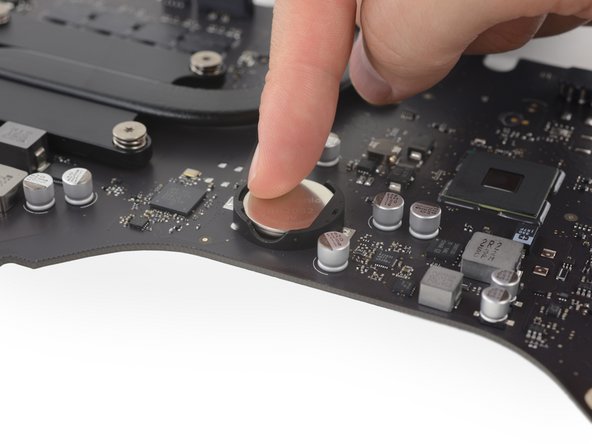
Allontana con attenzione la batteria dalle sporgenze di plastica (ciò aumenterà la pressione sul contatto a molla sull'altra estremità).
-
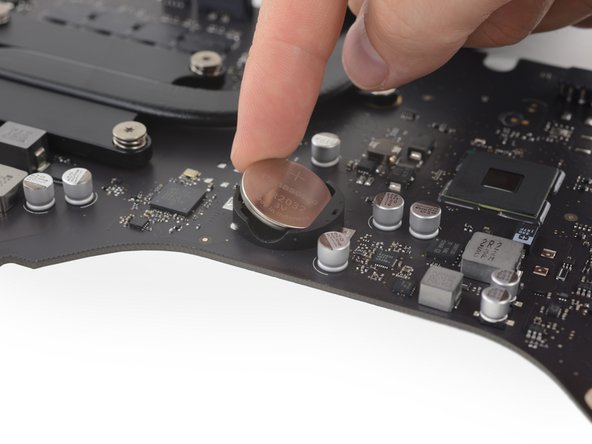
Una volta che hai liberato il bordo della batteria dalle sporgenze, inclinala finché non esce dal suo alloggiamento.
-


Per rimontare il dispositivo, segui queste istruzioni in ordine inverso.
Per rimontare il dispositivo, segui queste istruzioni in ordine inverso.
Annulla: non ho completato questa guida.
Altre 3 persone hanno completato questa guida.
Un ringraziamento speciale a questi traduttori:
100%

Sara Balestra ci sta aiutando ad aggiustare il mondo! Vuoi partecipare?
Inizia a tradurre ›

3 Commenti
Hmm. I don't see a single place in these instruction, including the parts needed list, that tells which battery is required. From one of the photos it looks like BR2032.
As I needed to replace the failing hard drive in my late 2015 21.5" iMac anyway, and the iMac is now nearly 8 years old, I figured I may as well replace the PRAM battery as well since I've got the screen off. The battery must be getting near its end of life anyway, right? And I don't want to have to open this iMac up again anytime soon. And there seems to be no way to tell what its voltage is without taking it out. So after going through this whole process and putting in a new battery (which registered 3.40 volts at installation), I measured the voltage of the old, original battery. 3.19 volts. I guess I could have waited another 8 years at this rate before replacing it! So if this helps anyone - as long as you keep your iMac plugged in, the PRAM battery in these models might last a good 16 years I guess. (I really wish that if they could not provide a way to measure the remaining life span or at least the voltage of the battery, they would have put it on the other side of the logic board!)
By the way, regarding BR2032 vs CR2032: Apple used BR2032 for the PRAM battery on these and many other iMac models, but the BR2032 is much more difficult to get hold of than the CR2032, as well as more expensive. (It's supposed to hold up better under the heat of the environment it's in.) However, I recently had to open a 2009 iMac again, two years after doing some prior work on it: beside the other work I had put in a CR2032 back then. The CR2032 I removed still had 3.14 volts after two full years in the 2009 iMac. So I don't think the CR2032 would hold up as long as a BR2032, but at that rate I suppose it would get at least 4 years of service before dropping too low.