Salta al contenuto principale

Xiaomi Redmi Note 9 Loudspeaker Replacement

Cosa ti serve

  1. Xiaomi Redmi Note 9 Loudspeaker Replacement, Eject the SIM card tray: passo 1, immagine 1 di 3 Xiaomi Redmi Note 9 Loudspeaker Replacement, Eject the SIM card tray: passo 1, immagine 2 di 3 Xiaomi Redmi Note 9 Loudspeaker Replacement, Eject the SIM card tray: passo 1, immagine 3 di 3
    • Insert a SIM card eject tool, a SIM eject bit, or a straightened paper clip into the hole on the SIM tray located at the left edge of the phone.

    • Press directly into the hole to eject the SIM card tray.

    • Remove the SIM card tray.

  2. Xiaomi Redmi Note 9 Loudspeaker Replacement, Heat the back cover: passo 2, immagine 1 di 1
    • The back cover of the Redmi Note 9 is held in place by plastic clips and adhesive. It might require some force to release the plastic clips.

    • Prepare an iOpener and apply it to the back cover for at least two minutes to loosen the adhesive underneath.

    • A hair dryer, heat gun, or hot plate may also be used, but be careful not to overheat the phone—the display and internal battery are both susceptible to heat damage.

  3. Xiaomi Redmi Note 9 Loudspeaker Replacement, Insert an opening pick: passo 3, immagine 1 di 3 Xiaomi Redmi Note 9 Loudspeaker Replacement, Insert an opening pick: passo 3, immagine 2 di 3 Xiaomi Redmi Note 9 Loudspeaker Replacement, Insert an opening pick: passo 3, immagine 3 di 3
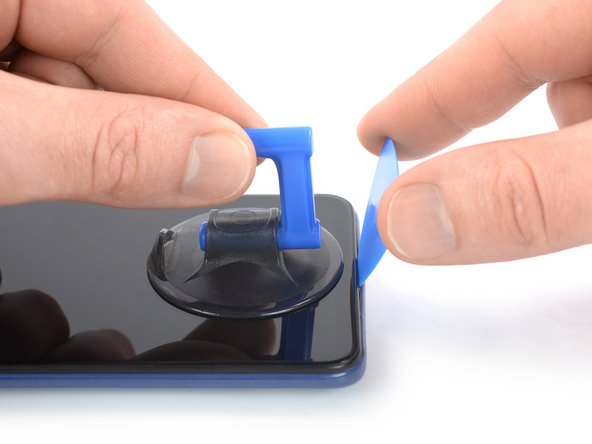
    • Secure a suction handle to the bottom edge of the screen, as close to the edge as possible.

    • If the screen is cracked, the suction handle may not stick. Try lifting it with strong tape, or superglue the suction handle in place and allow it to cure so you can proceed.

    • Lift the phone assembly with the suction handle to create a small gap between the assembly and the back cover.

    • In case you have trouble creating a gap, apply more heat to further soften the adhesive. Follow the iOpener instructions to avoid overheating.

    • Insert an opening pick in a steep angle into the gap you created. This might require some force.

    • Slide the opening pick to the bottom right corner to slice the adhesive and release the plastic clips holding the back cover in place.

  4. Xiaomi Redmi Note 9 Loudspeaker Replacement, Release the plastic clips and slice the adhesive: passo 4, immagine 1 di 2 Xiaomi Redmi Note 9 Loudspeaker Replacement, Release the plastic clips and slice the adhesive: passo 4, immagine 2 di 2
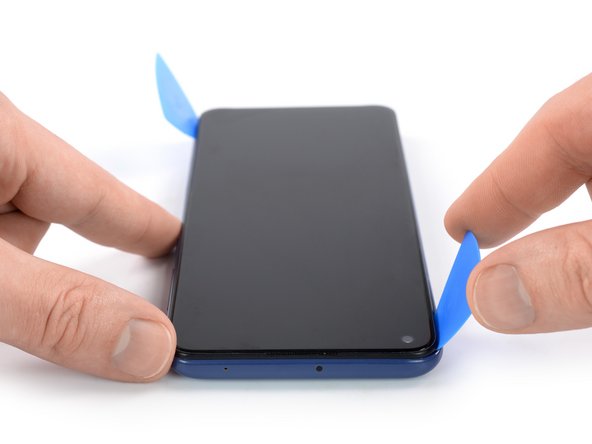
    • Insert a second opening pick in a steep angle at the bottom edge of your phone.

    • Slide the opening pick to the bottom left corner to release the plastic clips and to slice the adhesive.

    • Leave the opening picks in place to prevent the adhesive from resealing.

  5. Xiaomi Redmi Note 9 Loudspeaker Replacement, Release the plastic clips and slice the adhesive: passo 5, immagine 1 di 3 Xiaomi Redmi Note 9 Loudspeaker Replacement, Release the plastic clips and slice the adhesive: passo 5, immagine 2 di 3 Xiaomi Redmi Note 9 Loudspeaker Replacement, Release the plastic clips and slice the adhesive: passo 5, immagine 3 di 3
    • If the adhesive becomes hard to cut, it has most likely cooled down. Use your iOpener to reheat it.

    • Insert a third opening pick in a steep angle at the bottom left corner of your phone.

    • Slide the opening pick along the left edge of your phone to release the plastic clips and slice the adhesive.

    • Leave the opening pick in the top left corner to prevent the adhesive from resealing.

  6. Xiaomi Redmi Note 9 Loudspeaker Replacement: passo 6, immagine 1 di 3 Xiaomi Redmi Note 9 Loudspeaker Replacement: passo 6, immagine 2 di 3 Xiaomi Redmi Note 9 Loudspeaker Replacement: passo 6, immagine 3 di 3
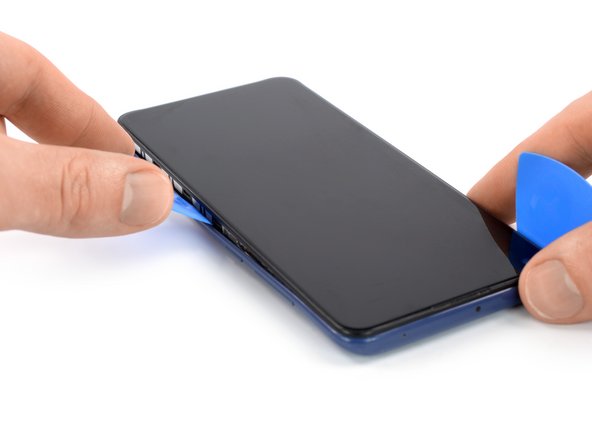
    • Insert a fourth opening pick in a steep angle at the bottom right corner of your phone.

    • Slide the opening pick along the right edge of your phone to release the plastic clips and slice the adhesive.

    • Leave the opening pick in the top right corner to prevent the adhesive from resealing.

    • Do not try to separate the phone assembly from the back cover all the way yet, the fingerprint cable is still connected to the motherboard.

  7. Xiaomi Redmi Note 9 Loudspeaker Replacement, Open the phone assembly: passo 7, immagine 1 di 3 Xiaomi Redmi Note 9 Loudspeaker Replacement, Open the phone assembly: passo 7, immagine 2 di 3 Xiaomi Redmi Note 9 Loudspeaker Replacement, Open the phone assembly: passo 7, immagine 3 di 3
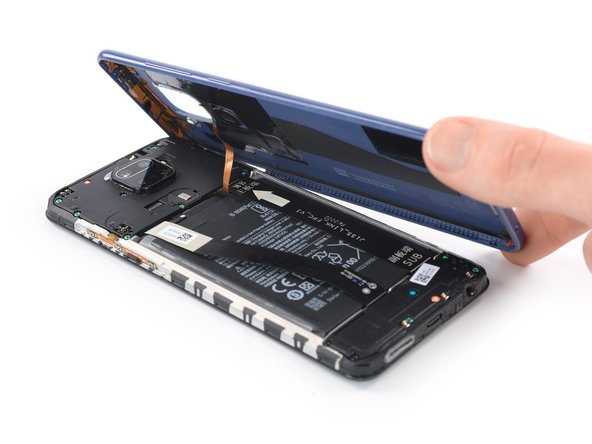
    • Flip your Redmi Note 9 over.

    • Avoid straining the fingerprint flex cable during the following procedure.

    • Carefully fold the back cover to the right side of the phone assembly like you would open a book from the back.

    • Slide the back cover underneath the phone assembly so that the phone assembly overlaps about one third of the back cover and the fingerprint cable is not strained.

  8. Xiaomi Redmi Note 9 Loudspeaker Replacement, Unfasten the motherboard cover screws: passo 8, immagine 1 di 1
    • Use a Phillips screwdriver to remove the eleven 3.9 mm-long screws securing the motherboard cover.

  9. Xiaomi Redmi Note 9 Loudspeaker Replacement, Pry up the motherboard cover: passo 9, immagine 1 di 2 Xiaomi Redmi Note 9 Loudspeaker Replacement, Pry up the motherboard cover: passo 9, immagine 2 di 2
    • Insert the tip of an opening pick underneath the bottom left edge of the motherboard cover.

    • Pry up the motherboard cover.

  10. Xiaomi Redmi Note 9 Loudspeaker Replacement, Remove the motherboard cover: passo 10, immagine 1 di 2 Xiaomi Redmi Note 9 Loudspeaker Replacement, Remove the motherboard cover: passo 10, immagine 2 di 2
    • Remove the motherboard cover.

  11. Xiaomi Redmi Note 9 Loudspeaker Replacement, Disconnect the fingerprint cable: passo 11, immagine 1 di 3 Xiaomi Redmi Note 9 Loudspeaker Replacement, Disconnect the fingerprint cable: passo 11, immagine 2 di 3 Xiaomi Redmi Note 9 Loudspeaker Replacement, Disconnect the fingerprint cable: passo 11, immagine 3 di 3
    • Use a spudger to disconnect the fingerprint cable by prying the connector straight up from its socket.

    • Separate the phone assembly from the back cover.

  12. Xiaomi Redmi Note 9 Loudspeaker Replacement, Disconnect the battery cable: passo 12, immagine 1 di 2 Xiaomi Redmi Note 9 Loudspeaker Replacement, Disconnect the battery cable: passo 12, immagine 2 di 2
    • Use a spudger to disconnect the battery cable by prying the connector straight up from its socket.

  13. Xiaomi Redmi Note 9 Loudspeaker Replacement, Unfasten the loudspeaker screws: passo 13, immagine 1 di 1
    • Use a Phillips screwdriver to remove the seven 3.9 mm-long screws securing the loudspeaker assembly.

  14. Xiaomi Redmi Note 9 Loudspeaker Replacement, Remove the loudspeaker assembly: passo 14, immagine 1 di 2 Xiaomi Redmi Note 9 Loudspeaker Replacement, Remove the loudspeaker assembly: passo 14, immagine 2 di 2
    • Remove the loudspeaker assembly.

    • During reassembly apply new adhesive where it's necessary after cleaning the relevant areas with isopropyl alcohol (>90%).

Conclusione

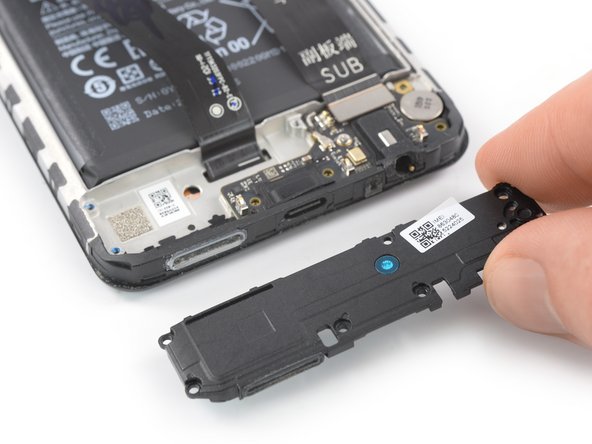
If possible, turn on your device and test your repair before installing new adhesive and resealing.

Compare your new replacement part to the original part—you may need to transfer remaining components or remove adhesive backings from the new part before installing.

To reassemble your device, follow the above steps in reverse order.

Take your e-waste to an R2 or e-Stewards certified recycler.

Repair didn’t go as planned? Try some basic troubleshooting, or ask our Answers community for help.

Altre 4 persone hanno completato questa guida.

Dominik Schnabelrauch

Membro da: 11/23/16

204.358 Reputazione

682 Guide realizzate

Team

iFixit Membro di iFixit

Staff

136 Membri

17.295 Guide realizzate

4 Commenti

Yesterday I completed replacing the loudspeaker for my note 9 using the instructions in this guide.

Although I had to reheat the i opener a few times I found it very useful to use a thermometer to check on the build up of heat in the phone.

Once I got the back off it was just a matter of following the instructions step by step.

I think the instructions are excellent!

Thank you!

ian - Replica

Hello all, I Just replaced the loudspeaker and It worked for a few times. It works intermittently. It seems that something it's not connected firmly, but I double checked all connections and they seem ok. What else can I check?

TIA

Tony

Sweetman - Replica

Hello all, I just replaced the loudspeaker and it worked for a few times. It works intermittently. It seems that something it's not connected firmly, but I double checked all connections and they seem ok. What else can I check? TIA Tony

Sweetman - Replica

Hello all, I Just replaced the loudspeaker and It worked for a few times. It works intermittently. It seems that something it's not connected firmly, but I double checked all connections and they seem ok. What else can I check?

TIA

Tony

Sweetman - Replica

Aggiungi Commento

Visualizza Statistiche:

Ultime 24 Ore: 3

Ultimi 7 Giorni: 27

Ultimi 30 Giorni: 125

Tutti i Tempi: 1,505