Salta al contenuto principale
Unisciti alla Community delle riparazioni - Crea un account

Xbox 360 Wireless Controller Buttons Replacement

Cosa ti serve

  1. Xbox 360 Wireless Controller Buttons Replacement, Battery: passo 1, immagine 1 di 2 Xbox 360 Wireless Controller Buttons Replacement, Battery: passo 1, immagine 2 di 2
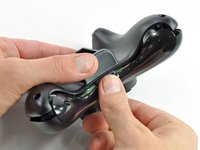
    • Depress the battery release button on the top of the controller.

    • Remove the battery holder from the controller.

    • The standard option for Xbox 360 Wireless Controllers Battery Packs is AA batteries. A rechargeable battery is also available, but both battery options are removed from the controller in the same way.

    Chiedi a FixBot
  2. Xbox 360 Wireless Controller Buttons Replacement, Rear Case: passo 2, immagine 1 di 1
    Strumento utilizzato in questo passaggio:
    Tweezers
    $4.99
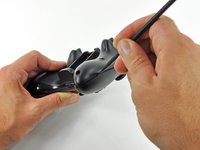
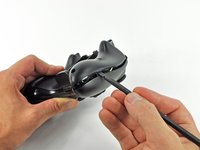
    • Use a pair of tweezers to peel the barcode sticker from the battery compartment.

    Chiedi a FixBot
  3. Xbox 360 Wireless Controller Buttons Replacement: passo 3, immagine 1 di 1
    • Remove the seven 9.3 mm T8 Security Torx screws securing the rear case to the front case.

    Chiedi a FixBot
  4. Xbox 360 Wireless Controller Buttons Replacement: passo 4, immagine 1 di 2 Xbox 360 Wireless Controller Buttons Replacement: passo 4, immagine 2 di 2
    Strumento utilizzato in questo passaggio:
    Spudger
    $2.99
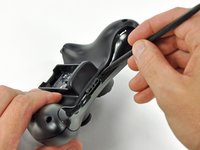
    • Insert a Spudger between the front and rear cases along the left edge of the controller.

    • Rotate the spudger toward the front of the controller, prying the two cases apart.

    Chiedi a FixBot
  5. Xbox 360 Wireless Controller Buttons Replacement: passo 5, immagine 1 di 2 Xbox 360 Wireless Controller Buttons Replacement: passo 5, immagine 2 di 2
    • Insert a spudger between the front and rear cases, near the headphone jack.

    • Rotate the spudger toward the front of the controller to pry the two cases apart.

    Chiedi a FixBot
  6. Xbox 360 Wireless Controller Buttons Replacement: passo 6, immagine 1 di 2 Xbox 360 Wireless Controller Buttons Replacement: passo 6, immagine 2 di 2
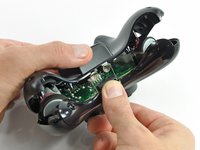
    • Grasp the controller by the battery compartment and the headphone jack.

    • Lift the battery compartment away from the headphone jack, separating the rear case from the front case and logic board.

    • The battery contact springs are held in place by slots in the battery housing in the rear case. Be sure to realign them properly during reassembly.

    Chiedi a FixBot
  7. Xbox 360 Wireless Controller Buttons Replacement, Vibration Motors: passo 7, immagine 1 di 2 Xbox 360 Wireless Controller Buttons Replacement, Vibration Motors: passo 7, immagine 2 di 2
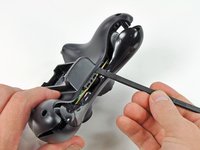
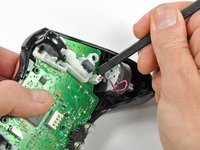
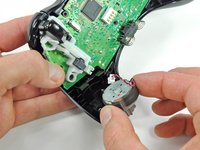
    • Use the flat end of a spudger to remove the vibration motor cable, moving it upward from its socket on the logic board.

    • Lift the vibration motor out of the front case.

    Chiedi a FixBot
  8. Xbox 360 Wireless Controller Buttons Replacement: passo 8, immagine 1 di 2 Xbox 360 Wireless Controller Buttons Replacement: passo 8, immagine 2 di 2
    • Remove the vibration motor from the other side of the controller using the same method previously described.

    • The left motor has significantly more counterweight than the right motor.

    Chiedi a FixBot
  9. Xbox 360 Wireless Controller Buttons Replacement, Logic Board: passo 9, immagine 1 di 2 Xbox 360 Wireless Controller Buttons Replacement, Logic Board: passo 9, immagine 2 di 2
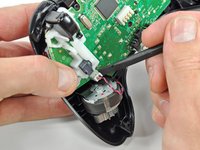
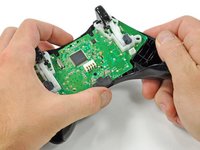
    • Lifting from the headphone jack and power plug, remove the logic board from the front case.

    Chiedi a FixBot
  10. Xbox 360 Wireless Controller Buttons Replacement, Buttons: passo 10, immagine 1 di 1
    • Remove the rubber pad from the back of the input buttons.

    Chiedi a FixBot
  11. Xbox 360 Wireless Controller Buttons Replacement: passo 11, immagine 1 di 2 Xbox 360 Wireless Controller Buttons Replacement: passo 11, immagine 2 di 2
    Strumento utilizzato in questo passaggio:
    Tweezers
    $4.99
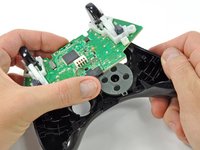
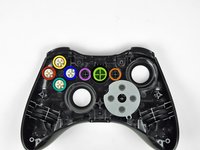
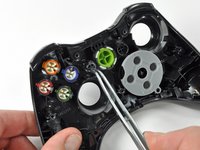
    • Using a pair of tweezers, remove the buttons from the front case.

    • A Button

    • B Button

    • X Button

    • Y Button

    • Start Button

    • Select Button

    • Guide Button

    Chiedi a FixBot
  12. Xbox 360 Wireless Controller Buttons Replacement: passo 12, immagine 1 di 1
    • Using a pair of tweezers, lift the home button's LED ring out of the front case of the controller.

    • All of the buttons have tabs that correspond to slots in the front case. This prevents buttons from being placed in the incorrect position or orientation.

    Chiedi a FixBot
Conclusione

To reassemble your device, follow these instructions in reverse order.

Altre 68 persone hanno completato questa guida.

Brett Hartt

Membro da: 04/12/10

132.114 Reputazione

144 guide realizzate

Team

iFixit Membro di iFixit

Staff

122 Membri

25.805 guide realizzate

3Commenti sulla guida

Hello I have had an Xbox for about 1-2years and everything has been working fine until the A button on one of my controllers stopped working I don't think it has gunk or anything because I can press it down and it comes back up just that when I press it in screen nothing happens but the other buttons work fine

Saul Escalon - Rispondi Condividi

Thank you for the teardown! My cat has just vomitted on my joystick…. I could have cleaned it now! I appreciate it , thanks…

Nathan St-Onge - Rispondi Condividi

Has anyone ever replaced the spring contacts in the logic board???

BJ Robbins - Rispondi Condividi

Aggiungi Commento

Visualizza statistiche:

Ultime 24 ore: 5

Ultimi 7 giorni: 56

Ultimi 30 giorni: 354

Tutti i Tempi: 78,297