Introduzione
The Withings Smart Body Analyzer WS-50 is a revolutionary scale that can measure one’s weight, body fat, heart rate and air quality. On top of all that, you connect easily connect it to your phone, to keep track of your fitness goals and make sure that you are achieving your desired results.
This particular guide will focus on the removal of the Withings Smart Body Analyzer WS-50's LCD screen. The LCD screen plays a crucial role in the function of this scale. If the screen is malfunctioning you would have no way of knowing any of the scales readings or if it was even on! Knowing this we have compiled an easy to follow guide to get you through this daunting task.
Cosa ti serve
-
-
-
Push the battery door
-
Open the compartment
-
Gently remove the batteries from their designated positions
-
Place them aside, away from the reach of children
 Chiedi a FixBot
-
-
-
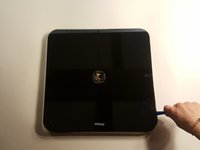
With caution, insert the plastic opening tools in between the disk and the glass face
-
It's a tight fit, so don't be afraid to apply a little bit of force
-
As soon as you hear a faint crackling sound, that means that the adhesive is budging out of place
-
Gently rotate the plastic spudger around the disk to get around the adhesive
-
Gently lift the metal disk
-
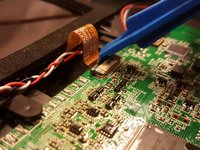
After the disk has been lifted, a wire and a small copper plate can be seen attached to the back of the disk
-
Carefully remove the wire and plate by peeling back the adhesive sticker that has been positioned around them
-
-
-
-
After all the above steps have been completed, proceed by removing the glass face
-
Carefully insert a plasic spudger in the small gap that exist in between the glass face and the plastic back
-
Run the plastic spudger all around the scale to increase the gap size
-
Place a plastic spudger in every corner, since the feet of the scale are also attached to the glass face using adhesive
-
Carefully insert the metal spudger underneath the adhesive that is located underneath the feet of the scale, and gently keep pushing until the adhesive is out of place
-
Repeat the above steps four times
-
After all the adhesives has been removed, gently lift the glass face off
-
-
-
-
-
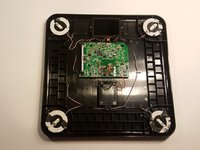
After the tempered glass panel has been removed, the screen can be accessed and is connected by a ribbon cable via the circuit board.
-
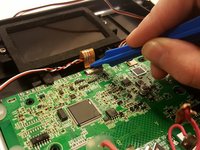
Gently remove the wire from the circuit board by gently pushing downward and away from the screen, on the metal tab that connects the wire to the circuit board.
-
-
-
Using the Phillips screwdriver head, unscrew the two screws that hold the screen in place.
-
-
-
The screen should be free from all constraints and all that is left is to carefully lift and remove the screen.
-
-






To reassemble your device, follow these instructions in reverse order.
Annulla: non ho completato questa guida.
Altre 2 persone hanno completato questa guida.

Team

UMass Dartmouth, Team S4-G1, Julie Spring 2017 Membro di UMass Dartmouth, Team S4-G1, Julie Spring 2017
UMASSD-JULIE-S17S4G1
4 Membri
5 guide realizzate
