Introduzione
Rimuovi il pannello frontale per accedere ai componenti interni del tuo iPod Touch.
Cosa ti serve
Panoramica Video
-
-
L'immagine a sinistra (pannello frontale già rimosso) mostra la posizione dei ganci in metallo (in rosso) che fanno presa sulla cornice in plastica. Nei prossimi passi, cerca di fare leva sul pannello frontale dagli spazi tra i ganci.
-
-
-
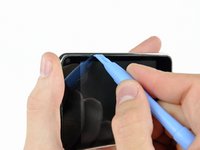
Infila delicatamente uno strumento di apertura per iPod tra il pannello frontale di vetro e la plastica che lo circonda vicino ai tasti del volume.
-
Ruota lo strumento lontano dall'iPod Touch per fare leva sul pannello di vetro.
This is a poor place to start. You risk damaging the volume control. It makes more sense to start at the bottom, at the Home button, where there is plenty of room and nothing to damage.
-
-
-
-
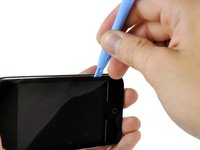
Continua a fare leva sul bordo sinistro finché anche quelli superiore ed inferiore iniziano a separarsi dall'iPod Touch.
-
Dopo che i bordi superiore ed inferiore si sono sollevati leggermente dall'iPod Touch, usa lo strumento di apertura per assicurarti che la plastica che li circonda si sia staccata dai ganci all'interno dell'iPod.
-
-
-
Usa la parte piatta di uno spudger (o uno strumento di apertura) per scollegare molto attentamente il connettore del cavo del touch screen dalla scheda madre superiore.
I had a real challenge getting the ribbon cable connected; after 20 minutes of trying while carefully balancing the front panel and trying not to rip the ribbon, I grabbed the old screen, ripped off the connector and practiced getting it on.
I had another challenge of the connector staying on...I had noticed a little piece of rubber had come off when I took the old screen off. That piece of rubber was EXACTLY the same size as the connector; I'd guess it is meant to hold the connector in place when the panel is put back on...So, I put it on top of the connector and closed it up..
Perfect!
Cheers, Rob
This was where I messed up, the adhesive on the digitizer was weak and when I tried to remove the original the bracket stayed in place, I figured that as I was installing the replacement and as I tried to put it into place and it wouldn't go I apparently jerked and broke the ribbon cable on the replacement there went my money now I have a faceless unusable iPod until I can order another, I did replace the LCD with little trouble though, not a completely failed repair.
-


Per rimontare il tuo dispositivo, segui le istruzioni in ordine inverso.
Per rimontare il tuo dispositivo, segui le istruzioni in ordine inverso.
Annulla: non ho completato questa guida.
Altre 97 persone hanno completato questa guida.
Un ringraziamento speciale a questi traduttori:
100%

Questi traduttori ci stanno aiutando ad aggiustare il mondo! Vuoi partecipare?
Inizia a tradurre ›

6 Commenti
When prying up - make sure that you lift the black plastic frame. I got trouble because on side I managed to lift the glass of the plastic frame on one side, and lifted the plastic frame out of the clips on the other sides, making it very hard to get the panel out. When I at last succeeded it was because the plastic frame broke in the lower right corner – when I had lifted the panel off the right side of the plastic frame was still attached (it needed to break at the top too before I could lift of the panel completely).
will i because to put the panel back on easily?
Patience and a can of compressed air are mandatory. The inside of my iPod Touch was pretty dusty after two years in my pocket. Before putting on the new digitizer, everything needs to be clean.
Also, I used my spudger to pry half the broken frame out of the left gutter (see Michael above). Doing that without damaging the screen was the hardest part.
I'm getting ready to do this and have the old screen partially off to let things dry out. I am, however, unclear on what to pry on to release the ribbon. From past experience with other iPod products, I'm thinking it is a small clamp that needs to be pried up. Is that the case and, if so, is it located where the picture indicates? I think the clamp is under the small grey plastic cover.
Be careful not to put the replacement panel back on too tightly! Gently snap it into place when you’re ready to finish the job. If you push too hard on the panel, the Home button ends up hitting the internals and will NOT work.
Do be gentle when snapping your replacement front panel back on your iPod. There is potential for the Home button to be “squished” up against the internals and thus unable to be pressed in. If this happens, you must pry the panel up enough to let the Home button clear all the parts behind it and leave room to work.
Matt Rausch - Replica