Introduzione
Questa guida illustra la procedura di apertura e di sostituzione della fotocamera.
Cosa ti serve
-
-
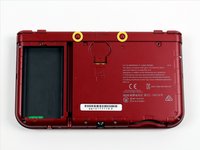
Disponi la 3DS al contrario. Rimuovi eventuali schede di gioco, cuffie, cavi di ricarica, stilo e qualsiasi altra cosa potrebbe essere connessa al dispositivo.
-
-
-
Con un cacciavite JIS #00, rimuovi le sei viti da 6 mm intorno ai bordi della cover secondaria.
-
-
-
-
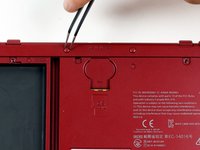
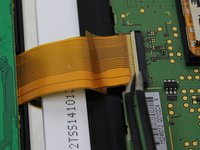
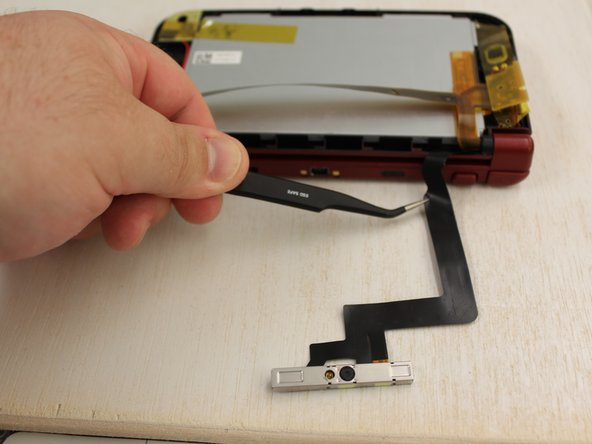
Con una pinzetta, solleva il piccolo sportello di chiusura a cerniera per sbloccare il connettore ZIF che fissa il cavo a nastro del Circle Pad.
-
Fai scorrere il cavo a nastro fuori dal connettore ZIF.
-
-
-
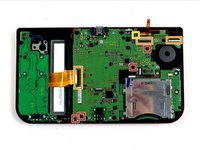
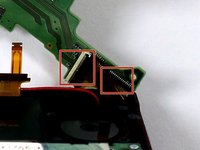
Con delle pinzette, estrai delicatamente i quattro cavi a nastro evidenziati dai loro connettori ZIF lungo i lati della scheda madre.
-
Tre dei connettori dei cavi a nastro sono dotati di alette di bloccaggio in plastica che coprono il nastro per evitare che scivoli. Usa le pinzette per sollevarle prima di rimuovere il cavo a nastro.
-
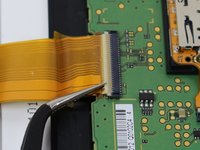
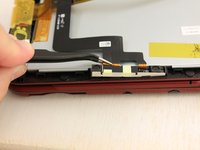
Anche questo connettore a nastro potrebbe avere un'aletta di bloccaggio in plastica, ma è diversa dalle altre ed è simile a quella usata per il Circle Pad. Solleva delicatamente l'aletta sul lato opposto al cavo a nastro per rimuovere il cavo.
-
-
-
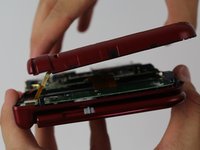
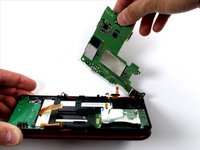
Ruotare con attenzione la scheda madre di 90 gradi verso le cerniere per scoprire altri due connettori ZIF sul lato inferiore della scheda madre.
-
Entrambi sono dotati di fermi che devono essere ribaltati verso l'alto. La chiusura sinistra, più lunga, è nera; quella destra, più corta, è bianca. Sollevare le linguette, estrarre i cavi a nastro e rimuovere la scheda madre.
-
-
-
Utilizzando una testa piatta da 1.5, rimuovi i quattro adesivi rossi di gomma che si trovano all'interno della copertura.
-
Al di sotto della gomma c'è un adesivo d'argento.
-
Usando una punta PH00, rimuovi le viti.
-
-
-
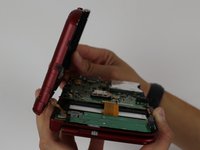
La fotocamera dovrebbe essere libera, basta sollevarla con cautela
-
Il cavo ad essa collegato dovrebbe essere facile da rimuovere dalla metà inferiore del DS.
-


Per riassemblare il dispositivo, seguire le istruzioni in ordine inverso.
Per riassemblare il dispositivo, seguire le istruzioni in ordine inverso.
Annulla: non ho completato questa guida.
Un'altra persona ha completato questa guida.
Un ringraziamento speciale a questi traduttori:
100%


Questi traduttori ci stanno aiutando ad aggiustare il mondo! Vuoi partecipare?
Inizia a tradurre ›

Team

iFixit, Team 1-1, Weber Winter 2016 Membro di iFixit, Team 1-1, Weber Winter 2016
FIX-WEBER-W16S1G1
4 Membri
37 Guide realizzate
6 Commenti
This doesn't actually show how to get the new camera in, I managed to pull the cable of the old one out but I have no idea how to get the new one through the hinge cover wrapping surround the wires
In some youtube video I saw that guy rolled new camera ribbon cable and got it through the hinge cover.
A whole bunch of steps missing the end. First you have to release the hinge: Remove the circuit board that has the arrow keys (4 screws), remove two plastic pieces immediately above (one black square, when removed a transparent thin piece is visible.
Open hinge to near 180. Using probe or bent tweezers or stiff, thin item, push the hinge pin towards the middle through the narrow opening exposed when the plastic pieces were removed. When it touches the display it's far enough, you may have to slightly flex the hinge to release the pin.
You can now release the other side, with the flex cables going through it and the antenna cable. Feed the 3 flex cables into the slot in the plastic as you release the hinge; once it's clear you can pull them through.
Curl the camera cable (it was on top, and attached on the upper side of the corner of the mainboard) and pull it through the rung and hollow ring.
continues...
"missing at the end" :-)
jesup -
Now reverse with the new cable - curl it gently to get it into the hinge and through the ring, help pull through with tweezers. Now you can start reversing. Note that the hinge pin needs the screen to be open near 180 to slide back into place. Also be careful when reattaching ribbon cables - the display cable (bottom cable of the 3 in the hinge, the longest one) is easy to put in upside down. Take pictures when disassembling. (contacts for this one go down)