Questa traduzione potrebbe non riflettere gli aggiornamenti più recenti dalla guida originale. Aiuta ad aggiornare la traduzione o visualizza la guida d'origine.
Introduzione
Usa questa guida per sostituire il gruppo display dello Huawei P9.
Prima di smontare il tuo telefono, scarica la batteria sotto il 25%. La batteria può prendere fuoco e/o esplodere se forata inavvertitamente, ma le possibilità che questo succeda sono molto più basse se è stata scaricata in precedenza.
Cosa ti serve
-
-
Per prima cosa, spegni il telefono e rimuovi il vassoio della scheda SIM.
-
Svita le due viti Pentalobe P2 posizionate sul fondo vicino alla porta USB-C.
-
-
-
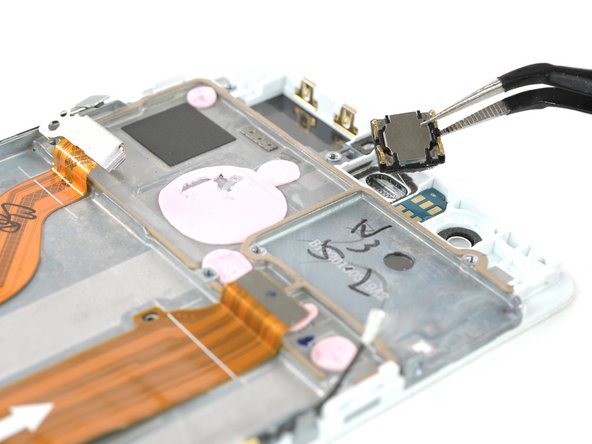
Scollega il sensore delle impronte digitali utilizzando uno spudger.
-
-
-
Scollega il cavo dell'antenna.
-
Rimuovi lo sticker posizionato sulla testa della vite.
-
-
-
-
La batteria è tenuta in posizione da tre pezzi di adesivo, una linguetta di estrazione rimovibile in centro e dal lato del vassoio della scheda SIM. Un terzo pezzo di adesivo sul lato del pulsante è privo di una linguetta di estrazione
-
Tira le strisce adesive con un movimento lento e costante per liberare la batteria.
-
Solleva lentamente la batteria verso il lato del pulsante per liberarla dal pezzo di adesivo nascosto che è rimasto.
-
-
-
Rimuovi dalla scheda madre le altre 5 viti a croce Phillips #00.
-
Stacca il cavo flessibile della scheda madre e anche il cavo di accensione e dei pulsanti del volume.
-
-
-
Quando la colla si è ammorbidita, inserisci uno spudger nel telaio centrale e spingi via il display dal telaio stesso.
-
Prendi una scheda di plastica o due plettri di apertura sotto la cornice del display nella parte superiore, tra lo schermo e il telaio. Questo impedirà che la colla possa aderire di nuovo.
-
-
-
Inserisci un plettro di apertura ad una profondità di circa 1,5 mm e fallo scorrere lungo il lato per separare il display dal telaio.
-
Potresti incontrare una maggiore resistenza nella parte terminale inferiore dell'LCD.
-
A questo punto fermati per il tempo necessario a riscaldare di nuovo questa parte e ammorbidire la colla.
-


Per rimontare il tuo dispositivo, segui queste istruzioni in ordine inverso.
Per rimontare il tuo dispositivo, segui queste istruzioni in ordine inverso.
Annulla: non ho completato questa guida.
Altre 46 persone hanno completato questa guida.
Un ringraziamento speciale a questi traduttori:
91%

albertob ci sta aiutando ad aggiustare il mondo! Vuoi partecipare?
Inizia a tradurre ›


14 Commenti
While the guide shows pictures along the process it doesn't really give the whole picture.
Just one example: as a repair guide, you could easily expect the display to be cracked and you can no longer use a suction cup to open it up.
A bigger issue is that the guide doesn't show steps up to the replacement part listed.
An incomplete guide while still providing enough information to help someone with experience in repairs.
ifixit sent me screen and digitizer without the metal frame. is there a way to remove the metal frame and add it to the replacement screen? does ifixit sell screen and digitizer with the metal frame?
you guys are killing me... first you sell the display without the frame even though your instructions clearly show the frame and now it is exactly the same story with a middle frame screen... why it is not part of your display package since it is necessary for the replacement and once again showed in instructional video?
Hello David, I am very sorry for the confusion. The guide was not congruent with the spare part in the shop. Having a display assembly with the frame already attached would be more convenient and an easier repair. Though the display without the frame is a bit cheaper but makes the guide more complex (hence the rating "difficult").
What instructional video do you mean? Is it for another device?
Please sir let me know if I replace the only screen is it not effect to battery. Because someone told me if I have replace screen it should need whole cover with battery . Please tell me is it true or not