Introduzione
No, Mario, vai là! Il touchscreen non risponde correttamente? Potresti aver bisogno di uno nuovo.
Cosa ti serve
-
Attrezzo utilizzato in questo passaggio:Phillips #00 Screwdriver$5.49
-
Usa un cacciavite Phillips PH00 per allentare le quattro viti lungo la parte superiore della cover posteriore.
-
-
-
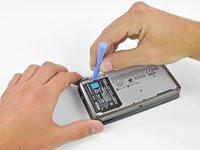
Infila uno strumento di apertura in plastica nella fessura nella scocca inferiore sopra la batteria.
-
Fai leva con lo strumento di apertura in plastica per sollevare la batteria.
-
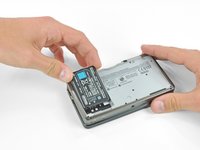
Afferra il bordo superiore della batteria e sollevalo dalla scocca inferiore.
-
-
-
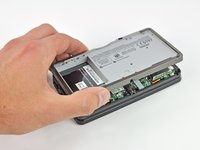
Usa un cacciavite JIS #00 per rimuovere le nove viti nere da 6,3 mm dal case inferiore.
-
Usa un cacciavite JIS #00 per rimuovere la vite argentata da 2,4 mm sopra lo slot della cartuccia di gioco.
-
-
-
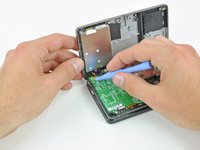
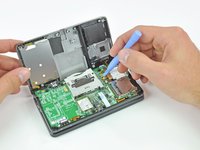
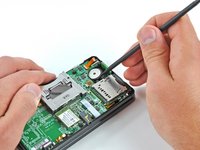
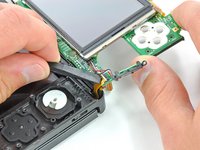
Svita le due viti a croce Phillips da 7,7 mm che fissano il retro della levetta analogica alla scheda madre.
-
-
-
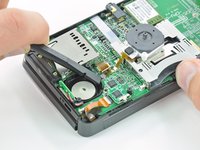
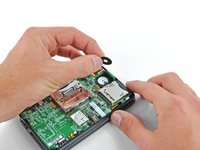
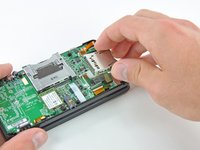
Svita le due viti a croce Phillips da 4,5 mm che fissano la scheda del lettore SD alla scheda madre.
-
-
-
-
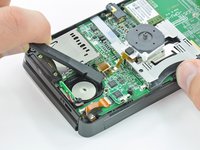
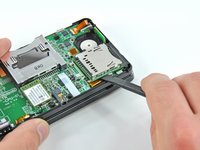
Infila la parte piatta di uno spudger tra la scheda del lettore SD e la scheda madre.
-
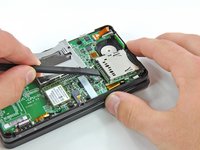
Solleva lentamente per allentare la scheda SD dallo schermo RF sotto di essa. Se sollevi troppo rapidamente, potresti strappare lo schermo o rompere i suoi punti di saldatura.
-
Passa lo spudger lungo i lati della scheda SD per liberarla dall'adesivo che la tiene in posizione.
-
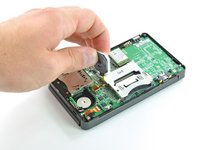
Una volta liberata, solleva la scheda del lettore SD dalla scheda madre.
-
-
-
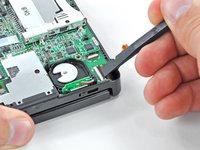
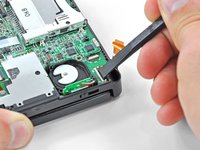
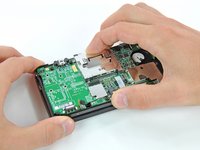
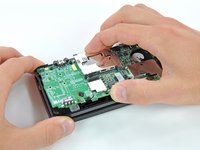
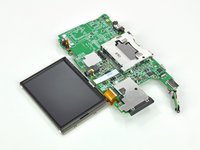
Infila la parte piatta di uno spudger sotto un angolo della scheda WiFi e solleva la scheda dalla scheda madre.
-
-
Attrezzo utilizzato in questo passaggio:Tweezers$4.99
-
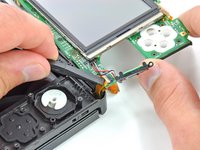
Afferra il cavo a nastro del microfono con un paio di pinzette vicno al microfono stesso.
-
Tira il microfono verso l'alto per sfilarlo dalla scocca superiore.
-
-
-
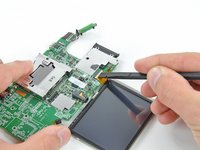
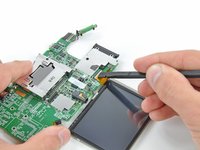
Usa la punta di uno spudger o le dita per staccare il nastro adesivo bianco che copre il connettore del cavo a nastro dello schermo touch.
-
-
-
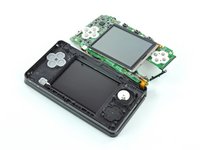
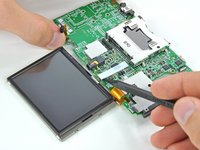
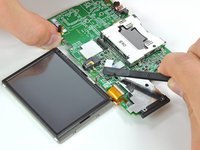
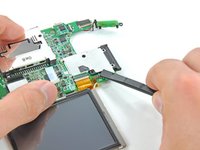
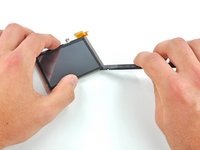
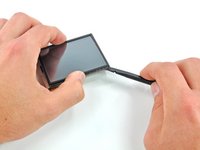
Partendo dall'angolo inferiore destro, inserisci l'estremità piatta di uno spudger tra il touchscreen e il frame LCD e solleva delicatamente il touchscreen dall’LCD.
-
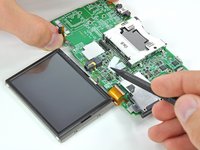
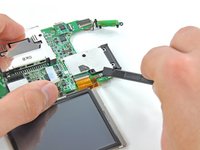
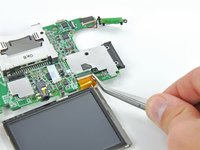
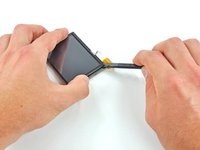
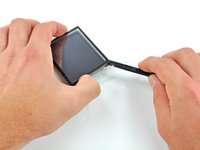
Inserisci lo spudger nell'angolo superiore destro tra i due pezzi e solleva delicatamente il touchscreen dal frame LCD.
-


Per rimontare il tuo dispositivo, segui queste istruzioni in ordine inverso.
Per rimontare il tuo dispositivo, segui queste istruzioni in ordine inverso.
Annulla: non ho completato questa guida.
Altre 38 persone hanno completato questa guida.
Un ringraziamento speciale a questi traduttori:
100%

ToToMalux ci sta aiutando ad aggiustare il mondo! Vuoi partecipare?
Inizia a tradurre ›

17 Commenti
I had no problem with the screws. A while ago I invested in a multi bit precision screwdriver. If you are going to be taking apart electronics this is worth the $20-$30 investment in the long run. If you strip a screw then you have the wrong bit, stop what your doing and wait until you can get the right tool.
This guide could have at least some tips on putting the 3ds back together. It is a true test of your patience. I got mine back together with lots of swearing and having to remove the motherboard several times. It could have been mentioned to keep in eye on your volume and wifi switch position. because I got mine back together and the volume is stuck on full blast and the wifi switch is stuck on. I am going to wait to strip it down again because I have to replace a shoulder button soon anyway.
Also removing the frame on the touch screen was not mentioned and it is really easy to break because it is taped down onto the touch screen.
Overall an excellent guide. Thanks to the author!
we're having trouble trying to put the lcd board's small ribbon cable back into the motherboard. if anyone could help we would be very grateful. thank you
all right, we got that, but now we're having trouble with redoing step 18--it's impossible to put the very short ribbon cable under the flap. any suggestions?
Fantastic guide and pictures. Just finished replacing the touch screen in my daughter's 3DS. I had to take the unit apart again and re seat the top screen connector but otherwise no problems.
Okay now does this fix the screen entirely because my friend can't use his screen anymore it is just black.