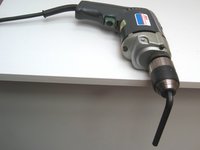
Introduzione
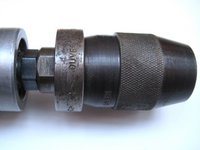
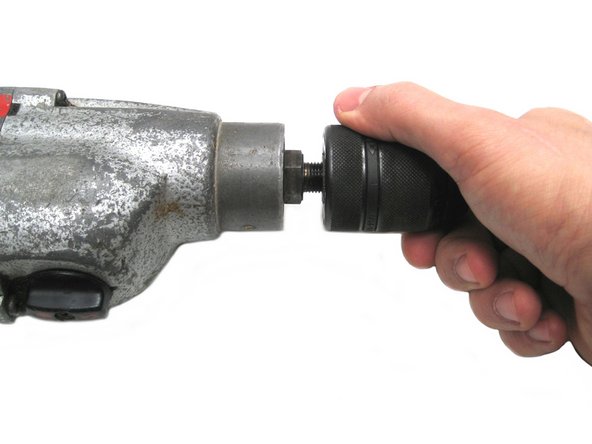
Il mandrino di un trapano è spesso la prima parte a usurarsi o rompersi. Fortunatamente, sostituirlo è un processo abbastanza semplice che di solito non richiede di smontare il trapano.
Anche se l'albero o il riduttore del tuo trapano necessitano di sostituzione, il che richiede smontaggio, è meglio rimuovere il mandrino prima di smontare il corpo.
Questa guida dovrebbe aiutarti a sostituire il mandrino su quasi tutti i trapani a filo o cordless, poiché i mandrini sono quasi sempre fissati all'albero tramite una filettatura. La dimensione della filettatura più comune è 1/2" x 20 tpi UNF, ma i trapani più piccoli possono avere una filettatura di 3/8" o anche più piccola.
In alcuni rari casi, come nei trapani angolari, nei modelli molto vecchi o nelle macchine grandi, il mandrino può essere montato su un gambo conico o può avere un attacco proprietario che richiede lo smontaggio del corpo. In questi casi, questa guida non è applicabile. In caso di dubbi, fai riferimento alla documentazione tecnica per la tua marca e modello.
Cosa ti serve
-
-
L'ultima cosa che vuoi è che il trapano inizi a far girare una chiave a 3000 RPM nel caso tu prema accidentalmente il grilletto!
-
-
-
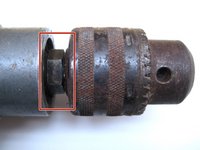
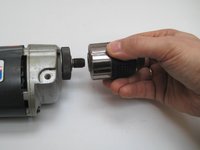
Apri completamente le ganasce e cerca una vite di ritenzione sul fondo del mandrino. Se è presente una vite, dovrai rimuoverla prima di poter svitare il mandrino.
-
Chiudi le ganasce fino a farle toccare appena il cacciavite può aiutare a mantenerlo centrato (specialmente su viti a testa piatta) e perpendicolare.
-
-
-
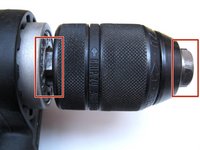
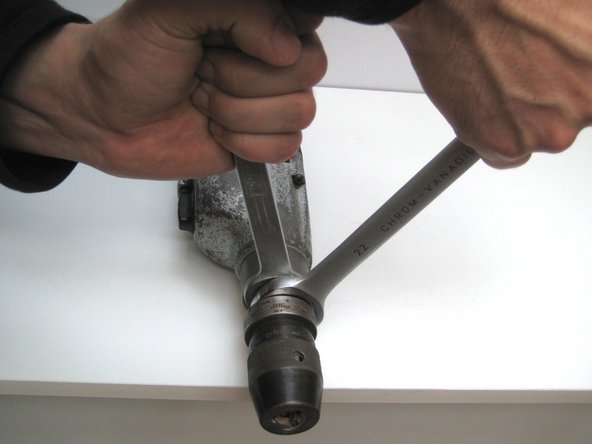
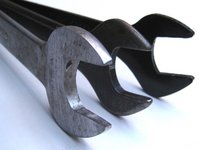
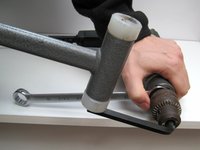
A seconda della marca e del modello specifico del tuo trapano e mandrino, potrebbe essere possibile afferrare uno o entrambi con una chiave a bocca aperta standard.
-
A seconda delle parti su cui puoi adattare una chiave, utilizzerai il metodo della Chiave Doppia, della Chiave Singola o il Metodo Senza Chiave.
-
Utilizza il metodo della chiave doppia ogni volta che è possibile, poiché è più controllato e ti consente di applicare una forza più controllata.
-
-
-
Se sia il mandrino che l'albero hanno un dispositivo che consente l'uso di una chiave, è la tua giornata fortunata!
-
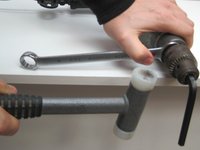
In alcuni casi, potresti dover usare una chiave sottile (o limarne una normale) poiché potrebbe non esserci spazio sufficiente per una chiave di dimensioni standard.
-
A differenza della vite di fermo, il mandrino è fissato con una filettatura standard destrorsa. Giralo in senso antiorario per rimuoverlo.
-
Con l'azione opposta di due chiavi, anche i mandrini più ostinati dovrebbero allentarsi.
-
-
-
-
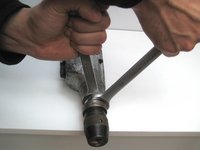
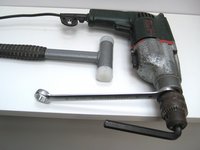
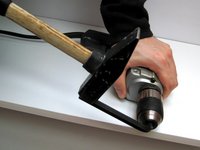
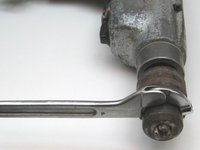
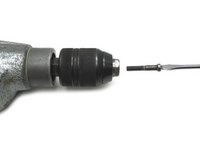
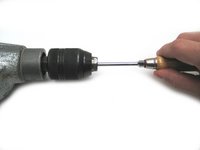
Se il mandrino non è predisposto per una chiave, il modo più semplice per girarlo con forza è utilizzare una chiave a brugola bloccata nelle ganasce del mandrino dal lato corto.
-
Se è possibile montare una chiave sul mandrino, appoggia il trapano in piano sul bordo di un banco da lavoro o di un tavolo robusto, con la chiave che poggia sul tavolo, il mandrino sporgente dal bordo e la chiave a brugola leggermente inclinata verso l'alto rispetto all'orizzontale.
-
Puoi anche provare, se riesci, a liberare il mandrino spingendo verso il basso la chiave a brugola a mano, anche se raramente funzionerà.
-
Se la forza manuale non è sufficiente, tieni fermo il trapano e dai un colpo deciso all'estremità della chiave a brugola, preferibilmente con un martello di legno o plastica. Un colpo secco dovrebbe allentare immediatamente il mandrino.
-
-
-
Anche se il mandrino non può essere afferrato in alcun modo, il metodo della chiave a brugola descritto nel passo precedente funzionerà solitamente su entrambi i modelli a filo e senza filo.
-
Molti trapani senza filo hanno un bloccaggio automatico del mandrino.
-
Nei trapani a rete, l'inerzia del motore e degli ingranaggi offre solitamente una resistenza sufficiente per liberare il mandrino dalla ganascia.
-
Se ti affidi esclusivamente all'inerzia, hai bisogno di una spinta improvvisa per allentare il mandrino. Premi forte sul trapano per impedirne il movimento e colpisci la chiave a brugola con un colpo particolarmente secco.
-
Questo richiederà un martello di acciaio, per quanto tu possa odiare maltrattare così la tua amata chiave a brugola, poiché un martello di plastica o legno attutirebbe l'impatto.
-
-
-
Per i trapani senza filo e i modelli a filo a bassa velocità/alta coppia, un'alternativa al metodo senza chiave è afferrare la chiave a brugola in una morsa, mettere il trapano in retromarcia, tenerlo saldamente con entrambe le mani e premere il grilletto.
-
Tuttavia, questo metodo non è adatto ai principianti, poiché non è privo di rischi: la coppia di reazione potrebbe farti male al polso e la corrente di avviamento bloccato potrebbe bruciare il motore del trapano.
-
Se il trapano ha un selettore di velocità meccanico e/o una frizione, assicurati di impostare il cambio sulla velocità più bassa e/o la frizione sul massimo.
-
-
-
Se il mandrino è completamente rotto, potresti non riuscire ad afferrare le sue ganasce con una chiave a brugola. In questi casi, il metodo della chiave singola o il metodo senza chiave non funzioneranno.
-
Sui mandrini a chiave, se non è presente alcun altro dispositivo per afferrare, puoi utilizzare una chiave a gancio inserendo il perno in uno dei fori per la chiave del mandrino.
-
Se sei nato sotto una stella molto fortunata, potresti riuscire a inserire una chiave del mandrino e colpirla con un martello proprio all'angolo giusto. Non ti ho detto di farlo.
-
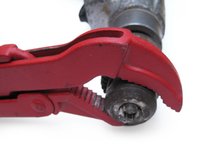
Una chiave giratubi afferrerà praticamente qualsiasi mandrino, ma con il rischio di danneggiarlo.
-
Se tutto il resto fallisce, è spesso possibile smontare il trapano, bloccare il portapinza o il mandrino in una morsa e afferrare l'altra parte con una chiave a pipa o un altro strumento di presa. Tuttavia, è molto probabile che ciò danneggi il portapinza e/o il mandrino.
-
-
-
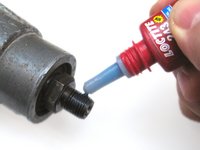
Se non c'è una vite di fermo e prevedi un'azione contraria forte (come quando sviti), applica una piccola quantità di composto bloccante per filetti sulla filettatura del mandrino.
-
Avvita il mandrino sul portapinza finché non arriva in fondo. Non è necessario stringerlo con forza eccessiva, si stringerà da solo con l'uso normale.
-
-
-
Inserisci e stringi la vite di fermo se applicabile (non tutti i mandrini sono progettati per accettare una vite di fermo).
-
Se la vite è danneggiata, usane una nuova per risparmiarti qualche problema in futuro.
-
Non fa male dare anche a queste filettature un po' di composto bloccante per filetti.
-
-
-
Ecco fatto! Con il tuo nuovo mandrino, sei pronto a forare come un professionista!
Well put together article.
@traur Ik weet niet of ik je vraag goed begrijp. De bevestigingsschroef gaat in principe gewoon door een boring in de boorkop, dus die zou er vlot uit moeten komen langs voren. Je moet daarvoor wel de spanbekken van de boorkop helemaal openzetten om plaats te maken voor de kop van de schroef.
Nee, schroef blijft hangen in de kop, ook na voorzichtig aantikken aan de achterkant
Hmmm ik begrijp het niet goed. Normaal komt de schroef helemaal uit de boorkop nog voor je de boorkop van de spindel schroeft. Ik zie niet goed wat de schroef verder zou kunnen vasthouden, maar misschien maak ik me geen juiste voorstelling van de situatie waar jij mee zit. Kan je eventueel je vraag met foto's posten op https://www.ifixit.com/Answers/Ask?
Sorry, je hebt helemaal gelijk, maar ik moest het spanbekken echt max maximaal openzetten, want anders bleef ie er achter hangen. Dank!
Blij dat ik kon helpen. Succes verder!
-


Annulla: non ho completato questa guida.
Altre 16 persone hanno completato questa guida.
Un ringraziamento speciale a questi traduttori:
100%


Questi traduttori ci stanno aiutando ad aggiustare il mondo! Vuoi partecipare?
Inizia a tradurre ›

Team

17Commenti sulla guida
Very well explained guide!
Thanks.
What if it is corroded chuck
@Abdulrahmon idris You mean if the threads in spindle and chuck are rusted solid? You could try spraying penetrating oil into the joint and letting it soak in for a few hours before trying to loosen the chuck. Heat can also help on solid metal-body chucks: heating the chuck with a blowtorch will cause it to expand, which may free up the threads. Be aware though that this could damage seals or other non-metal parts in the chuck, if present; and I would definitely remove the spindle from the drill before doing this, if possible (some spindles slide in from the inside of the gear case meaning they can't be removed unless the chuck comes off). If all else fails, you may need to resort to an angle grinder to grind through the chuck...
Yeah I burned up a Makita cordless hammer drill using in the vise method to me it looks like they had red Loctite not blue used on the threads but anyway my mistake was i didn’t adjust the clutch first. It didn’t take much for it to sizzle I can tell you that. It was done and over with before I could react
@joshuastang Sorry to hear that. Stuff like that happens to us all. You win some, you learn some...
My cordless makita drill chuck wont come loose at all. I tried the hammer and allen key but all it does is turn on the gear assembly. I can actually grab hold of the allen key and turn the chuck and you can hear it turning on the gear assembly. Its in first gear, on the drill selector and clutch is at the highest. Any thoughts from anyone please?
@warrenjashman Hi Warren, can you share the precise model of your drill? That might give some insight in how best to proceed. Did you check for a retaining screw and remove it if present? Note that even if the gear assembly can be rotated by turning the chuck, the allen key method can still work if you hit the key sharply enough - it's all about inertia. It may take a few attempts though.
@pauls40812 Hi Paul, since you wouldn't be using a small drill like that for forceful anti-clockwise rotation (such as when removing screws), you should actually be fine without the retaining screw. The chuck will tighten itself onto the spindle with use and should not loosen when reversing occasionally (as you might do to back the drill bit out of a hole more easily). If you have some threadlocking compound at hand, this will help to make sure the chuck stays put.
Should you wish to source a longer retaining screw anyway, you'll first need to identify the screw size (diameter and thread pitch). The diameter is easily measured with vernier calipers whereas a comb-type thread pitch gauge would be the easiest way to identify pitch. In metric, M6x1mm would be the most common size for these screws; in imperial it might be 1/4"x20tpi for instance. Lastly, identify how much longer the screw should be than the current one to determine the total length (obviously as long as you get a long enough screw, you can always file it down a bit if needed). An internet search for "chuck retaining screw" accompanied by the dimensions you need should lead you to a number of sources where you can purchase them. Remember you need a left hand thread screw!
expering electricshock when operating pistoldrill
when switching on pistol drill electric shock from chuck end ?
@royheppenstall This means the double insulation of the drill is compromised. Some current carrying part is making electrical contact with a metal part inside the drill, and the voltage is conducted through the gear train to the spindle and chuck. That drill is definitely unsafe to use until the problem is sorted out! If you disassemble the drill, you will likely be able to visually identify the location of the current leak.
Thanks for this excellent write-up! You provided much superior explanations than those "Youtwit" videos, not to mention several different approaches. Saved me time & headaches, much appreciated!
Hi, I have a Silverline Tools SS 1010-HD drill and want to change the chuck. I have loosened the chuck on the shaft and can unscrew it a short way but then it stops and will not go further. I cannot see a retaining screw (and if there was one I wouldn't expect to be able to unscrew the check at all!). There is a 'cross' arrangement that on first glance could be mistaken for a retaining screw but is not. The 'item' spins freely if a crosshead screwdriver is inserted ... it behaves more like maybe a 'collet' arrangement would but if it is I cannot see how (or what) to insert down the chuck to compress the collars. Any thoughts please.
Hi firlandsfarm, I would suggest that you post this question in the answers forum along with some pictures if you manage. See https://www.ifixit.com/Answers.
De elektromannen van ons repaicafé gaan altijd zitten op de stekker van het apparaat waar ze mee bezig zijn. Zo voorkomen ze dat een ander iets stoms doet.
Jim Pansee - Replica