Introduzione
Usa questa guida per sostituire il cavo del connettore Lightning e del jack cuffie. Se hai già provato a pulire il connettore Lightning senza successo, la sostituzione del connettore Lightning può risolvere problemi di ricarica e connettività.
Cosa ti serve
Panoramica Video
-
-
Spegni il tuo iPhone prima di cominciare a smontarlo.
-
Rimuovi le due viti Pentalobe P2 da 3,6 mm vicino al connettore Lightning.
-
-
Attrezzo utilizzato in questo passaggio:Clampy - Anti-Clamp$24.95
-
Tira la maniglia blu indietro per sbloccare i bracci dell'Anti-Clamp.
-
Fai scorrere i bracci oltre il bordo sinistro o destro del tuo iPhone.
-
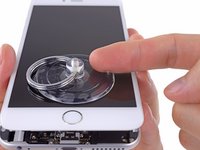
Posiziona le ventose vicino al bordo inferiore dell'iPhone, appena sopra il tasto Home, una di fronte e una sul retro.
-
Premi le ventose insieme per farle aderire sull'area desiderata.
-
-
-
Tira la manopola blu in avanti per bloccare i bracci.
-
Gira la manopola in senso orario di 360° o finché le ventose cominciano ad allungarsi.
-
Inserisci un plettro di apertura o un altro strumento sotto lo schermo quando l'Anti-Clamp crea una fessura abbastanza grande.
-
Salta i prossimi tre passi.
-
-
-
Usa una singola ventosa per sollevare il pannello frontale:
-
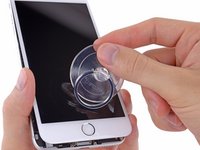
Premi una ventosa sullo schermo, appena sopra al tasto Home.
-
-
-
Mentre tieni fermo l'iPhone con una mano, tira la ventosa per separare lievemente il gruppo del pannello frontale dal case posteriore.
-
Usando uno strumento di apertura in plastica, inizia a staccare con delicatezza il case posteriore, allontanandolo dal gruppo display, mentre continui a tirare con la ventosa.
-
-
-
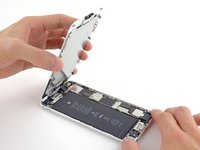
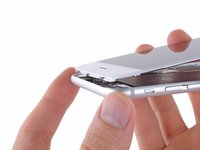
Solleva dal case posteriore il lato del pulsante home del gruppo del pannello frontale, usando il lato superiore del telefono come una cerniera.
-
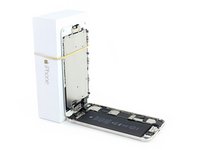
Apri il display a un angolo di circa 90° e posalo contro qualcosa che lo tenga aperto mentre tu stai lavorando sul telefono.
-
Aggiungi un elastico per tenere il display al suo posto mentre lavori. In questo modo si eviteranno sforzi imprevisti sui cavi del display.
-
-
-
-
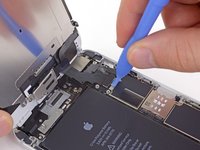
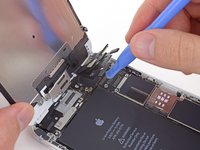
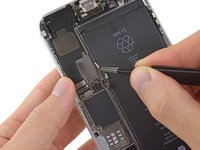
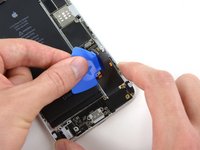
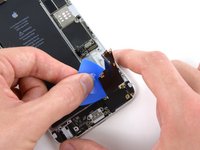
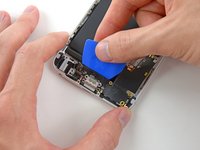
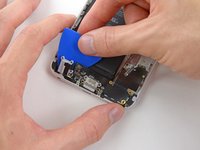
Scollega il cavo del connettore di ricarica dal suo alloggiamento sulla scheda logica usando l'estremità piatta di uno spudger.
-
-
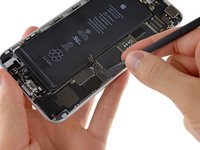
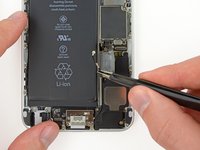
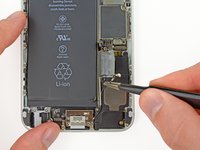
Attrezzo utilizzato in questo passaggio:Tweezers$4.99
-
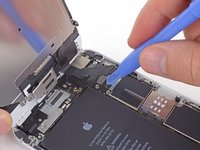
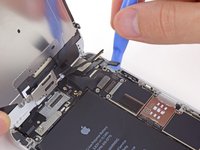
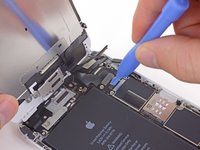
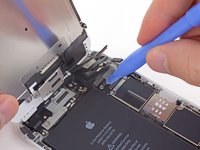
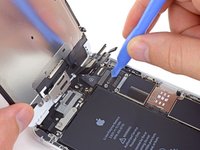
Afferra con una pinzette il connettore dell'antenna e inizia a sfilarlo con cautela dal suo canale sull'altoparlante.
-
-
-
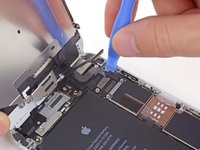
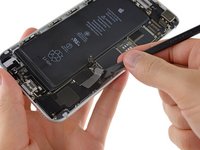
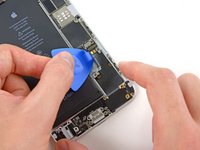
Rimuovi le due viti a croce Phillips #00 che fissano la staffa metallica al gruppo del connettore Lightning.
-
-
-
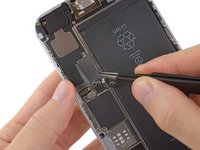
Solleva dall'iPhone il cavo del connettore Lightning e del jack cuffie e rimuovilo.
-
Usa uno strumento di plastica per eliminare tutti i pezzi di adesivo rimasti sul case posteriore dietro il cavo.
-
Confronta la tua parte di ricambio con l'originale per verificare eventuali differenze. Potresti trovare una guarnizione di gomma attaccata al vecchio jack cuffie; se necessario, questa parte deve essere trasferita sul nuovo componente.
-
Controlla bene la parte di ricambio e poi stacca eventuali pellicole o astucci protettivi prima dell'installazione.
-


Per rimontare il tuo dispositivo, segui queste istruzioni in ordine inverso.
Annulla: non ho completato questa guida.
Altre 149 persone hanno completato questa guida.
Un ringraziamento speciale a questi traduttori:
100%


Questi traduttori ci stanno aiutando ad aggiustare il mondo! Vuoi partecipare?
Inizia a tradurre ›

25Commenti sulla guida
I did this tonight, took about 45 min. I used my iFixit tool kit to all the work.
When putting it back together I had an issue with my screen going all "white lines", turns out it was just a loose connection on the digitizer cable, I lifted it and placed it again and all is good with the world.
I had to replace the assembly because I was getting feedback when making calls with headphones and no voice at all with headphones if the phone was plugged into power. Now I can do both.
Thanks so much iFixit for making this possible.
After fixing my headset jack successfully, people could not hear me clearly on the mic. I took it apart again today. The clip that holds the mic in place, next to the jack, had been put down too tight to the mic, which kept it from moving enough to pick sound up clearly -- everything was muddied. I only had to pull the case open a little, unscrew the mic assembly to loosen it, wiggle it back a bit, move the mic a little to align it better with the hole, and then tighten it back down. It works beautifully now and everyone says I sound better than ever. A really easy fix, but it could have been avoided if there were instructions on putting everything back together or at least tips for little things like this.
My iphone stuck into headphone,what can i do to fix it?please help me as soon as possible
Hi @Tannaz pourian
If you are stuck on headphone mode first thing you can do is a quick fix if it works for you. You first turn off your iphone and with a gentle hand you can pull out any dirt or particals inside your headphone jack with a pin then clean it with a cotton bud with a little acitone or alcohol ( Don’t use too much of alcohol only little would be fine otherwise it could damage you display if it gets into your phone). Then after completing this process let it dry for a while and turn on your phone. I hope it works for you:) orthewise you have to replace your whole cc flex pannel. Good luck
I recently replaced the headphone jack but when I tried it out after successfully replacing it, the headphones still gave a crackling sound. Less than before but still very noticeable. Anyone have any suggestions to fix this issue?