Introduzione
La batteria del tuo New Nintendo 2DS XL potrebbe dover essere sostituita se il dispositivo non si accende quando premi il tasto di accensione. La batteria è direttamente accessibile dal sotto il pannello inferiore. Per ulteriori informazioni, fai riferimento alla nostra pagina delle soluzioni di base.
Cosa ti serve
-
-
Prima di iniziare lo smontaggio, rimuovi:
-
La penna
-
La cartuccia di gioco
-
La scheda SD
-
-
-
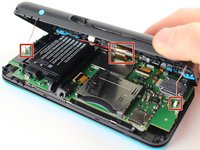
Svita le quattro viti tri-point da 6 mm posizionate nei quattro angoli del pannello inferiore.
The Y0 was too big; I ended up using a Y00 and that worked fine
Would not recommend using a Y000 like I tried to do
gotta use Japanese Industry Standard YOO (blunt end)- I did not, and accidentally stripped two of the screws… still trying to figure out how to remove them -_-;
I'm using the Y-0.6 and seems to only unscrew 2 of the screws on the right side of the handheld, the other 2 aren't moving
screws are too tight
-
-
-
-
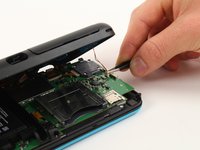
Usando uno spudger, separa il pannello posteriore dalla copertura anteriore facendo leva delicatamente attorno al pannello.
-
Ci sono diversi ganci lungo la cerniera della copertura, quindi ti consigliamo di lavorare su un lato corto e i due lati lunghi prima di finire con l'ultimo lato corto.
You need to be super careful separating the top from the bottom at the rear end. I got stuck there, applied a lil more force and ripped the right shoulder button straight off the pcb!
The front headphone Jack got stuck in the bottom case and snapped when opening, didn’t notice until after replacing the battery (which is a nightmare btw) I used some floss underneath the battery to give you better leverage since the side plastic is so thin and fragile. I cannot get the headphone Jack back into position now and will have to take it to a shop for (I’m sure much more expensive) repairs. Honestly DO NOT try repair this thing, just pay someone else to repair these. Compared to the OG 2011 3DS these are a nightmare to work with. Nintendo really went out of their way to make this impossible to repair, I had an extra set of pretty capable hands too.
I also ripped off the headphone jack when taking the case apart. I never pulled hard. You need to be careful to give the headphone jack clearance before applying any force.
-
-
Attrezzo utilizzato in questo passaggio:Tweezers$4.99
-
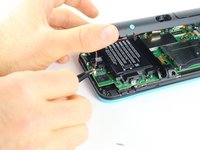
Usando delle pinzette, scollega i due cavi che collegano i tasti posteriore su entrambi i lati della scheda madre tirandoli delicatamente verso l'alto.
I unfortunately took off the base of one when trying to pull apart. Is there a fix or will it not be broken?
Did you manage to fix this at all?
When you are putting these cables back, make sure to check the orientation of the cable. You have to match the cable head to the entry point, so you may have to turn the cable around. I spent a bit too much time trying to connect the cables just because I didn't realize that I had to turn the cable around.
Aren't these the speaker cables? I haven't taken any 2DS's apart in a while, but I'm pretty sure these cables connect to the speakers
-
-
-
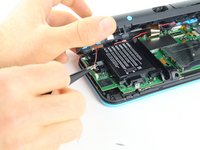
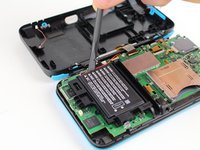
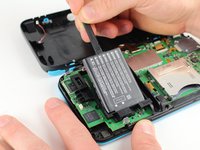
Usando uno spudger, solleva la batteria.
-
Ricordati che c'è un pad adesivo che tiene la batteria ferma sul suo supporto. Potrebbe essere necessario usare diversi strumenti per separare la batteria dal suo supporto e dalla scheda madre.
Personally, I skipped this step and everything still works fine. I wasn't able to take the battery out because the adhesive was too strong.
Small square of adhesive. Pull up slowly and it’ll release after 10-20 seconds
Any advise for dealing with CTR-003 spicy pillow? So far in this transplant operation, both my devices batteries are okay... but... I dunno, if I were to run into a spicy pillow in the future, what would be the least awful way to pull it out?
Not sorry, when I see these repair jobs that involve the company gluing the battery into the device (or even soddering in that soon to be spicy pillow) this is just something I'm wondering about
I haven't taken my 2ds apart yet, depending on how devices are built it might work to slide a solid thread (eg fishing rope, or floss but that might rip) under it, and do a sewing motion.
-


Per rimontare il tuo dispositivo, segui le istruzioni in ordine inverso.
Per rimontare il tuo dispositivo, segui le istruzioni in ordine inverso.
Annulla: non ho completato questa guida.
Altre 40 persone hanno completato questa guida.
Un ringraziamento speciale a questi traduttori:
100%

Questi traduttori ci stanno aiutando ad aggiustare il mondo! Vuoi partecipare?
Inizia a tradurre ›

Team

Cal Poly, Team S18-G6, Forte Fall 2017 Membro di Cal Poly, Team S18-G6, Forte Fall 2017
CPSU-FORTE-F17S18G6
5 Membri
20 Guide realizzate
14 Commenti
Does the 2ds xl have the same as the new 3ds xl
no. the 2ds shares the same battery type as the Nintendo DS and the Nintendo switch pro controller.
Jason -
CTR-003 Battery
Do I need to put a sticky pad on the new battery?
Got the exact screwdriver (Y00 / 1.5 x 50mm) but it doesn‘t fit. What are my options?
Get the one that fits: y0
I just bought a Y0 because of this comment and I ended up stripping the screwdriver.
It appears that the SPR-003 battery is no longer stocked by Nintendo, and hasn't been for at least the last ~12 months or so - I'm uncertain where we might be able to find a reputable OEM these days for them, as it's not like we can trust something like amazon reviews anymore (if ever we could).
Would be great if iFixit could work on stocking something 'near-OEM' like they do with the DS / DS Lite so we'd have a trusted place to buy them from!
Based on the teardown, the 2DS XL uses the CTR-003 battery, not the SPR-003 in the 3DS XL.
Be careful not to rip off the headphone jack when taking the case apart.
Great guide, though I must stress patience. Also, if the volume slider happens to fall out/shift, as happened to me, make sure to set the actual volume switch in a position where the (in this case blue) plastic piece will catch it in the 'U' shaped trough when the shell is closed up again.
This does not take 3 minutes, nor is it that easy! Specifically, getting the shell off is a real pain, even with a prying tool. I ended up cracking the plastic too, which is a real shame since getting a replacement is quite difficult (or you get a crappy third party one). I think this guide should have a video.
update: my brand new ifixit spudger tool just broke from doing this! The tip is now stuck between the shell and the device. Maybe I'm just not handy at all, but this isn't feeling worth it anymore!
This is a great repair instructional, but I would advise also looking at the below video link. (I used both.) Sometimes watching 2 repair guides can help when you think you think you’re stuck. For example, I had a really hard time getting the hinge off!
https://www.youtube.com/watch?v=Zuu_T2ls...
(HINT: Works best if you rotate it 180 degrees, so that you are repairing it from the same perspective as the technician)
skat1140 - Replica