Introduzione
Segui questa guida per sostituire completamente la scheda logica.
Cosa ti serve
-
-
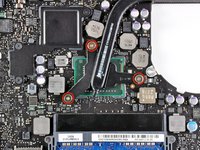
Rimuovi le dieci viti seguenti:
-
Tre viti con testa a croce Phillips #00 da 14,4 mm
-
Tre viti con testa a croce Phillips #00 da 3,5 mm
-
Quattro viti con testa a croce Phillips #00 da 3,5 mm con spallamento
-
-
-
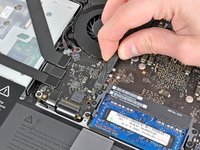
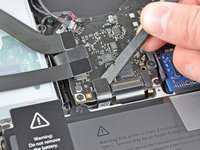
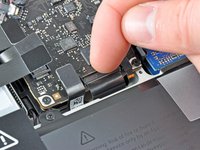
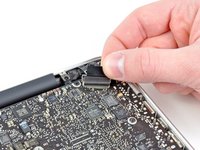
Usa l'estremità di uno spudger per rimuovere il connettore della batteria dal suo zoccolo sulla scheda logica.
-
-
-
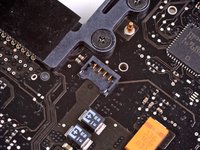
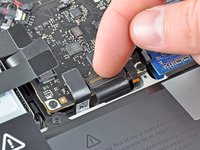
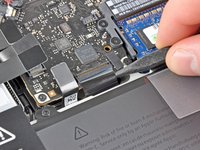
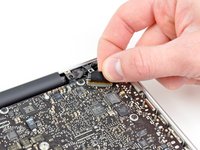
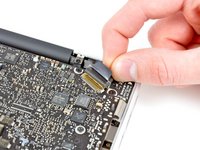
Usa il bordo di uno spudger per scollegare il connettore della ventola dalla sua presa sollevandolo dalla scheda madre.
-
-
-
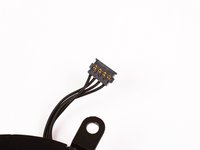
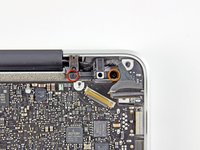
Usa la punta di uno spudger per tirare il cavo dell'altoparlante/subwoofer destro fuori dalla sporgenza di bloccaggio in plastica integrata nella scocca superiore.
-
Tira il cavo dello speaker destro verso l'alto per scollegarlo dalla sua presa sulla scheda madre.
-
-
-
-
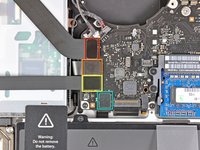
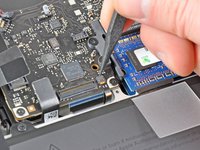
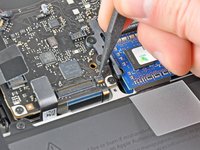
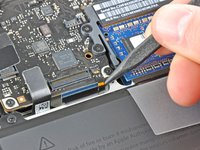
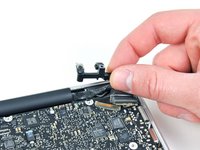
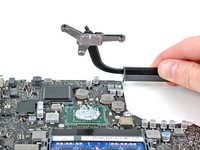
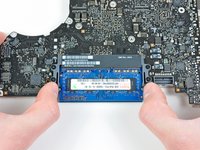
Stando attenti ai diversi connettori vicino ai bordi, solleva la scheda madre dal bordo vicino al lettore CD.
-
Senza piegare la scheda, rimuovila dalla scocca superiore, stando attento al cavo flessibile della scheda di alimentazione che potrebbe impigliarsi nella scocca superiore.
-
Rimuovi la scheda madre.
-
-
-
Sfila il cavo del microfono dal suo alloggio incavato nella copertura dello speaker sinistro.
-
-
-
Rimuovi il pezzo di nastro adesivo nero che copre il connettore del microfono.
-


Per riassemblare il dispositivo, segui le istruzioni nell'ordine inverso.
Per riassemblare il dispositivo, segui le istruzioni nell'ordine inverso.
Annulla: non ho completato questa guida.
Altre 132 persone hanno completato questa guida.
Un ringraziamento speciale a questi traduttori:
100%


Questi traduttori ci stanno aiutando ad aggiustare il mondo! Vuoi partecipare?
Inizia a tradurre ›

6 Commenti
My son spilled soda into 13"MB early 2011, I did not get to repair for 6 weeks. Machine took over twice typical time to start-up and once running, cursor showed stuttered movement and launching applications was very slow.
I used guide (only steps 1-19) to remove logic board and delicately cleaned with very slightly damp Q-Tip (using Windex electronics cleaner) & dried, every place I cleaned, using compressed air. I did not remove the heatsink, as I assumed the paste protected the processor underneath.
Once cleaned, I reversed all steps and it booted quickly and all other issues disappeared. THANK YOU!!!
what is logic board part number if I want to order new one
For the Early 2011 MBP A1278 with the Core i5 2.3 GHz processor, the part numbers are 661-5869 and 661-6078
Susanna -
Do you send to Brazil the same Logic board above Its the Early 2011 MBP A1278 with the Core i5 2.3 GHz processo. It had many issues with it’s Logic boar and I think it’s a manufacture defect. I’m so desaposentes with apple planned Obsolescence, ando no repair. It’s not the same apple. My computer was boutique inAustralia , so I’m protected by their consumer act(2010) I just have to prove it was a hidden problem.
My track pad was difficult to "click". I've replaced batteries before, so I knew that it was definitely a swollen battery. However, when removing the damaged, swollen battery, I used the end of a flat head screw driver to pry up the battery connection... DON'T DO THAT! I saw the tiniest of sparks around pins 4-5-6 on the 9 pin battery connector. New battery installed, but the OS didn't recognize the new battery -- black "X" over the battery indicator. Further, the wall charger would not recharge the new battery. Instead, the computer ran off the 30% charge that new batteries are shipped with. I ordered another new battery, and after draining a second battery without being able to charge, I figured that spark was the sign that I fried something in the logic board. Indeed that was exactly the case, and logic board replacement did fix the issue. I found these instructions INVALUABLE in replacing my old logic board.
$260 lesson: Always use a plastic spudger when dislodging connectors in computers!
Thanks!