Introduzione
Questa guida prerequisita è per aiutarti a smontare il mouse. Il mouse deve essere smontato in gran parte per completare le procedure per risolvere la maggior parte dei problemi.
Indossa un laccio anti statico per proteggerti da scariche statiche durante la riparazione.
Cosa ti serve
-
-
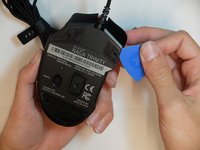
Rimuovi le coperture laterali intercambiabili.
 Chiedi a FixBot
-
-
-
-
Separa la parte superiore della copertura del mouse da quella inferiore usando il plettro.
-
-
-
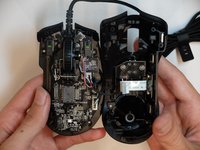
Sgancia il connettore del cavo a nastro che è tenuto fermo da dei ganci sulla scheda madre usando la punte di uno spudger.
-
-
-
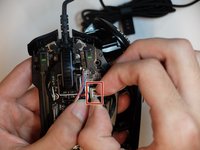
Scollega il connettore a 3 pin dei LED della copertura superiore accanto alla scheda madre.
-


Per rimontare il tuo dispositivo, segui le istruzioni in ordine inverso.
Annulla: non ho completato questa guida.
Altre 19 persone hanno completato questa guida.
Un ringraziamento speciale a questi traduttori:
100%
Daniele Carminati ci sta aiutando ad aggiustare il mondo! Vuoi partecipare?
Inizia a tradurre ›
Team

Embry-Riddle Aeronautical University, Team S6-G2, Salas Fall 2019 Membro di Embry-Riddle Aeronautical University, Team S6-G2, Salas Fall 2019
ERAU-SALAS-F19S6G2
4 Membri
13 guide realizzate
12Commenti sulla guida
I would like to to point out that at step 7, second picture, the 3-pin connector is for the top 2 buttons. the RGB LED is actually in the board and can be seen in step 7 first picture, tiny white square at the bottom, top left where it says K7-D1.
The cable for the Naga2014 fits admirably and appears to work fully, BUT NOTE: the green and white wires need to be swapped around in the plug at the end that connects inside the mouse.
If you feel along the back, you'll notice that it is 'rougher' than the injection-molded plastic; this is a sticker that hides 4 Phillips #1 screws and two more magnets. Peel off the sticker and remove the screws--the plate should then lift right out. I... discovered this the hard way after destructively disassembling a broken 12-button part because the design LOOKS like it just clips on, and I wasn't sure if this was a heat glue situation or something else. Here's the 6-button part fully disassembled. https://i.imgur.com/xK7IPus.jpg
How do you remove the board so that you can replace the mouse buttons when they break?