Salta al contenuto principale

Samsung NX500 Main board Replacement

Cosa ti serve

  1. Samsung NX500 Main board  Replacement, Battery: passo 1, immagine 1 di 2 Samsung NX500 Main board  Replacement, Battery: passo 1, immagine 2 di 2
    • Pull the switch on the bottom of the camera back with your thumb.

  2. Samsung NX500 Main board  Replacement: passo 2, immagine 1 di 2 Samsung NX500 Main board  Replacement: passo 2, immagine 2 di 2
    • Push second switch(blue) forward with your thumb.

  3. Samsung NX500 Main board  Replacement: passo 3, immagine 1 di 1
    • Pull out battery.

  4. Samsung NX500 Main board  Replacement, Screen Side Encasement: passo 4, immagine 1 di 3 Samsung NX500 Main board  Replacement, Screen Side Encasement: passo 4, immagine 2 di 3 Samsung NX500 Main board  Replacement, Screen Side Encasement: passo 4, immagine 3 di 3
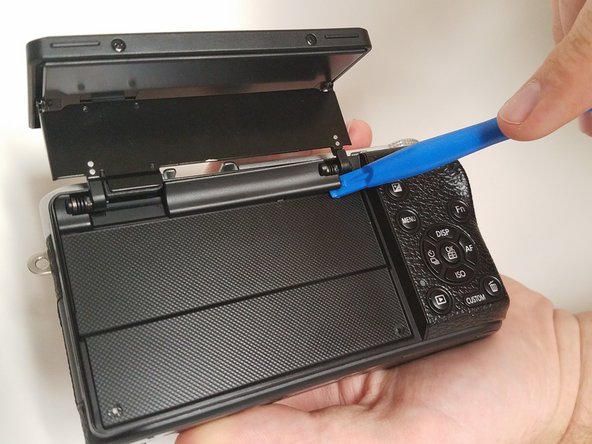
    • Open the screen exposing the hinge cover and place the plastic opening tool inside.

    • Pry the hinge cover up by moving the plastic opening tool in a downward motion.

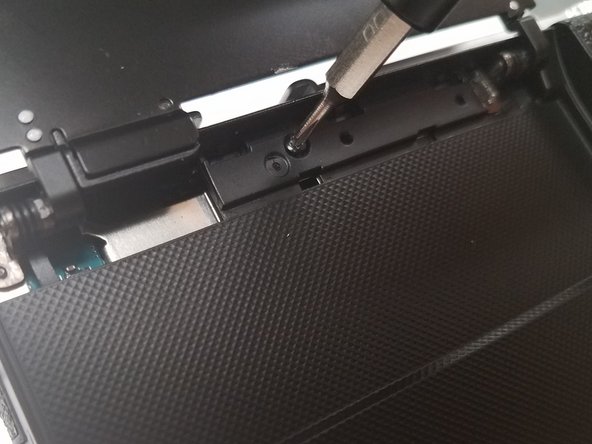
    • Remove the black 4mm Phillips #000 screw that is revealed once the hinge cover is removed.

  5. Samsung NX500 Main board  Replacement: passo 5, immagine 1 di 3 Samsung NX500 Main board  Replacement: passo 5, immagine 2 di 3 Samsung NX500 Main board  Replacement: passo 5, immagine 3 di 3
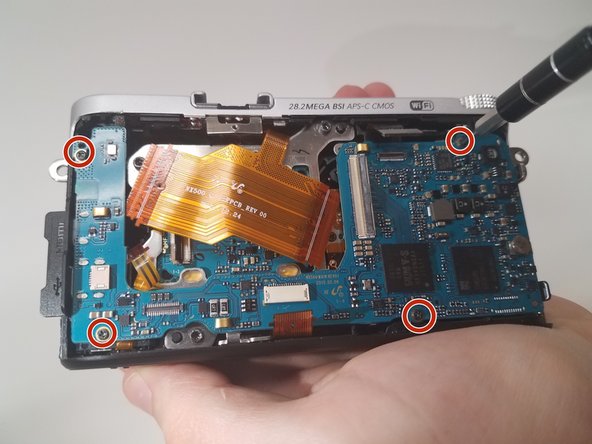
    • Unscrew the two 4 mm Phillips #000 screws on the right hand side of the camera using the screwdriver.

    • Unscrew five more 4 mm Phillips #000 screws that are located at the bottom of the camera with the screwdriver.

    • In the second step, do not the remove the two 4 mm Phillips #000 screen on the screen.

    • Remove the last exterior 4 mm Phillips #000 screws on the left hand side of the camera with the scredriver.

  6. Samsung NX500 Main board  Replacement: passo 6, immagine 1 di 2 Samsung NX500 Main board  Replacement: passo 6, immagine 2 di 2
    • Use the plastic opening tool in a downward motion around each side of the camera to pry the casing open.

    • The casing should be removed easily; you shouldn't have to use much force.

  7. Samsung NX500 Main board  Replacement: passo 7, immagine 1 di 2 Samsung NX500 Main board  Replacement: passo 7, immagine 2 di 2
    • Locate the black ribbon at the bottom left of the camera's interior.

    • Place the plastic opening tool under the black ribbon connector.

    • Remove the cable by moving your plastic opening tool in a downward motion.

    • There is zero to little force needed to remove this ribbon.

  8. Samsung NX500 Main board  Replacement, Main board: passo 8, immagine 1 di 3 Samsung NX500 Main board  Replacement, Main board: passo 8, immagine 2 di 3 Samsung NX500 Main board  Replacement, Main board: passo 8, immagine 3 di 3
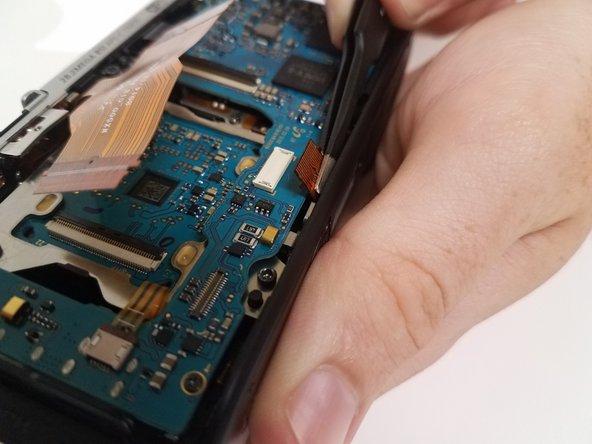
    • Lift the black latch of the left main ribbon connector using a wide-set plastic opening tool in a downward motion.

    • Use your fingers to disconnect the cable.

    • There are five ZIF cables total to be removed.

  9. Samsung NX500 Main board  Replacement: passo 9, immagine 1 di 3 Samsung NX500 Main board  Replacement: passo 9, immagine 2 di 3 Samsung NX500 Main board  Replacement: passo 9, immagine 3 di 3
    • Use the wide-set plastic opening tool to lift the latch on the right main ZIF cable in a downward motion.

    • Disconnect the cable using your finger.

  10. Samsung NX500 Main board  Replacement: passo 10, immagine 1 di 2 Samsung NX500 Main board  Replacement: passo 10, immagine 2 di 2
    • Locate the ZIF cable at the bottom of the main board.

    • Disconnect the cable with the tweezers by pulling it away from where the cable is connected.

    • Be careful not tug too hard on the cable as you can damage it.

  11. Samsung NX500 Main board  Replacement: passo 11, immagine 1 di 2 Samsung NX500 Main board  Replacement: passo 11, immagine 2 di 2
    • Locate the skinny ZIF cable on the left side of the main board.

    • Disconnect the cable with the tweezers by pulling it away from where the cable is connected.

    • Be careful not tug too hard on the cable as you can damage it.

  12. Samsung NX500 Main board  Replacement: passo 12, immagine 1 di 3 Samsung NX500 Main board  Replacement: passo 12, immagine 2 di 3 Samsung NX500 Main board  Replacement: passo 12, immagine 3 di 3
    • Locate the black cable connected at the top right of the main board.

    • Place the wide-set plastic opening tool underneath the gray connector and carefully pry it up.

    • It will easily pop up.

  13. Samsung NX500 Main board  Replacement: passo 13, immagine 1 di 1
    • Remove the 4 black 4-mm Phillips #000 screws located near each corner of the main board.

    • Lift the board out of the casing and carefully put it somewhere safe.

Conclusione

To reassemble your device, follow these instructions in reverse order.

Altre 2 persone hanno completato questa guida.

Team

USF Tampa, Team 18-5, Blackwell Fall 2016 Membro di USF Tampa, Team 18-5, Blackwell Fall 2016

USFT-BLACKWELL-F16S18G5

3 Membri

12 Guide realizzate

4 Commenti

How do you actually get the mainboard for replacement? Is it directly through Samsung?

Andrew Bydlon - Replica

Nevermind, the parts are available at Samsungparts.com.

I believe the particular part of interest is the AD92-02282A, although I'll write a followup if this is not correct.

Andrew Bydlon -

I can now confirm the part is the AD92-02282A. Following this guide worked very well and saved me risking $800 on ebay for a used nx500.

Andrew Bydlon -

i’ve been told that after replacing the mainboard the camera needs to be adjusted which could only be done by a professional workshop.

did you run into any problems with the new mainboard?

Christoph Bresch - Replica

Aggiungi Commento

Visualizza Statistiche:

Ultime 24 Ore: 1

Ultimi 7 Giorni: 7

Ultimi 30 Giorni: 16

Tutti i Tempi: 1,446