Introduzione
This shows how to remove the midframe to reveal the phone's bowels.
Cosa ti serve
-
-
-
Insert a fingernail or plastic opening tool in the gap between the rear case and the base of the phone.
 Chiedi a FixBot
-
-
-
Slide your fingernail or plastic opening tool along the edge of the rear case.
-
Lift the case gently from the base.
-
-
-
-
-
-
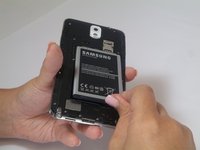
Insert a fingernail or plastic opening tool into the small gap between the battery and the phone base.
-
Lift the battery out of its recess.
-
-
-
-
-
Place your fingernail in the groove of the stylus pen.
-
Pull the stylus pen away from the phone.
-
-
-
-
-
Remove the twelve 4mm Phillips #00 screws from the back chassis.
-
-
-
Insert the plastic opening tool into the Stylus Pen placement holder.
-
Lift the plastic opening tool so that the midframe separates from the base.
-
-


To reassemble your device, follow these instructions in reverse order.
Annulla: non ho completato questa guida.
Altre 48 persone hanno completato questa guida.
Team

USF Tampa, Team 2-2, Blackwell Fall 2014 Membro di USF Tampa, Team 2-2, Blackwell Fall 2014
USFT-BLACKWELL-F14S2G2
4 Membri
38 guide realizzate
2Commenti sulla guida
the info provided is perfectly narrated and illustrated, however this guide is incomplete and potentially misleading. unintentionally im sure..
the guide is titled "Mid Frame Replacement" and all this guide tells you is how to remove the rear frame (still 2 separate components) it has made no mention of the fact the mid-frame is fused to the screen assembly nor any of the ribbon/cables thats quite possibly may affect the reader, and im afraid some may order a mid frame thinking they can handle this, only to be puzzled when the back comes off and they are left pondering what next.. im not trying to be spiteful, you guys are amazing and i always check your guides before a repair/swap ect that ive not done before to make sure i dont miss a hidden ribbon cable or device specific shortcut, im simply trying to look for the beginners that are aspiring to become one of ..
That being said love the site guys!! keep up teh good work, i use you at least a half dozen times a week :)
regards,
vick0den