Salta al contenuto principale
Unisciti alla Community delle riparazioni - Crea un account

Samsung DV300F Lens Replacement

Cosa ti serve

  1. Samsung DV300F Lens Replacement, Front and Rear Casing: passo 1, immagine 1 di 3 Samsung DV300F Lens Replacement, Front and Rear Casing: passo 1, immagine 2 di 3 Samsung DV300F Lens Replacement, Front and Rear Casing: passo 1, immagine 3 di 3
    • Remove the two black 4.2 mm screws on the right side of the camera using a Phillips #0 screwdriver.

    • Remove the two black 4.2 mm screws on the left side of the camera using a Phillips #0 screwdriver.

    • Remove the two black 4.2 mm screws on the bottom of the camera using a Phillips #0 screwdriver.

    Chiedi a FixBot
  2. Samsung DV300F Lens Replacement: passo 2, immagine 1 di 2 Samsung DV300F Lens Replacement: passo 2, immagine 2 di 2
    • Remove the back case of the camera carefully.

    Chiedi a FixBot
  3. Samsung DV300F Lens Replacement: passo 3, immagine 1 di 3 Samsung DV300F Lens Replacement: passo 3, immagine 2 di 3 Samsung DV300F Lens Replacement: passo 3, immagine 3 di 3
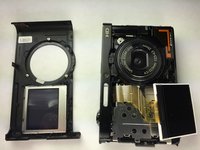
    • Remove the front case of the camera.

    • Remove the front LCD screen from the front case next to the lens.

    Chiedi a FixBot
  4. Samsung DV300F Lens Replacement, Back Button Control: passo 4, immagine 1 di 2 Samsung DV300F Lens Replacement, Back Button Control: passo 4, immagine 2 di 2
    • Remove the blue button control from its position next to the LCD screen.

    • Pull the ribbon cable to disconnect the blue button control from the camera.

    Chiedi a FixBot
  5. Samsung DV300F Lens Replacement, Back LCD Screen: passo 5, immagine 1 di 1
    • Remove the back LCD screen from its place carefully.

    Chiedi a FixBot
  6. Samsung DV300F Lens Replacement: passo 6, immagine 1 di 2 Samsung DV300F Lens Replacement: passo 6, immagine 2 di 2
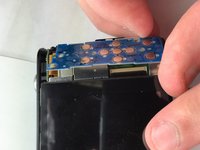
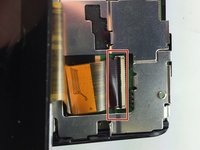
    • Flip the black tab where the back LCD screen connects to the circuit board.

    • Pull the tape connection to disconnect the back LCD screen from the circuit board.

    Chiedi a FixBot
  7. Samsung DV300F Lens Replacement, Lens: passo 7, immagine 1 di 2 Samsung DV300F Lens Replacement, Lens: passo 7, immagine 2 di 2
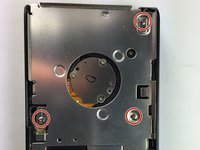
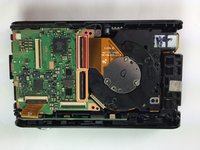
    • Unscrew the 3 silver #0 Phillips 4.45mm screws from the circuit board cover

    • Remove the circuit board cover

    Chiedi a FixBot
  8. Samsung DV300F Lens Replacement: passo 8, immagine 1 di 2 Samsung DV300F Lens Replacement: passo 8, immagine 2 di 2
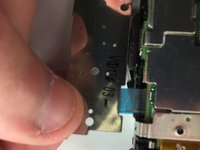
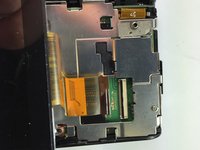
    • Flip the first black tab connecting the lens to the circuit board

    • Flip the second black tab connecting the lens to the circuit board

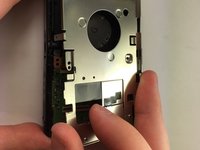
    • Push the lens out from the front to remove it from the camera

    Chiedi a FixBot
Conclusione

To reassemble your device, follow these instructions in reverse order.

Altre 6 persone hanno completato questa guida.

Team

Baylor, Team 5-10, Williams Spring 2015 Membro di Baylor, Team 5-10, Williams Spring 2015

BU-WILLIAMS-S15S5G10

3 Membri

10 guide realizzate

1Commento della guida

pourquoi ne pas aussi montrer comment demonter le lens de samsung dv300f

nouzalek - Rispondi Condividi

Aggiungi Commento

Visualizza statistiche:

Ultime 24 ore: 1

Ultimi 7 giorni: 9

Ultimi 30 giorni: 84

Tutti i Tempi: 3,183