Salta al contenuto principale
Unisciti alla Community delle riparazioni - Crea un account

Panasonic ES-RF31 Battery Replacement

Cosa ti serve

    1. Panasonic ES-RF31 Battery Replacement, Battery: passo 1, immagine 1 di 3 Panasonic ES-RF31 Battery Replacement, Battery: passo 1, immagine 2 di 3 Panasonic ES-RF31 Battery Replacement, Battery: passo 1, immagine 3 di 3
      • Loose the screw at the bottom part of the razor

      Chiedi a FixBot

      Aggiungi Commento

    2. Panasonic ES-RF31 Battery Replacement, Removing the Backcover: passo 2, immagine 1 di 3 Panasonic ES-RF31 Battery Replacement, Removing the Backcover: passo 2, immagine 2 di 3 Panasonic ES-RF31 Battery Replacement, Removing the Backcover: passo 2, immagine 3 di 3
      • Slide the cover from top to bottom

      Chiedi a FixBot

      Aggiungi Commento

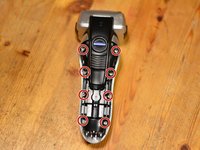
    3. Panasonic ES-RF31 Battery Replacement, Removing the Batterycover: passo 3, immagine 1 di 2 Panasonic ES-RF31 Battery Replacement, Removing the Batterycover: passo 3, immagine 2 di 2
      • Loosen these eight screws

      Chiedi a FixBot

      Aggiungi Commento

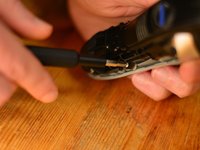
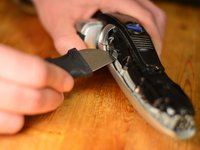
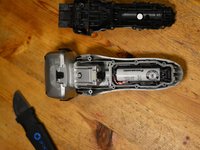
    4. Panasonic ES-RF31 Battery Replacement, Removing the Battery Cover: passo 4, immagine 1 di 2 Panasonic ES-RF31 Battery Replacement, Removing the Battery Cover: passo 4, immagine 2 di 2
      • Insert an opening tool into the gap

      • Gently remove the battery cover

      Chiedi a FixBot

      Aggiungi Commento

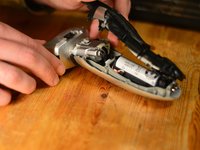
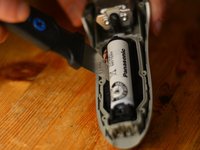
    5. Panasonic ES-RF31 Battery Replacement, Removing the Battery: passo 5, immagine 1 di 2 Panasonic ES-RF31 Battery Replacement, Removing the Battery: passo 5, immagine 2 di 2
      • Gently remove the battery

      Chiedi a FixBot

      Aggiungi Commento

Conclusione

To reassemble your device, follow these instructions in reverse order.

Annulla: non ho completato questa guida.

Altre 9 persone hanno completato questa guida.

Daniel

Membro da: 07/06/15

1.055 Reputazione

2 guide realizzate

Team

iFixit EU Team Membro di iFixit EU Team

Staff

37 Membri

2.173 guide realizzate

5Commenti sulla guida

Thanks Daniel,

I followed your instructions and all went well. One thing to add: after re-assembly of the (loaded) battery my razor would not turn on. At first I thought of a bad contact, but it turned out that the razor needed a few minutes plugged into the power supply. After that it worked fine. I suspect, that the load-control hardware needs the external power to reset itself.

Cheers, Nils

Nils Kay - Rispondi Condividi

Hello Nils!

Thanks for the hint.

Glad to hear that your razor works again!

Greetings

Daniel - Rispondi Condividi

Daniel, thank you very much for instruction.

Unfortunetly, into shaver I found only 1 battery.

Because used 3.7 v element, I prepared 2 x 1.2 v batteries.

Виктор Богачёв - Rispondi Condividi

My razor was the Panasonic ES8103S and the disassembly process was similar. From the pictures above, the battery looks the same. My razor actually had a piece under the slide-off cover that was totally rusted so I will just buy a new one on Amazon for $50. For future reference, I would like to know where you get the replacement battery? There is no model number on the battery and I couldn’t find any info online.

David Paul - Rispondi Condividi

A great guide, I have just successfully changed my razor battery. I found the OE battery available on Ebay in the UK. Many thanks to Daniel and kudos to Panasonic for making the job simple.

Cameron - Rispondi Condividi

Aggiungi Commento

Visualizza statistiche:

Ultime 24 ore: 1

Ultimi 7 giorni: 20

Ultimi 30 giorni: 125

Tutti i Tempi: 9,264