Questa versione può contenere modifiche errate. Passa all'ultima istantanea verificata.
Introduzione
Guida per sostituire la batteria dello spazzolino elettrico Oral-B White Pro 1000 a causa di una batteria difettosa. Questa guida illustra i passaggi di smontaggio dello spazzolino elettrico Oral-B White Pro 1000. Fai attenzione a non invertire il polo positivo (+) e negativo (-) quando cambi la batteria. Questa guida richiede un saldatore che raggiunge alte temperature. Fai riferimento a questa utile guida per dei consigli sulla saldatura e sulla dissaldatura.
Cosa ti serve
-
Questo passaggio è privo di traduzione. Aiuta a tradurlo
-
Remove the brush head by pulling the top away from the base.
-
-
Questo passaggio è privo di traduzione. Aiuta a tradurlo
-
Pry open the end cap from the toothbrush body.
-
Remove the spring.
-
-
Questo passaggio è privo di traduzione. Aiuta a tradurlo
-
Apply pressure on the brush shaft to release the toothbrush internals.
-
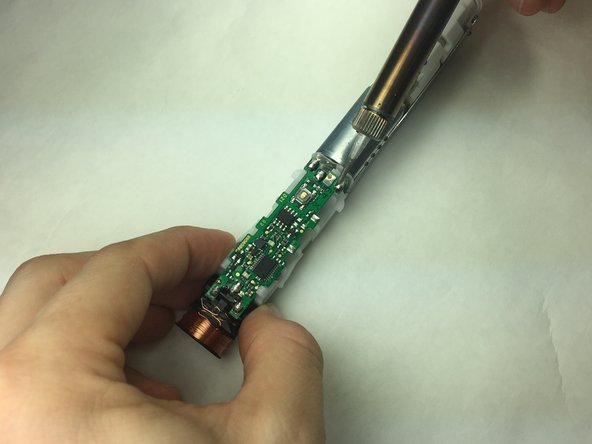
Remove the internals through the bottom of the toothbrush body.
-
-
-
Questo passaggio è privo di traduzione. Aiuta a tradurlo
-
Use flat head screwdriver to remove power button pressure plate.
-
-
Questo passaggio è privo di traduzione. Aiuta a tradurlo
-
Desolder the coil wire from the motherboard.
-
Squeeze and remove coil from motherboard.
-
-
Questo passaggio è privo di traduzione. Aiuta a tradurlo
-
Desolder the motor from motherboard.
-
Remove motherboard and battery from body of toothbrush internals.
-
-
Questo passaggio è privo di traduzione. Aiuta a tradurlo
-
Desolder the battery connections from the motherboard.
-
Remove motherboard from battery holder.
-
-
-
Tira per far scorrere la batteria fuori dall'alloggiamento della batteria.
-
Rimuovi la batteria.
-


Per rimontare il tuo dispositivo, segui queste istruzioni in ordine inverso.
Per rimontare il tuo dispositivo, segui queste istruzioni in ordine inverso.
Annulla: non ho completato questa guida.
Altre 21 persone hanno completato questa guida.
Un ringraziamento speciale a questi traduttori:
100%


Questi traduttori ci stanno aiutando ad aggiustare il mondo! Vuoi partecipare?
Inizia a tradurre ›
Team

IUPUI, Team S5-G4, Baechle Fall 2017 Membro di IUPUI, Team S5-G4, Baechle Fall 2017
IUPUI-BAECHLE-F17S5G4
3 Membri
6 Guide realizzate
14 Commenti
This guide also works for Oral-B genius 9000. Thank You!! On mine, the coil wires was losen. Just soldered it back and works fine again.
Same with mine: coil was loose. I guessed it because the red blinking light would not react (turn off) by putting the toothbrush on the charger. (checked also a second charger, never through away older parts, using as spare…) ;)
Karsten -
This guide also works for Oral B PRO 2950N. Thank you so much!
I had the same issue, the coil was broken on one side, and it doesn't charge. Adding a little bit of solder to weld the broken end was enough for making it charge again
What type of battery is that? It's not listed under “parts.”
I’ve wrote it in another comment as well, but in case you didn’t see it: As far as I know, these are 4/5 AA batteries with about 1200 mAh and U-shaped solder tails. So the size of the battery is roughly 42x14mm . But as mentioned in the comments, regular AA size batteries worked in my case as well, just had to cut the spacers in the battery retainer. AA batteries are cheaper to get obviously and most likely they’ll have more capacity as well.
benn_i -