Salta al contenuto principale

Nokia XL Dual Sim Rear Camera Replacement

Cosa ti serve

  1. Nokia XL Dual Sim Rear Camera Replacement, Back Cover Removal: passo 1, immagine 1 di 1
    • You will first need to separate the back cover from the device.

    • Gently pry open each side of the device at the indicated locations. It is best to use a plastic opening tool or similar tool.

  2. Nokia XL Dual Sim Rear Camera Replacement, Battery Removal: passo 2, immagine 1 di 2 Nokia XL Dual Sim Rear Camera Replacement, Battery Removal: passo 2, immagine 2 di 2
    • Remove the back cover.

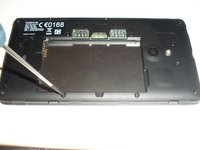
    • Use a plastic opening tool to lift the battery. Then, remove it.

  3. Nokia XL Dual Sim Rear Camera Replacement, Screen Separation part 1: passo 3, immagine 1 di 2 Nokia XL Dual Sim Rear Camera Replacement, Screen Separation part 1: passo 3, immagine 2 di 2
    • To access the inner components of the device, remove the various screws. Keep them separate, and organize them by size.

    • You will need a T5 Precision Torx screw driver to remove the screws.

    • The locations of the T5x3.4mm screws are indicated in the picture.

    • The locations of the T5x4.1mm screws are indicated in the picture.

  4. Nokia XL Dual Sim Rear Camera Replacement, Screen Separation part 2: passo 4, immagine 1 di 3 Nokia XL Dual Sim Rear Camera Replacement, Screen Separation part 2: passo 4, immagine 2 di 3 Nokia XL Dual Sim Rear Camera Replacement, Screen Separation part 2: passo 4, immagine 3 di 3
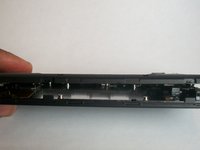
    • Use the plastic opening tool to gently pry the device apart.

    • There are flaps on both sides of the phone as indicated in the picture. This is what you will need to pry apart.

    • Please be cautious when opening the device. There are various connectors inside the device that must be handled with care.

  5. Nokia XL Dual Sim Rear Camera Replacement, System components: passo 5, immagine 1 di 1
    • Once the device is open, take note of all the components.

  6. Nokia XL Dual Sim Rear Camera Replacement, Camera Removal Pt. 1: passo 6, immagine 1 di 2 Nokia XL Dual Sim Rear Camera Replacement, Camera Removal Pt. 1: passo 6, immagine 2 di 2
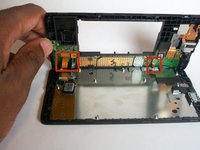
    • With tweezers, gently release the rear camera motherboard connector.

  7. Nokia XL Dual Sim Rear Camera Replacement, Camera Removal Pt. 2: passo 7, immagine 1 di 3 Nokia XL Dual Sim Rear Camera Replacement, Camera Removal Pt. 2: passo 7, immagine 2 di 3 Nokia XL Dual Sim Rear Camera Replacement, Camera Removal Pt. 2: passo 7, immagine 3 di 3
    • Gently pull the motherboard connector upward to remove the rear camera component.

Conclusione

To reassemble your device, follow these instructions in reverse order.

Un'altra persona ha completato questa guida.

Shadeed Bilal

Membro da: 09/25/14

231 Reputazione

4 Guide realizzate

Team

USF Tampa, Team 1-4, Brown Fall 2014 Membro di USF Tampa, Team 1-4, Brown Fall 2014

USFT-BROWN-F14S1G4

3 Membri

7 Guide realizzate

0 Commenti

Aggiungi Commento

Visualizza Statistiche:

Ultime 24 Ore: 0

Ultimi 7 Giorni: 0

Ultimi 30 Giorni: 1

Tutti i Tempi: 745