Salta al contenuto principale
Unisciti alla Community delle riparazioni - Crea un account

Nokia 6560 Keyboard Replacement

Cosa ti serve

  1. Nokia 6560 Keyboard Replacement, Battery: passo 1, immagine 1 di 2 Nokia 6560 Keyboard Replacement, Battery: passo 1, immagine 2 di 2
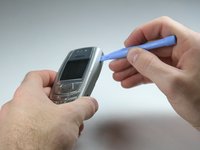
    • Remove the back cover of your cell phone by pushing the small slider with your fingernail towards the top of the phone.

    • Lift off your cell phone's back cover.

    Chiedi a FixBot
  2. Nokia 6560 Keyboard Replacement: passo 2, immagine 1 di 2 Nokia 6560 Keyboard Replacement: passo 2, immagine 2 di 2
    • Use your index finger to first push down and then lift up the battery as shown.

    • Remove the battery from your cell phone.

    Chiedi a FixBot
  3. Nokia 6560 Keyboard Replacement, Keypad: passo 3, immagine 1 di 2 Nokia 6560 Keyboard Replacement, Keypad: passo 3, immagine 2 di 2
    • Open the front cover of your cell phone with the plastic opening tool or finger nail.

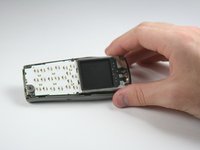
    • Lift the cover upwards, starting from the bottom below the keypad.

    Chiedi a FixBot
  4. Nokia 6560 Keyboard Replacement: passo 4, immagine 1 di 2 Nokia 6560 Keyboard Replacement: passo 4, immagine 2 di 2
    • Lift the keypad off of the keyboard as it is not attached to the phone anymore.

    • If you want to clean your keyboard do not use chemical cleaners or too much water, instead, use a damp cloth.

    • It may be tricky to get the keypad in the right position while closing the front cover for the reassembly. Ensure they are aligned properly before closing the front cover!

    Chiedi a FixBot
  5. Nokia 6560 Keyboard Replacement, Keyboard: passo 5, immagine 1 di 1
    • Unscrew the six T6 torx screws which attach the frame to the cell phone case.

    • Be careful not to scratch your display with the screw driver.

    Chiedi a FixBot
  6. Nokia 6560 Keyboard Replacement: passo 6, immagine 1 di 1
    • Lift the frame off of your cell phone.

    Chiedi a FixBot
  7. Nokia 6560 Keyboard Replacement: passo 7, immagine 1 di 1
    • Lift the keyboard out of the plastic frame.

    Chiedi a FixBot
Conclusione

To reassemble your device, follow these instructions in reverse order.

Un'altra persona ha completato questa guida.

Team

Cal Poly, Team 3-17, Maness Winter 2010 Membro di Cal Poly, Team 3-17, Maness Winter 2010

CPSU-MANESS-W10S3G17

4 Membri

12 guide realizzate

0Commenti sulla guida

Aggiungi Commento

Visualizza statistiche:

Ultime 24 ore: 0

Ultimi 7 giorni: 2

Ultimi 30 giorni: 48

Tutti i Tempi: 1,760