Salta al contenuto principale
Nintendo Wii Remote B Trigger Button Replacement

Nintendo Wii Remote B Trigger Button Replacement

Emily

Emily e 11 altri collaboratori

Ultimo aggiornamento il September 8, 2023

15 - 20 minuti
Moderato
Guida Studente in Evidenza

Introduzione

Vai al passo 1

The B button can malfunction or get misaligned due to improper or over use. Installing the B button requires disassembly of the entire device. This means removing the front cover plate, and the motherboard.

Cosa ti serve

Strumenti

  • iFixit Opening Tool
    iFixit Opening Tool
  • Y1 Tri-point Screwdriver
    Y1 Tri‑point Screwdriver
  • Spudger
    Spudger

Mostra di più…

  1. Nintendo Wii Remote B Trigger Button Replacement, Front Cover Plate and Batteries: passo 1, immagine 1 di 2 Nintendo Wii Remote B Trigger Button Replacement, Front Cover Plate and Batteries: passo 1, immagine 2 di 2
    • Flip the Wii Remote over so the battery cover faces you.

    • Push up on the bottom tab.

    • Remove the battery cover.

  2. Nintendo Wii Remote B Trigger Button Replacement: passo 2, immagine 1 di 1
    • Remove the first battery by pressing down on the positive end and pulling the battery out.

    • Remove the second battery by pushing up on the positive end and pulling the battery out.

  3. Nintendo Wii Remote B Trigger Button Replacement: passo 3, immagine 1 di 1
    • Using a tri-point Y1 Screwdriver, remove the two center 7mm screws by turning them counterclockwise.

    • Repeat with the two bottom screws.

  4. Nintendo Wii Remote B Trigger Button Replacement: passo 4, immagine 1 di 2 Nintendo Wii Remote B Trigger Button Replacement: passo 4, immagine 2 di 2
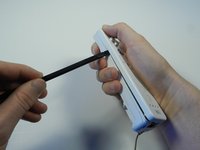
    • With the flat end of a spudger, gently apply pressure to the tabs located on left side of the controller.

    • These tabs are breakable. However, if the tabs are broken the controller will still function.

    • Open the front plate like a book.

    • Small parts may fall out as you open the front plate.

  5. Nintendo Wii Remote B Trigger Button Replacement, Motherboard: passo 5, immagine 1 di 2 Nintendo Wii Remote B Trigger Button Replacement, Motherboard: passo 5, immagine 2 di 2
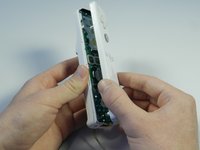
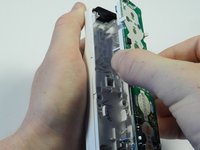
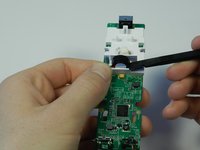
    • Using the connector port, gently lift the motherboard about 2 cm from the base.

    • Electrostatic discharge may damage the device. Be careful and avoid touching the electronic components as much as possible.

  6. Nintendo Wii Remote B Trigger Button Replacement: passo 6, immagine 1 di 2 Nintendo Wii Remote B Trigger Button Replacement: passo 6, immagine 2 di 2
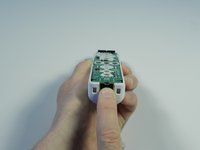
    • Grasp the edges of the motherboard and pull it straight away from the case.

  7. Nintendo Wii Remote B Trigger Button Replacement, B Trigger Button: passo 7, immagine 1 di 2 Nintendo Wii Remote B Trigger Button Replacement, B Trigger Button: passo 7, immagine 2 di 2
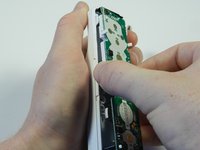
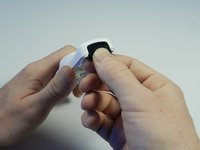
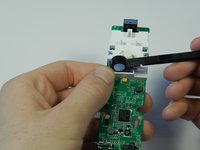
    • Locate the black sensor screen found at the bottom end of the Wii remote.

    • Grip the free edge of the black sensor screen and gently pull it down to remove from the Wii control.

  8. Nintendo Wii Remote B Trigger Button Replacement: passo 8, immagine 1 di 2 Nintendo Wii Remote B Trigger Button Replacement: passo 8, immagine 2 di 2
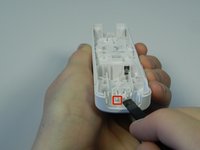
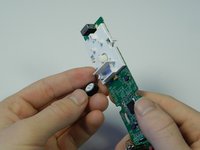
    • Find the two small tabs near the front end of the white plastic housing.

    • Place the flat end of the spudger tool under one tab and lightly push up until the tabs pop out of place.

  9. Nintendo Wii Remote B Trigger Button Replacement: passo 9, immagine 1 di 1
    • Flip the remote over and the plastic B trigger will fall out.

    • Catch the plastic trigger so it does not get lost.

  10. Nintendo Wii Remote B Trigger Button Replacement: passo 10, immagine 1 di 3 Nintendo Wii Remote B Trigger Button Replacement: passo 10, immagine 2 di 3 Nintendo Wii Remote B Trigger Button Replacement: passo 10, immagine 3 di 3
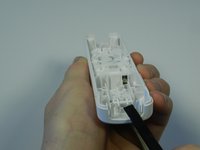
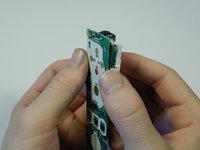
    • Flip the motherboard so that the rumble motor and the white plastic housing face up.

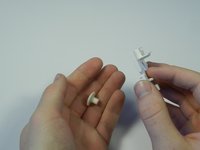
    • Place the flat end of the spudger tool under the round rumble motor and lightly push up.

    • Tilt the motherboard to the left and the rumble motor will fall out of the white housing.

    • Do not pull the rumble motor out, this could cause the wires to rip from the motherboard.

  11. Nintendo Wii Remote B Trigger Button Replacement: passo 11, immagine 1 di 3 Nintendo Wii Remote B Trigger Button Replacement: passo 11, immagine 2 di 3 Nintendo Wii Remote B Trigger Button Replacement: passo 11, immagine 3 di 3
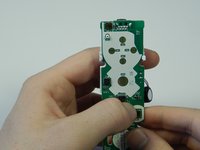
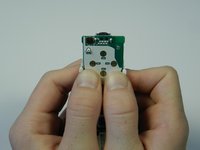
    • Flip the motherboard over and locate the two white tabs at the top the plastic housing.

    • Place both thumbs on the inside of the tabs and push the tabs outward.

    • Use the inner sides of your thumbs to separate the motherboard from the plastic housing.

  12. Nintendo Wii Remote B Trigger Button Replacement: passo 12, immagine 1 di 2 Nintendo Wii Remote B Trigger Button Replacement: passo 12, immagine 2 di 2
    • Gently push the rubber button out of the plastic housing.

    • The rubber button is bouncy, so be cautious after pushing it out.

Conclusione

To reassemble your device, follow these instructions in reverse order.

Altre 2 persone hanno completato questa guida.

Emily

Membro da: 04/14/13

1.854 Reputazione

6 Guide realizzate

Team

Cal Poly, Team 3-44, Amido Spring 2013 Membro di Cal Poly, Team 3-44, Amido Spring 2013

CPSU-AMIDO-S13S3G44

4 Membri

28 Guide realizzate

0Commenti sulla guida

Aggiungi Commento

Visualizza Statistiche:

Ultime 24 Ore: 6

Ultimi 7 Giorni: 25

Ultimi 30 Giorni: 98

Tutti i Tempi: 18,483