Questa traduzione è stata generata automaticamente e non è stata ancora revisionata da una persona. Parli questa lingua? Dai un’occhiata.
Introduzione
Se la scheda madre è guasta, segui la nostra guida per smontare la console videogame e rimuovere la scheda madre.
Cosa ti serve
-
-
-
Rimuovi le sei viti a croce Phillips da 13,25 mm sulla parte inferiore della console videogame con un cacciavite a taglio da 2,5.
-
Capovolgi la console videogame e rimuovi la parte superiore tirandola verso l'alto e allontanandola dal resto del dispositivo con le mani.
 Chiedi a FixBot
-
-
-
Rimuovi le sette viti a croce Phillips da 13,25 mm dalla copertura in metallo con un cacciavite a croce Phillips #2.
-
Rimuovi la copertura in metallo tirandola verso l'alto e lontano dal resto della console con le mani.
-
-
-
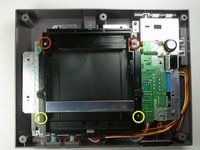
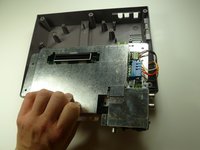
Rimuovi le due viti a croce Phillips argentate da 17,45 mm dal vassoio della cartuccia usando un cacciavite a croce Phillips #2.
-
Rimuovi le due viti a croce Phillips color bronzo da 13,25 mm dal vassoio della cartuccia usando un cacciavite a croce Phillips #2.
-
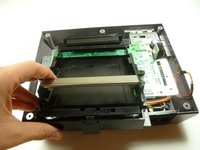
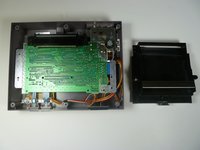
Fai scorrere il vassoio della cartuccia verso di te, allontanandolo dal connettore a 72 pin, e staccalo dal gruppo scheda madre.
-
-
-
-
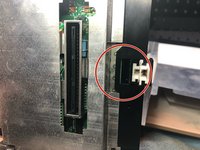
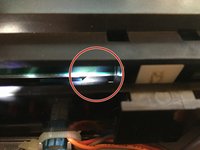
Nota: Sotto il vassoio della cartuccia si trova una linguetta/bordo nero a forma di trapezio (vedi indicatore). Quando il montaggio è corretto, questa linguetta/bordo si posiziona sotto la scheda madre e la schermatura, come mostrato qui.
-
-
-
-
-
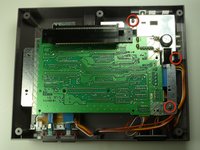
Rimuovi le tre viti a croce Phillips da 13,25 mm che fissano la scheda madre al telaio inferiore con un cacciavite a croce Phillips #2.
-
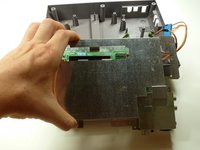
Solleva il gruppo scheda madre dritto verso l'alto ed estrailo dal telaio in plastica con le mani.
-
-
-
Scollega i cablaggi dalla scheda madre:
-
Controller 1 (sinistro)
-
Controller 2 (destro)
-
Alimentazione
-
-
-
Solleva lo schermo EMI (copertura metallica) dal gruppo scheda madre.
-
-


Per rimontare il dispositivo, segui queste istruzioni in ordine inverso.
Annulla: non ho completato questa guida.
Altre 32 persone hanno completato questa guida.
Un ringraziamento speciale a questi traduttori:
100%

Translation Bot ci sta aiutando ad aggiustare il mondo! Vuoi partecipare?
Inizia a tradurre ›
Team

Cal Poly, Team 14-40, Forte Fall 2010 Membro di Cal Poly, Team 14-40, Forte Fall 2010
CPSU-FORTE-F10S14G40
4 Membri
66 guide realizzate
8Commenti sulla guida
What do I do if my console doesn't work at all I put a game in and the power light flashes on and off and or the screen stays on purple
Clean the 72-pin connector and cartridge pins
What do I do if my console doesn't work at all the power light flashes on and off or it'll stay on but the screen shows purple what could be the
you need to change the cartridge connector (the one to the mainboard)