Salta al contenuto principale

Nintendo DSi Top LCD Screen Replacement

Guida Archiviata
Questa guida è mantenuta solo per scopi storici. Usa la versione aggiornata della guida per eseguire la riparazione.

Cosa ti serve

  1. Attenzione: i passaggi 1-2 provengono da una guida contrassegnata come in corso.

    Nintendo DSi Top LCD Screen Replacement, Battery: passo 1, immagine 1 di 1
    • Loosen the two screws on the battery panel. Then lift the panel up to remove it.
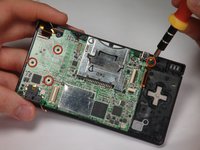
  2. Nintendo DSi Top LCD Screen Replacement: passo 2, immagine 1 di 1
    • L Button.

    • Top of the battery pack.

    • To remove the battery pack, place your fingernail or a spudger at the top of the battery near the L button. Gently lift the battery out.

  3. Attenzione: i passaggi 3-4 provengono da una guida contrassegnata come in corso.

    Nintendo DSi Top LCD Screen Replacement, Motherboard: passo 3, immagine 1 di 2 Nintendo DSi Top LCD Screen Replacement, Motherboard: passo 3, immagine 2 di 2
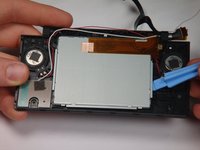
    • Remove 4 Phillips screws from the board.

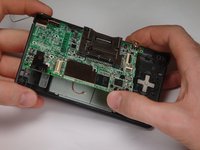
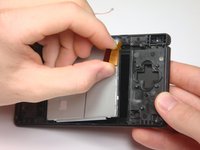
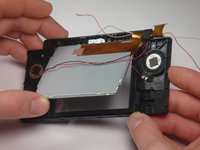
    • Lift the main board from the bottom end and flip it over to reveal the last connector.

    • Keep the main board fairly close to the case, making sure not to damage the last ribbon cable holding it in place.

  4. Nintendo DSi Top LCD Screen Replacement: passo 4, immagine 1 di 1
    • Disconnect the ribbon cable by gently using a plastic opening tool to flip up the black connector latch. The cable should easily slide out from the connector.

    • The motherboard should now be free from the rest of the device.

  5. Attenzione: i passaggi 5-7 provengono da una guida contrassegnata come in corso.

    Nintendo DSi Top LCD Screen Replacement, Disassembling Nintendo DSi Bottom case: passo 5, immagine 1 di 1
    • Remove the rubber front-panel button membranes from the device. Pay careful attention to where the buttons go, so you can replace them correctly.

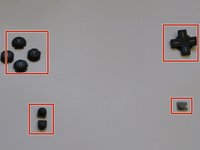
    • A/B/X/Y button assembly

    • Select/Start button assembly

    • D-pad

    • Power button

  6. Nintendo DSi Top LCD Screen Replacement: passo 6, immagine 1 di 2 Nintendo DSi Top LCD Screen Replacement: passo 6, immagine 2 di 2
    • Remove the plastic buttons and keep them in a safe place.

    • All of the buttons have "key" notches to prevent them from being inserted incorrectly (backwards or in the wrong place), but it can take a while to figure out where everything goes if they get shuffled around.

  7. Nintendo DSi Top LCD Screen Replacement: passo 7, immagine 1 di 2 Nintendo DSi Top LCD Screen Replacement: passo 7, immagine 2 di 2
    • Flip the case open, and push the lower screen assembly out of the frame.

  8. Nintendo DSi Top LCD Screen Replacement, Top LCD Screen: passo 8, immagine 1 di 1
    • To make the repair easier, we recommend removing the bottom LCD screen prior to replacing the top LCD screen.

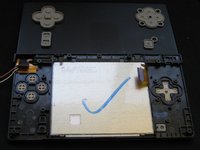
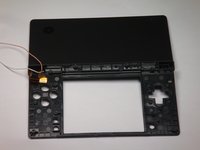
    • Using a spudger, or similar tool, pry out the 4 square screw covers.

  9. Nintendo DSi Top LCD Screen Replacement: passo 9, immagine 1 di 1
    • Remove 4 Phillips screws with a #00 Phillips screwdriver.

  10. Nintendo DSi Top LCD Screen Replacement: passo 10, immagine 1 di 1
    • Place a plastic opening tool between the front panel and top edge of the outer case. Slide the tool along the edge as needed to prop open the case.

    • With the screen facing you, slide the screen side down with your thumbs to separate the screen from the cover.

  11. Nintendo DSi Top LCD Screen Replacement: passo 11, immagine 1 di 1
    • Remove the antenna from the bottom left of the device.

    • Remove the microphone from the top of the frame.

  12. Nintendo DSi Top LCD Screen Replacement: passo 12, immagine 1 di 1
    • Use a spudger to pry the camera out of its place.

  13. Nintendo DSi Top LCD Screen Replacement: passo 13, immagine 1 di 1
    • Cables for the components in the upper half of the device run through the hinge, which must be carefully disassembled before continuing.

    • Start by pushing the sliding shaft in the hinge on the opposite side of the wires/ribbons.

  14. Nintendo DSi Top LCD Screen Replacement: passo 14, immagine 1 di 1
    • On the reverse side of the casing, insert the spudger onto the surface of the sliding shaft just left of the LED light channels.

    • Push the sliding shaft completely through the hinge until it stops and the hinge is released.

  15. Nintendo DSi Top LCD Screen Replacement: passo 15, immagine 1 di 1
    • The right side of bottom case should separate from the top case when you remove the sliding shaft.

    • Do not pull up too far or the wire hinge may be damaged.

    • Slide the top case to the right to separate the joint.

    • Weave the wires and ribbons through the wire hinge to completely separate the top and bottom casings.

  16. Nintendo DSi Top LCD Screen Replacement: passo 16, immagine 1 di 2 Nintendo DSi Top LCD Screen Replacement: passo 16, immagine 2 di 2
    • The speakers are soldered to the ribbon cable attached to the upper LCD, so they must be removed at the same time as the LCD.

    • Lift the top LCD out of the plastic frame. Carefully thread the ribbon cable out of the hinge to avoid damaging it.

  17. Nintendo DSi Top LCD Screen Replacement: passo 17, immagine 1 di 1
    • To remove the speakers, place a flat object underneath and gently pry them off.

Conclusione

To reassemble your device, follow these instructions in reverse order.

Un'altra persona ha completato questa guida.

rjcamero

Membro da: 11/05/09

50 Reputazione

3 Guide realizzate

Team

Cal Poly, Team 6-1, Maness Fall 2009 Membro di Cal Poly, Team 6-1, Maness Fall 2009

CPSU-MANESS-F09S6G1

5 Membri

4 Guide realizzate

0 Commenti

Aggiungi Commento

Visualizza Statistiche:

Ultime 24 Ore: 13

Ultimi 7 Giorni: 80

Ultimi 30 Giorni: 325

Tutti i Tempi: 28,801