Introduzione
This guide showcases how to replace the back casing on a Nikon COOLPX p7700 camera. By following these seven simple steps, you should comfortably be able to remove the casing on the camera to get to the inside.
Cosa ti serve
-
-
-
Turn camera to the left side and remove the two 4.3 mm black side screws using the Phillips #00 screwdriver.
-
Remove the side panel.
 Chiedi a FixBot
-
-
-
Open the touch screen, and remove the three 4.3 mm black screws inside using the Phillips #00 screwdriver.
-
-
-
Remove the 4.3 mm black screw on top of the camera, right above where the screen folds out. Use the Phillips #00 screwdriver.
-
-
-
-
Remove the two 4.3 mm black screws on the right side of the camera using the Phillips #00 screwdriver.
-
-
-
Remove the 4.3 mm black screws on the bottom of the camera using the Phillips #00 screwdriver.
-
-


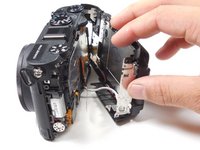
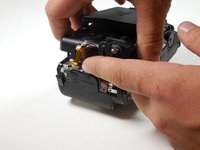

To reassemble your device, follow these instructions in reverse order.
Annulla: non ho completato questa guida.
Altre 2 persone hanno completato questa guida.

Team

Colorado Springs, Team 2-7, Panko Spring 2015 Membro di Colorado Springs, Team 2-7, Panko Spring 2015
UCCS-PANKO-S15S2G7
3 Membri
10 guide realizzate
