Introduzione
This guide outlines instructions for replacing a broken front screen . The touchscreen is the most buried component in the device, and lots of important cables need to be removed to access the screen. If the steps in this guide are followed, no damage is expected to come to the device. For more information, refer to our troubleshooting page.
Cosa ti serve
-
-
Before starting the disassembly, remove
-
The stylus
-
Any game cartridge
-
The SD card
-
-
-
Unscrew the four 6mm tri-point screws located at the four corners of the bottom panel.
The Y0 was too big; I ended up using a Y00 and that worked fine
Would not recommend using a Y000 like I tried to do
gotta use Japanese Industry Standard YOO (blunt end)- I did not, and accidentally stripped two of the screws… still trying to figure out how to remove them -_-;
I'm using the Y-0.6 and seems to only unscrew 2 of the screws on the right side of the handheld, the other 2 aren't moving
screws are too tight
-
-
-
Using a spudger, separate the back panel from the front casing by gently prying around the panel.
-
There are many clips along the hinge of the case, so it is recommended to work your way along one short side and the two long sides before finishing the last short side.
You need to be super careful separating the top from the bottom at the rear end. I got stuck there, applied a lil more force and ripped the right shoulder button straight off the pcb!
The front headphone Jack got stuck in the bottom case and snapped when opening, didn’t notice until after replacing the battery (which is a nightmare btw) I used some floss underneath the battery to give you better leverage since the side plastic is so thin and fragile. I cannot get the headphone Jack back into position now and will have to take it to a shop for (I’m sure much more expensive) repairs. Honestly DO NOT try repair this thing, just pay someone else to repair these. Compared to the OG 2011 3DS these are a nightmare to work with. Nintendo really went out of their way to make this impossible to repair, I had an extra set of pretty capable hands too.
I also ripped off the headphone jack when taking the case apart. I never pulled hard. You need to be careful to give the headphone jack clearance before applying any force.
-
-
Attrezzo utilizzato in questo passaggio:Tweezers$4.99
-
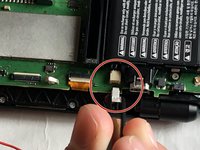
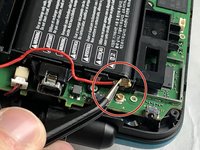
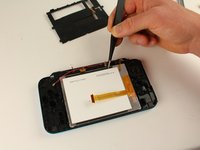
Using tweezers, disconnect the two cables that connect the rear buttons on either side to the motherboard by gently pulling them upwards.
I unfortunately took off the base of one when trying to pull apart. Is there a fix or will it not be broken?
Did you manage to fix this at all?
When you are putting these cables back, make sure to check the orientation of the cable. You have to match the cable head to the entry point, so you may have to turn the cable around. I spent a bit too much time trying to connect the cables just because I didn't realize that I had to turn the cable around.
Aren't these the speaker cables? I haven't taken any 2DS's apart in a while, but I'm pretty sure these cables connect to the speakers
-
-
-
-
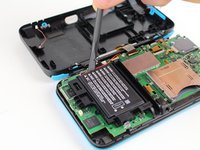
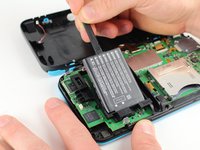
Using a spudger, lift out the battery.
-
Be aware that there is a sticky pad holding the battery into its tray. It may be necessary to use multiple tools to gently pry the battery away from the tray and motherboard.
Personally, I skipped this step and everything still works fine. I wasn't able to take the battery out because the adhesive was too strong.
Small square of adhesive. Pull up slowly and it’ll release after 10-20 seconds
Any advise for dealing with CTR-003 spicy pillow? So far in this transplant operation, both my devices batteries are okay... but... I dunno, if I were to run into a spicy pillow in the future, what would be the least awful way to pull it out?
Not sorry, when I see these repair jobs that involve the company gluing the battery into the device (or even soddering in that soon to be spicy pillow) this is just something I'm wondering about
I haven't taken my 2ds apart yet, depending on how devices are built it might work to slide a solid thread (eg fishing rope, or floss but that might rip) under it, and do a sewing motion.
-
-
Attrezzo utilizzato in questo passaggio:Tweezers$4.99
-
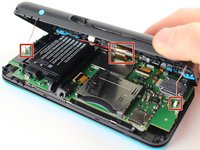
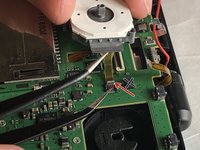
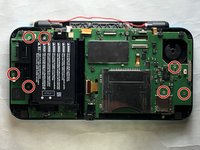
There are 8 ribbon cables that need to be removed as shown in the picture.
-
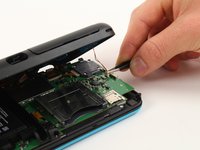
For the remaining 6 (in red), use a pair of tweezers to flip the latches up and pull the ribbon cable out.
-
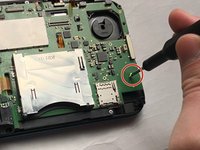
Note that the second picture shows a broken ribbon connector next to the joystick ribbon connector (to the right of the red arrow). Do not attempt to unlatch this connector as shown in the picture!
Do not just pull up “latches”, two of these are not zif connectors and pulling the top off will break it! I now have a dead 2DS XL because I followed this guide.
I made the same mistake. The guide is now updated.
Mike -
Trying to follow this guide... uh... what is a latch? That is a type of leverage based opening/closing device right? I'm not seeing anything on my board or in the images that I could call a "latch"
I'm not able to find this locking mechanism described in the image... much less know what I am using tweezers on
I would love to go further... but uh... there is no leverage based locking/closing/opening device in any of the images that I can see... no I can see on my board
Oh right, and it doesn't take a psychic to know somebody is going to be all "ooh, why not Google it". After about a full page of ads, this is the Wikipedia entry for Latches. I do not see anything in the image, or on my board that matches that
Okay update on how I got confused... turns out all the latches (except one) were already open. Apparently I tend to jostle my game device a bit on the hard side... and at some point they all (except one) came exceptionally loose. I literally could have just pulled the ribbon cables out
On a related note... the reason my R-Button wasn't working wasn't due to stickiness... turns out I had somehow managed to push it so hard it depopulated itself from the board and was just sitting loose inside the case (well... as loose as it could be... it did not travel too much)... going to need to figure out how to repopulate the R-Button--looks like it could prolly be resoddered back in
Prolly a good thing these repair guides exist
But yeah... turns out all the clasps/latches whatever were completely open when I opened the case... that would prolly explain why the battery kept draining so quickly
Is there any way to fix those "latches" if open?
-
-
Attrezzo utilizzato in questo passaggio:Tweezers$4.99
-
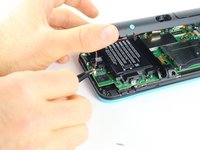
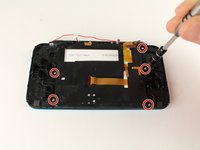
Remove the five 7.5mm phillips screws using a PH000 screwdriver.
-
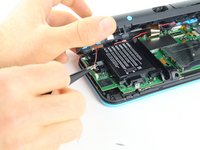
Using tweezers, pull up the plate covering the touchpad. The center ribbon cable will slide through this plate.
-


To reassemble your device, follow these instructions in reverse order.
To reassemble your device, follow these instructions in reverse order.
Annulla: non ho completato questa guida.
Altre 17 persone hanno completato questa guida.

Team

Cal Poly, Team S18-G6, Forte Fall 2017 Membro di Cal Poly, Team S18-G6, Forte Fall 2017
CPSU-FORTE-F17S18G6
5 Membri
20 Guide realizzate
12 Commenti
Please do top screen next, that’s what I need, but still +30 points :)
Hi Bud
Great instructions, but where do you buy 2ds xl replacement screens. I’ve looked everywhere. I only see 2ds and 3dsxl replacements for sale
Thanks
John
Where can you find the screen replacements?
Where can you find the screen replacements? This is a great guide but I can't find the screen replacements anywhere.
I changed the digitizer of touch screen for one new, but still not working. which can be the problem? thank you for you answer.
⚠WARNING⚠
This guide has a fatal error on step 11. The latch on the connector mentioned in step 11 should NOT be lifted, doing so will break the connector.
Same goes for step 18.
The guide has been updated.
Mike -
This guide literally told me to do something that broke my 2DS
This guide broke my device by telling me to flip up one of the ribbon connectors that didn't flip up. Definitely a newbie trap here and not well explained. Now I need to do a motherboard swap or send it into Nintendo. Hours of my life wasted for a guide that could have explained about how the connector worked.
The guide has been fixed.
Mike -
I found this guide very helpful repairing my grandsons console, but what a faff! I have replaced many phone screens in my time, mostly i phones, but this was the most complex stripdown I have ever done, so the help was most appreciated.
Okay... did this repair (I actually transplanted a screen from a donor system)... apparently my n2DSXL was really banged up. As the R-button was depopulated from the board (I guess I pushed it too hard playing Mario Kart?). Several screw columns were loose inside the case and the ribbons were unlatched/unclasped... and mostly just staying in place as a suggestion
.
When I put it back together, the analog stick was all messed up. So I'll have to fix that up a bit... but I have a touch screen now. Hooray
.
It would also appear that the ZL button was loose in the donor system... so uh... guides on repopulating the L/R/ZL/ZR buttons in the future?
This is a great repair instructional, but I would advise also looking at the below video link. (I used both.) Sometimes watching 2 repair guides can help when you think you think you’re stuck. For example, I had a really hard time getting the hinge off!
https://www.youtube.com/watch?v=Zuu_T2ls...
(HINT: Works best if you rotate it 180 degrees, so that you are repairing it from the same perspective as the technician)
skat1140 - Replica