Salta al contenuto principale
Unisciti alla Community delle riparazioni - Crea un account

Nabi Jr Battery Replacement

Cosa ti serve

    1. Nabi Jr Battery Replacement, Rear Case: passo 1, immagine 1 di 1
      • Remove the red rubber case from the device. This should come off with ease.

      Chiedi a FixBot

      Aggiungi Commento

    2. Nabi Jr Battery Replacement: passo 2, immagine 1 di 1
      • Turn the device so the screen is facing away from you.

      • Using a philips head, size #00, screwdriver, remove the screws in each corner of the plastic casing.(total of 4 screws)

      Chiedi a FixBot

      Aggiungi Commento

    3. Nabi Jr Battery Replacement: passo 3, immagine 1 di 1
      • Remove the device casing using a small plastic pry bar.

      • This might take a little bit of force to accomplish, don't be afraid to go at it with a little gusto.

      Chiedi a FixBot

      Aggiungi Commento

    4. Nabi Jr Battery Replacement: passo 4, immagine 1 di 1
      • After loosening the back cover, remove it from the device so you can get at the innards.

      Chiedi a FixBot

      Aggiungi Commento

    1. Nabi Jr Battery Replacement, Battery: passo 5, immagine 1 di 1
      • Lift the battery up from the motherboard.

      • Don't rip the soldered wires from the board.

      • The battery is stuck to the motherboard with adhesive, it may take a little pull to separate.

      Chiedi a FixBot

      Aggiungi Commento

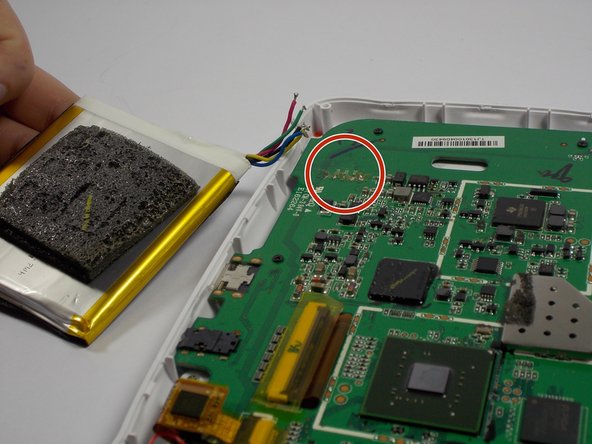
    2. Nabi Jr Battery Replacement: passo 6, immagine 1 di 1
      • Remove the battery from the motherboard

      • De-solder the colored wires

      • Be sure to note the order in which the wires are connected to the board before desoldering them.

      • Be careful while removing the solder off of the colored battery wires. The soldering iron will be extremely hot

      Chiedi a FixBot

      Aggiungi Commento

    3. Nabi Jr Battery Replacement: passo 7, immagine 1 di 2 Nabi Jr Battery Replacement: passo 7, immagine 2 di 2
      • Replace the old battery with the new one

      • Solder the wires of the new battery into the pads on the motherboard

      • Be careful when soldering the wires in. Soldering iron will be extremely hot

      Chiedi a FixBot

      Aggiungi Commento

    4. Nabi Jr Battery Replacement: passo 8, immagine 1 di 1
      • Once the wires are fully soldered, put the new battery back to the initial position

      • Close the case by putting the back cover back on the device

      • Will take some force

      • Make sure the battery is not in the way of the back cover

      Chiedi a FixBot

      Aggiungi Commento

    5. Nabi Jr Battery Replacement: passo 9, immagine 1 di 1
      • Once the back cover is on, screw in the four screws that you had taken off in the beginning

      • Put the red rubber casing back on.

      Chiedi a FixBot

      Aggiungi Commento

Conclusione

If all the steps were followed correctly, the device should be fully closed and ready to go

Annulla: non ho completato questa guida.

Altre 4 persone hanno completato questa guida.

7Commenti sulla guida

Thank you for sharing the idea ,but I need that NABI JR battery. So ,where from I can purchase it .

Lus Ka - Rispondi Condividi

I have seen them on ebay but it's easier to find a Nabi 2 battery on ebay. The Nabi 2 battery is quite a bit larger but with a very minor mod to the Nabi Jr. the Nabi 2 battery will fit and give you a much longer run time from a single charge.

darcshadow - Rispondi Condividi

My old Nabi jr battery is a plug in with 2 reds 1 white and 2 black wires. My new Cameron sino battery is blue green red yellow black. What is the order to resolder them.

Dennis Blixt - Rispondi Condividi

I have the same problem with the problem of the replacement battery not having the same wiring configuration or plug. Did you ever get this resolved?

Delores Duke - Rispondi Condividi

Where can I buy the battery live in Mexico

Roos - Rispondi Condividi

Aggiungi Commento

Visualizza statistiche:

Ultime 24 ore: 0

Ultimi 7 giorni: 7

Ultimi 30 giorni: 32

Tutti i Tempi: 12,345