Salta al contenuto principale
Unisciti alla Community delle riparazioni - Crea un account

Makita XPH01 Forward/Reverse Switch Replacement

Cosa ti serve

  1. Makita XPH01 Forward/Reverse Switch Replacement, Battery: passo 1, immagine 1 di 1
    • Hold the drill upright.

    • Place your finger on the white battery-release button.

    Chiedi a FixBot

    Aggiungi Commento

  2. Makita XPH01 Forward/Reverse Switch Replacement: passo 2, immagine 1 di 1
    • Press and hold the white release button located on the front of the battery.

    Chiedi a FixBot

    Aggiungi Commento

  3. Makita XPH01 Forward/Reverse Switch Replacement: passo 3, immagine 1 di 1
    • Slide the battery forward while pressing down on the white battery-release button.

    Chiedi a FixBot

    Aggiungi Commento

  4. Makita XPH01 Forward/Reverse Switch Replacement, Outer Casing: passo 4, immagine 1 di 2 Makita XPH01 Forward/Reverse Switch Replacement, Outer Casing: passo 4, immagine 2 di 2
    • Hold the drill upright with the back panel facing you.

    • Unscrew the two 18 mm screws from the back panel using a Phillips PH2 screwdriver.

    Chiedi a FixBot

    Aggiungi Commento

  5. Makita XPH01 Forward/Reverse Switch Replacement: passo 5, immagine 1 di 1
    • Apply slight pressure to the sides of the backplate and pull away from the drill.

    Chiedi a FixBot

    Aggiungi Commento

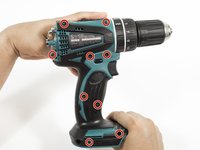
  6. Makita XPH01 Forward/Reverse Switch Replacement: passo 6, immagine 1 di 2 Makita XPH01 Forward/Reverse Switch Replacement: passo 6, immagine 2 di 2
    • Unscrew the nine 18 mm screws from the outer casing using a Phillips PH2 screwdriver.

    Chiedi a FixBot

    Aggiungi Commento

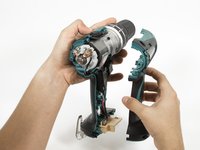
  7. Makita XPH01 Forward/Reverse Switch Replacement: passo 7, immagine 1 di 2 Makita XPH01 Forward/Reverse Switch Replacement: passo 7, immagine 2 di 2
    • Apply slight pressure to the sides of the outer casing and pull away from the drill.

    Chiedi a FixBot

    Aggiungi Commento

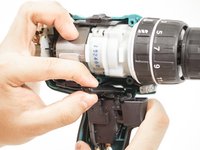
  8. Makita XPH01 Forward/Reverse Switch Replacement, Forward/Reverse Switch: passo 8, immagine 1 di 1
    • Pull the black trigger assembly away from the drill.

    Chiedi a FixBot

    Aggiungi Commento

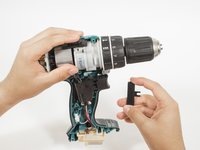
  9. Makita XPH01 Forward/Reverse Switch Replacement: passo 9, immagine 1 di 2 Makita XPH01 Forward/Reverse Switch Replacement: passo 9, immagine 2 di 2
    • Grab onto the forward/reverse switch.

    • Gently pull the forward/reverse switch to separate it from the trigger assembly.

    Chiedi a FixBot

    Aggiungi Commento

Conclusione

To reassemble your device, follow these instructions in reverse order.

Annulla: non ho completato questa guida.

Altre 4 persone hanno completato questa guida.

Eric Herwatt

Membro da: 10/05/16

1.038 Reputazione

7 guide realizzate

Team

Cal Poly, Team 15-4, Livingston Fall 2016 Membro di Cal Poly, Team 15-4, Livingston Fall 2016

CPSU-LIVINGSTON-F16S15G4

4 Membri

7 guide realizzate

0Commenti sulla guida

Aggiungi Commento

Visualizza statistiche:

Ultime 24 ore: 2

Ultimi 7 giorni: 15

Ultimi 30 giorni: 57

Tutti i Tempi: 6,787