Questa versione può contenere modifiche errate. Passa all'ultima istantanea verificata.
Cosa ti serve
-
-
Rimuovi le seguenti 10 viti a croce Phillips che fissano il case inferiore a quello superiore:
-
Sette viti da 3 mm.
-
Tre viti da 13,5 mm.
-
-
CompraAttrezzo utilizzato in questo passaggio:P6 Pentalobe Screwdriver 2009 15" MacBook Pro Battery$5.49
-
-
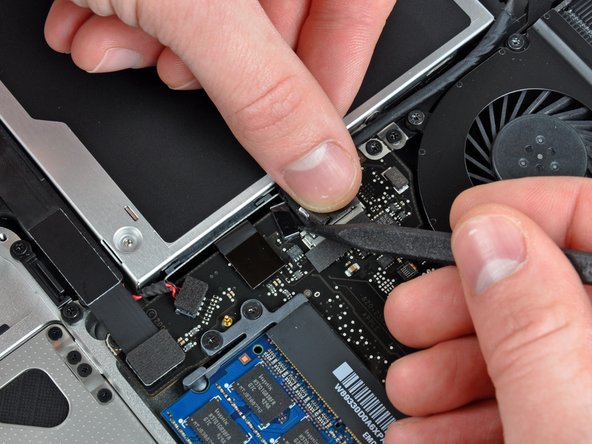
Trattenere l'estremità del fermacavo con un dito, mentre si utilizza la punta di un inseritore per sollevare leggermente l'altra estremità e ruotarla lontano dal connettore del cavo della fotocamera.
-
-
-
Questo passaggio è privo di traduzione. Aiuta a tradurlo
-
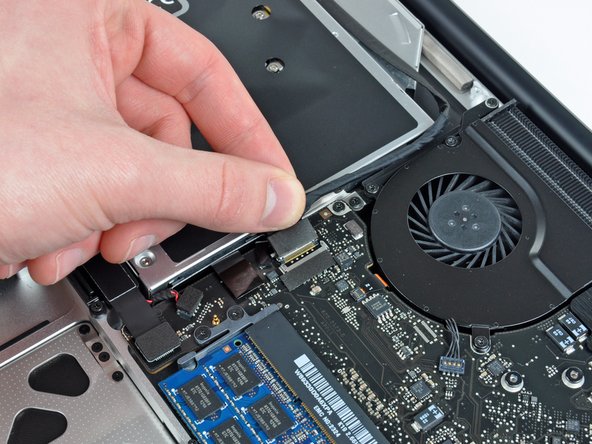
Use the flat end of a spudger to pry the hard drive/IR sensor cable connector up off the logic board.
-
Peel the hard drive cable up from the channel within the subwoofer and right speaker.
-
-
Questo passaggio è privo di traduzione. Aiuta a tradurlo
-
Using the flat end of a spudger, pry the subwoofer/right speaker connector straight up off the logic board.
-
-
Questo passaggio è privo di traduzione. Aiuta a tradurlo
-
Remove the following four screws securing the subwoofer and right speaker to the upper case:
-
Two 3.2 mm Phillips screws.
-
One 2.6 mm Phillips screw.
-
One 5 mm Phillips screw.
-
-
Questo passaggio è privo di traduzione. Aiuta a tradurlo
-
Lift the subwoofer and right speaker assembly out of the upper case.
-


Annulla: non ho completato questa guida.
Altre 12 persone hanno completato questa guida.

2 Commenti
Excellent tutorial : be careful when removing the woofer connection : do it exactly as it is pictured otherwise you may harm the motherboard.
I followed these steps in order to inspect the cracked subwoofer of my MBP. After disassembly, the membrane was unglued and instead of replacing, finnally I glued it again with Neopren. It works perfectly again !