Salta al contenuto principale

Logitech UE Boom Speaker Replacement

Cosa ti serve

  1. Logitech UE Boom Speaker Replacement, D-ring: passo 1, immagine 1 di 1
    • Turn the device over. The D-ring will be on the left face of the speaker when viewing the device from this orientation.

  2. Logitech UE Boom Speaker Replacement: passo 2, immagine 1 di 2 Logitech UE Boom Speaker Replacement: passo 2, immagine 2 di 2
    • Lift the handle on the D-ring and unscrew it.

    • Remove the D-ring.

  3. Logitech UE Boom Speaker Replacement, Bluetooth Adapter: passo 3, immagine 1 di 1
    • Any repairs made from this point forward will void your device's warranty.

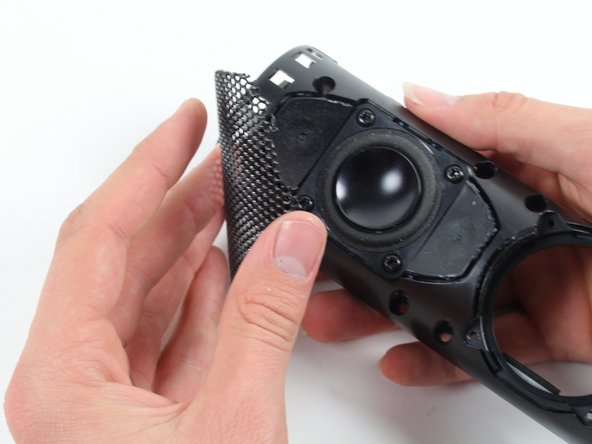
    • Holding the speaker upright, wedge the metal spudger in between the casing and the speaker. Gently pry open the tabs as they are easily broken.

  4. Logitech UE Boom Speaker Replacement: passo 4, immagine 1 di 3 Logitech UE Boom Speaker Replacement: passo 4, immagine 2 di 3 Logitech UE Boom Speaker Replacement: passo 4, immagine 3 di 3
    • Find the part of the casing that covers the volume controls. Wedge the metal spudger under this and pry open all of the tabs as in the previous step.

    • Repeat for the bottom of the speaker and pry the casing open with your fingers.

  5. Logitech UE Boom Speaker Replacement: passo 5, immagine 1 di 2 Logitech UE Boom Speaker Replacement: passo 5, immagine 2 di 2
    • Using the Phillips J0 head screwdriver, unscrew the four silver 9 mm screws.

    • Do the same for the two black 7 mm screws.

  6. Logitech UE Boom Speaker Replacement: passo 6, immagine 1 di 3 Logitech UE Boom Speaker Replacement: passo 6, immagine 2 di 3 Logitech UE Boom Speaker Replacement: passo 6, immagine 3 di 3
    • This next step involves the use of a hot soldering iron. Remember to be careful during this step since it can be easy to burn yourself.

    • Using a soldering iron, de-solder the two ends of the switch plate.

  7. Logitech UE Boom Speaker Replacement: passo 7, immagine 1 di 1
    • With the switch plate disconnected, remove it and your device should now look like this.

  8. Logitech UE Boom Speaker Replacement, Lithium Battery: passo 8, immagine 1 di 1
    • With a metal spudger, pry open the tabs on the speaker sleeve along the length of the speaker.

  9. Logitech UE Boom Speaker Replacement: passo 9, immagine 1 di 1
    • Use a plastic opening tool to pry the sleeve off from the bottom of the speaker.

  10. Logitech UE Boom Speaker Replacement: passo 10, immagine 1 di 3 Logitech UE Boom Speaker Replacement: passo 10, immagine 2 di 3 Logitech UE Boom Speaker Replacement: passo 10, immagine 3 di 3
    • Peel off the sleeve.

  11. Logitech UE Boom Speaker Replacement: passo 11, immagine 1 di 2 Logitech UE Boom Speaker Replacement: passo 11, immagine 2 di 2
    • Use a Phillips 1 screwdriver to unscrew the eight black 14 mm screws along the length of the casing.

  12. Logitech UE Boom Speaker Replacement: passo 12, immagine 1 di 2 Logitech UE Boom Speaker Replacement: passo 12, immagine 2 di 2
    • With the screws removed, pry open the casing to be able to get to the components inside.

    • Try prying the case open from one of the ends if that is easier.

  13. Logitech UE Boom Speaker Replacement: passo 13, immagine 1 di 2 Logitech UE Boom Speaker Replacement: passo 13, immagine 2 di 2
    • With a Phillips #00 screwdriver, unscrew two 5.6 mm screws from the rectangular shaped circuit board.

  14. Logitech UE Boom Speaker Replacement: passo 14, immagine 1 di 1
    • With the Phillips #2 screwdriver, unscrew the 9.9 mm screw from the larger circuit board surrounding the speaker.

  15. Logitech UE Boom Speaker Replacement: passo 15, immagine 1 di 1
    • Once all of the screws are gone, you should be able to remove the circuit boards and find the battery.

  16. Logitech UE Boom Speaker Replacement: passo 16, immagine 1 di 2 Logitech UE Boom Speaker Replacement: passo 16, immagine 2 di 2
    • Remove the battery by pulling it from the terminal as marked in the picture.

  17. Logitech UE Boom Speaker Replacement, Speaker: passo 17, immagine 1 di 1
    • At this point, you should have the case completely open and removed the battery from the motherboard.

  18. Logitech UE Boom Speaker Replacement: passo 18, immagine 1 di 2 Logitech UE Boom Speaker Replacement: passo 18, immagine 2 di 2
    • Remove the panel covering the speaker with the spudger. Be careful while doing this, as it is a very fragile and brittle metal panel.

  19. Logitech UE Boom Speaker Replacement: passo 19, immagine 1 di 1
    • Unscrew the bolts holding the speaker in after removing the panel covering the speakers.

  20. Logitech UE Boom Speaker Replacement: passo 20, immagine 1 di 2 Logitech UE Boom Speaker Replacement: passo 20, immagine 2 di 2
    • Gently pull the speaker off of the case after unscrewing the screws holding it in place.

  21. Logitech UE Boom Speaker Replacement: passo 21, immagine 1 di 1
    • Start unscrewing the screws on the second speaker (the process for removing the panels is the same for both speakers!).

  22. Logitech UE Boom Speaker Replacement: passo 22, immagine 1 di 1
    • Remove the speaker from the casing as was done previously with the other speaker.

  23. Logitech UE Boom Speaker Replacement: passo 23, immagine 1 di 2 Logitech UE Boom Speaker Replacement: passo 23, immagine 2 di 2
    • Gently unplug the speaker from the motherboard after removing it from its place in the casing of the device.

  24. Logitech UE Boom Speaker Replacement: passo 24, immagine 1 di 2 Logitech UE Boom Speaker Replacement: passo 24, immagine 2 di 2
    • Gently unplug the other speaker from the motherboard after removing it from its place in the casing of the device.

    • After this, you will have completely removed the speakers from the device!

Conclusione

To reassemble your device, follow these instructions in reverse order.

Altre 18 persone hanno completato questa guida.

Team

Cal Poly, Team 4-1, Maness Fall 2015 Membro di Cal Poly, Team 4-1, Maness Fall 2015

CPSU-MANESS-F15S4G1

4 Membri

22 Guide realizzate

16 Commenti

thank you for this excellent tutorial. Would you have an idea where replacement speakers can be found online ?

olivier delannoy - Replica

Is it necessary to solder the bluetooth adapter because my speaker got dented and now it makes a weird popping sound when i play my music on high volume. i think the problem is that the metal frame is touching the speaker causing the popping sound when the speaker vibrates

Humberto Aponte - Replica

my speaker have the same problem what should i do?

streetfames -

How many speakers are inside exactly, 2 or 4 ? I didn't understand if there are 2 per side or not...

I don't have sound on a side of my speaker and I don't now if this is normal (it is new)

Pixedy - Replica

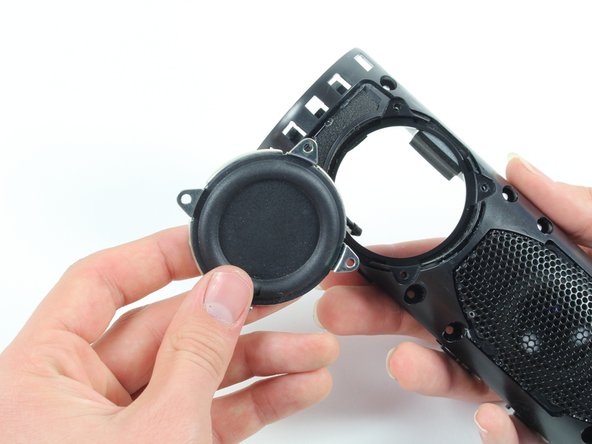
There are 2 speakers and 2 passive resonators, the 2 on the top are speakers while the 2 on the bottom are basically speakers without coils, they are just cones that rely on the pressure and vibration inside of the device generated by the real speakers on top to vibrate themselves and increase bass/low-end presence.

frankg65tg -

Aggiungi Commento

Visualizza Statistiche:

Ultime 24 Ore: 6

Ultimi 7 Giorni: 46

Ultimi 30 Giorni: 203

Tutti i Tempi: 63,119