Salta al contenuto principale

Huawei Watch GT 3 Motherboard & Daughterboard Replacement

Cosa ti serve

  1. Huawei Watch GT 3 Motherboard & Daughterboard Replacement, Remove the watch band: passo 1, immagine 1 di 1
    • Before starting repairs, take your watch off the charger and power it down.

    • Remove the watch band.

  2. Huawei Watch GT 3 Motherboard & Daughterboard Replacement, Unfasten the back cover screws: passo 2, immagine 1 di 1
    • Remove the four 3.7 mm-long Torx T2 screws securing the back cover.

  3. Huawei Watch GT 3 Motherboard & Daughterboard Replacement, Pry up the rear panel: passo 3, immagine 1 di 2 Huawei Watch GT 3 Motherboard & Daughterboard Replacement, Pry up the rear panel: passo 3, immagine 2 di 2
    • Insert the edge of a spudger into the the loudspeaker opening at the bottom edge of your watch.

    • When prying up the back cover put a finger on top or the edge of it and hold it down. Too much force during the prying procedure may lead to popping off the back cover too quickly and tearing the rear panel assembly cable.

    • The plastic clamps holding the back cover in place sit very tight and may require some force during the prying procedure.

    • Use a spudger to pry up the rear panel of your Huawei watch GT 3.

    • Don't try to remove the back cover assembly all the way yet, it's still connected to the daughterboard.

  4. Huawei Watch GT 3 Motherboard & Daughterboard Replacement, Swing open the rear panel assembly: passo 4, immagine 1 di 2 Huawei Watch GT 3 Motherboard & Daughterboard Replacement, Swing open the rear panel assembly: passo 4, immagine 2 di 2
  5. Huawei Watch GT 3 Motherboard & Daughterboard Replacement, Peel off the black tape: passo 5, immagine 1 di 2 Huawei Watch GT 3 Motherboard & Daughterboard Replacement, Peel off the black tape: passo 5, immagine 2 di 2
    Attrezzo utilizzato in questo passaggio:
    Tweezers
    $4.99
    Compra
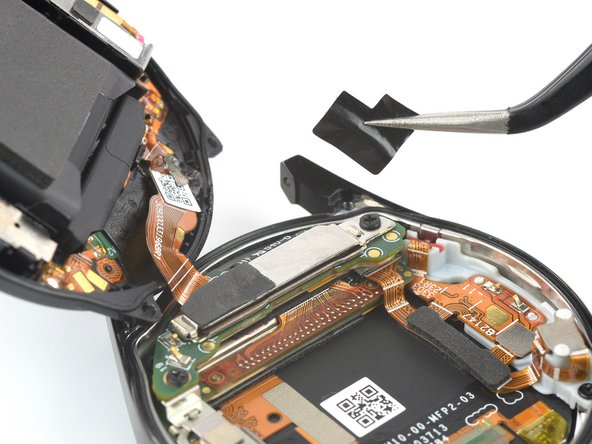
    • Use a pair of tweezers to peel the black tape off the battery connector bracket.

  6. Huawei Watch GT 3 Motherboard & Daughterboard Replacement, Unfasten the battery connector bracket screw: passo 6, immagine 1 di 1
    • Remove the singe 2.2 mm-long Phillips screw securing the battery connector bracket.

  7. Huawei Watch GT 3 Motherboard & Daughterboard Replacement, Remove the battery connector bracket: passo 7, immagine 1 di 3 Huawei Watch GT 3 Motherboard & Daughterboard Replacement, Remove the battery connector bracket: passo 7, immagine 2 di 3 Huawei Watch GT 3 Motherboard & Daughterboard Replacement, Remove the battery connector bracket: passo 7, immagine 3 di 3
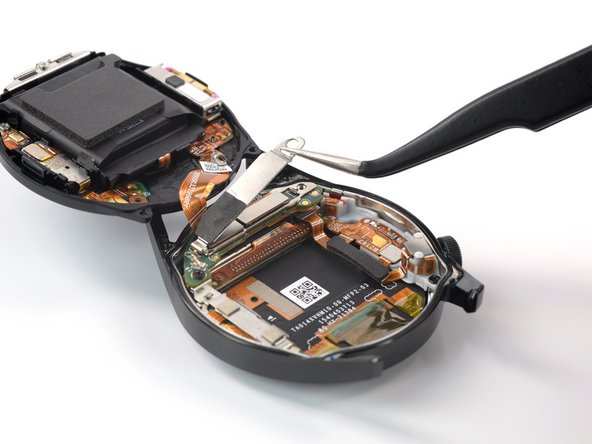
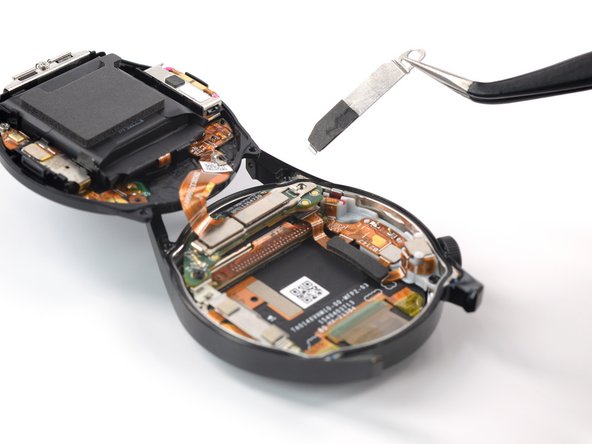
    • Use a pair of tweezers to remove the battery connector bracket.

    • The connector bracket is secured with a small metal hook next to the screw recess. This hook sits very tight und you might need to bend it a little to the side to remove the bracket.

  8. Huawei Watch GT 3 Motherboard & Daughterboard Replacement, Disconnect the back cover assembly: passo 8, immagine 1 di 3 Huawei Watch GT 3 Motherboard & Daughterboard Replacement, Disconnect the back cover assembly: passo 8, immagine 2 di 3 Huawei Watch GT 3 Motherboard & Daughterboard Replacement, Disconnect the back cover assembly: passo 8, immagine 3 di 3
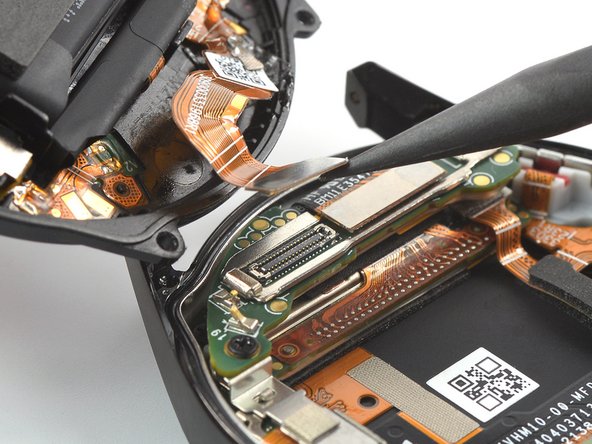
    • Use a spudger to disconnect the rear panel assembly cable by prying the connector straight up from its socket.

    • Remove the rear panel assembly.

  9. Huawei Watch GT 3 Motherboard & Daughterboard Replacement, Unfasten the daughterboard screw: passo 9, immagine 1 di 1
    • Remove the singe 2.2 mm-long Phillips screw securing the daughterboard.

  10. Huawei Watch GT 3 Motherboard & Daughterboard Replacement, Disconnect the motherboard flex cable: passo 10, immagine 1 di 2 Huawei Watch GT 3 Motherboard & Daughterboard Replacement, Disconnect the motherboard flex cable: passo 10, immagine 2 di 2
    • Use a spudger to disconnect the motherboard flex cable by prying the connector straight up from its socket.

  11. Huawei Watch GT 3 Motherboard & Daughterboard Replacement, Remove the daughterboard: passo 11, immagine 1 di 2 Huawei Watch GT 3 Motherboard & Daughterboard Replacement, Remove the daughterboard: passo 11, immagine 2 di 2
    Attrezzo utilizzato in questo passaggio:
    Tweezers
    $4.99
    Compra
    • Use a pair of tweezers to remove the daughterboard.

  12. Huawei Watch GT 3 Motherboard & Daughterboard Replacement, Remove the display connector bracket: passo 12, immagine 1 di 3 Huawei Watch GT 3 Motherboard & Daughterboard Replacement, Remove the display connector bracket: passo 12, immagine 2 di 3 Huawei Watch GT 3 Motherboard & Daughterboard Replacement, Remove the display connector bracket: passo 12, immagine 3 di 3
    • Use a pair of tweezers to remove the display connector bracket.

  13. Huawei Watch GT 3 Motherboard & Daughterboard Replacement, Unfasten the motherboard screws: passo 13, immagine 1 di 1
    • Remove the three 2.2 mm-long Phillips screw securing the motherboard.

  14. Huawei Watch GT 3 Motherboard & Daughterboard Replacement, Disconnect the display and digitizer: passo 14, immagine 1 di 3 Huawei Watch GT 3 Motherboard & Daughterboard Replacement, Disconnect the display and digitizer: passo 14, immagine 2 di 3 Huawei Watch GT 3 Motherboard & Daughterboard Replacement, Disconnect the display and digitizer: passo 14, immagine 3 di 3
    • Use a spudger to disconnect the display and digitizer cables by prying the connectors straight up from their sockets.

  15. Huawei Watch GT 3 Motherboard & Daughterboard Replacement, Disconnect the watch button cable: passo 15, immagine 1 di 2 Huawei Watch GT 3 Motherboard & Daughterboard Replacement, Disconnect the watch button cable: passo 15, immagine 2 di 2
    • Use a spudger to disconnect the watch button cable by prying the connector straight up from its socket.

  16. Huawei Watch GT 3 Motherboard & Daughterboard Replacement, Remove the motherboard: passo 16, immagine 1 di 3 Huawei Watch GT 3 Motherboard & Daughterboard Replacement, Remove the motherboard: passo 16, immagine 2 di 3 Huawei Watch GT 3 Motherboard & Daughterboard Replacement, Remove the motherboard: passo 16, immagine 3 di 3
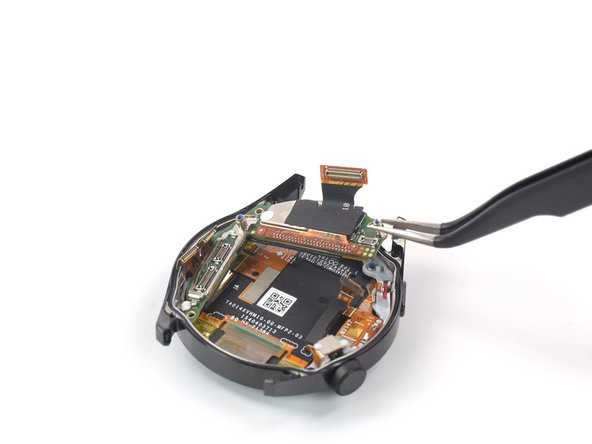
    • Use a pair of tweezers to lift the mother board out of the watch frame and remove it.

Conclusione

If possible, turn on your device and test your repair before installing new adhesive and resealing.

Compare your new replacement part to the original part—you may need to transfer remaining components or remove adhesive backings from the new part before installing.

To reassemble your device, follow these instructions in reverse order.

Take your e-waste to an R2 or e-Stewards certified recycler.

Repair didn’t go as planned? Try some basic troubleshooting, or ask our Answers community for help.

Un'altra persona ha completato questa guida.

Team

iFixit Membro di iFixit

Staff

136 Membri

17.303 Guide realizzate

2 Commenti

Where to buy Huawei gt3 daughter board?

HamoodJ - Replica

Hi my connector cabel is broken where do i find a new backcover with battery ens connector cabel?

Huawei Watch GT3 Pro

//Hampus

Hampus Akvist - Replica

Aggiungi Commento

Visualizza Statistiche:

Ultime 24 Ore: 2

Ultimi 7 Giorni: 27

Ultimi 30 Giorni: 96

Tutti i Tempi: 1,475