Introduzione
RAM stands for Random Access Memory. This memory allows your computer to access recently used data more quickly. This guide will take you through the process of replacing the RAM in an HP Compaq nc6400 Laptop. You will need the correct replacement or compatible RAM for your laptop to complete the installation.
Cosa ti serve
-
-
Locate the battery lock below the battery labeled one.
-
Slide the lock all the way to the left to release the left lock of the battery.
-
-
-
Locate the lock labeled two at the bottom right corner below the battery.
-
Slide and hold the lock to the left.
-
-
-
-
Once both the battery locks are unlocked, slide the battery out to remove.
-
-
-
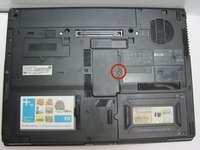
Remove the 1.2 Philips #1 screw holding down the RAM cover to the body.
-
-
-
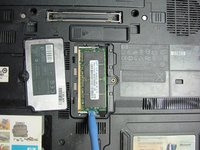
Once the screw is removed, use a spudger to pry open the case covering the RAM chip.
-
-
-
Use a plastic opening tool to pull back the white clip holding the RAM chip in place.
-
Once the plastic opening tool has disengaged the clip from the RAM chip, keep the plastic opening tool locked into place.
-
-
-
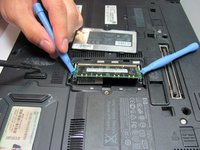
With a second plastic opening tool,repeat the above process
-
After both plastic opening tools have been locked in place, the RAM chip should pop out about 1/4 of a inch.
-
-
-
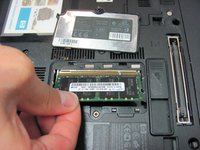
Grab the RAM chip with your thumb and index finger
-
Carefully pull the RAM chip out
-


To reassemble your device, follow these instructions in reverse order.
Annulla: non ho completato questa guida.
Altre 5 persone hanno completato questa guida.
Team

Cal Poly, Team 14-6, Forte Fall 2013 Membro di Cal Poly, Team 14-6, Forte Fall 2013
CPSU-FORTE-F13S14G6
5 Membri
5 guide realizzate