Salta al contenuto principale
Unisciti alla Community delle riparazioni - Crea un account

Disassembling IBM ThinkPad A30 Floppy Disk Drive

  1. Disassembling IBM ThinkPad A30 Floppy Disk Drive, Battery: passo 1, immagine 1 di 2 Disassembling IBM ThinkPad A30 Floppy Disk Drive, Battery: passo 1, immagine 2 di 2
    • Flip the ThinkPad over so that it is upside down.

    • Slide the highlighted tab to the left.

    • With your finger on the tab, remove the battery by lifting it upwards away from the laptop.

    Chiedi a FixBot

    Aggiungi Commento

  2. Disassembling IBM ThinkPad A30 Floppy Disk Drive, Floppy Disk Drive: passo 2, immagine 1 di 2 Disassembling IBM ThinkPad A30 Floppy Disk Drive, Floppy Disk Drive: passo 2, immagine 2 di 2
    • Hold the Thinkpad as the picture shows.

    • There is a switch located just above and to the right of the drive.

    • Slide the switch to the right. A small, black tab will pop out.

    Chiedi a FixBot

    Aggiungi Commento

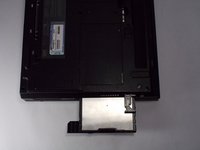
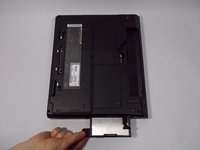
  3. Disassembling IBM ThinkPad A30 Floppy Disk Drive: passo 3, immagine 1 di 2 Disassembling IBM ThinkPad A30 Floppy Disk Drive: passo 3, immagine 2 di 2
    • Pull the small black tab away from the computer to access the drive.

    • Gently pull the drive out from the laptop.

    • If there is a problem with your tab, whether it doesn't pop out or it doesn't expose the floppy drive, please check the corresponding entry in the troubleshooting page.

    Chiedi a FixBot

    Aggiungi Commento

Conclusione

To reassemble, place the floppy disk drive back into its bay the way it was facing before

Annulla: non ho completato questa guida.

Jessica

Membro da: 10/06/10

162 Reputazione

7 guide realizzate

Team

Cal Poly, Team 4-44, Amido Fall 2010 Membro di Cal Poly, Team 4-44, Amido Fall 2010

CPSU-AMIDO-F10S4G44

4 Membri

26 guide realizzate

0Commenti sulla guida

Aggiungi Commento

Visualizza statistiche:

Ultime 24 ore: 3

Ultimi 7 giorni: 9

Ultimi 30 giorni: 53

Tutti i Tempi: 3,211