Salta al contenuto principale

DigMedia MusicStore CD-ROM Drive Replacement

Cosa ti serve

  1. DigMedia MusicStore CD-ROM Drive Replacement, Remove screws: passo 1, immagine 1 di 1
    • Remove six Philips #2 screws from the bottom of the case.

    • REASSEMBLY CAUTION: To prevent thread stripping during reassembly, turn screws backwards slowly until you feel the screw thread drop into the original plastic thread, and only then, tighten screw normally but lightly - you're working with 20+ year-old plastics.

  2. DigMedia MusicStore CD-ROM Drive Replacement, Disconnect top cover ribbon cable: passo 2, immagine 1 di 1
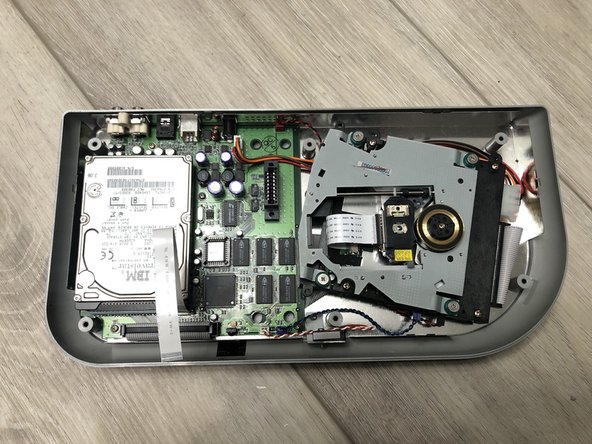
    • Carefully fold the top and bottom open, revealing a ribbon cable connecting the two halves.

    • Unlock and disconnect the ribbon cable. Unlock by pulling the lock lever evenly on both sides, parallel to the board surface (not lift/pivot), in the direction of the ribbon cable.

    • When this ZIF (Zero Insertion Force) connector is properly unlocked, the ribbon cable should just fall right out of the socket (no need to pull with any strength).

  3. DigMedia MusicStore CD-ROM Drive Replacement, Remove RF shield: passo 3, immagine 1 di 2 DigMedia MusicStore CD-ROM Drive Replacement, Remove RF shield: passo 3, immagine 2 di 2
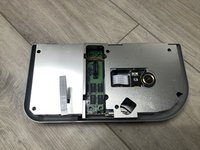
    • Simply lift the RF shield off the unit.

    • When reinstalling, take note of the 6 fork-like interlocking clips around the edge of the shield, which should engage with the original positions.

  4. DigMedia MusicStore CD-ROM Drive Replacement, CD-ROM cables and screws: passo 4, immagine 1 di 1
    • Disconnect the digital audio connector (red) and the lid switch return connector (blue) from the logic board.

    • Unscrew four Philips #2 screws that secure the CD-ROM drive to the chassis.

    • REASSEMBLY CAUTION: To prevent thread stripping during reassembly, turn screws backwards slowly until you feel the screw thread drop into the original plastic thread, and only then, tighten screw normally but lightly - you're working with 20+ year-old plastics.

  5. DigMedia MusicStore CD-ROM Drive Replacement, Data and Power cables: passo 5, immagine 1 di 1
    • Disconnect the large 40-pin IDE data connector and disconnect the 4-pin PC power connector from the CD-ROM drive.

  6. DigMedia MusicStore CD-ROM Drive Replacement, Remove CD-ROM: passo 6, immagine 1 di 1
    • Lift the CD-ROM drive out of the chassis.

Conclusione

To reassemble your device, follow these instructions in reverse order.

Matt Falcon

Membro da: 05/09/15

2.231 Reputazione

13 Guide realizzate

0 Commenti

Aggiungi Commento

Visualizza Statistiche:

Ultime 24 Ore: 0

Ultimi 7 Giorni: 0

Ultimi 30 Giorni: 2

Tutti i Tempi: 59