Salta al contenuto principale
Dell XPS 13 9310 SSD Replacement

Dell XPS 13 9310 SSD Replacement

Spencer Day

Spencer Day e 4 altri collaboratori

Ultimo aggiornamento il October 24, 2024

15 - 30 minuti
Moderato

Introduzione

Vai al passo 1

Use this guide to replace the SSD on your Dell XPS 13 9310.

Before you perform this repair, if at all possible, back up your existing SSD. If you are replacing the SSD where your operating system is installed, familiarize yourself with a disk cloning utility so you’ll be ready to migrate your data to the new SSD.

Be sure to completely power off and unplug your laptop. Make sure the laptop is not in standby, sleep, or hibernation mode.

Cosa ti serve

Kit di riparazione

Questi kit contengono tutti i ricambi e gli strumenti necessari per completare questa guida.

Ricambi

Strumenti

Mostra di più…

  1. Dell XPS 13 9310 SSD Replacement, Unfasten the lower case: passo 1, immagine 1 di 2 Dell XPS 13 9310 SSD Replacement, Unfasten the lower case: passo 1, immagine 2 di 2
    • Use a T5 Torx screwdriver to remove the eight 3.3 mm screws securing the case.

  2. Dell XPS 13 9310 SSD Replacement, Insert an opening pick: passo 2, immagine 1 di 2 Dell XPS 13 9310 SSD Replacement, Insert an opening pick: passo 2, immagine 2 di 2
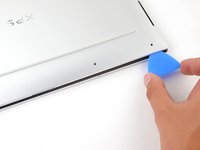
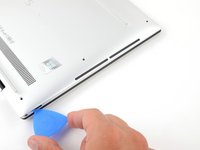
    • Insert an opening pick between the lower case and the chassis on the front right edge.

  3. Dell XPS 13 9310 SSD Replacement, Release the case's front clips: passo 3, immagine 1 di 2 Dell XPS 13 9310 SSD Replacement, Release the case's front clips: passo 3, immagine 2 di 2
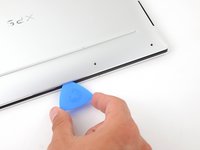
    • Slide the pick along the front edge to release the clips securing the lower case.

  4. Dell XPS 13 9310 SSD Replacement, Release the remaining clips: passo 4, immagine 1 di 3 Dell XPS 13 9310 SSD Replacement, Release the remaining clips: passo 4, immagine 2 di 3 Dell XPS 13 9310 SSD Replacement, Release the remaining clips: passo 4, immagine 3 di 3
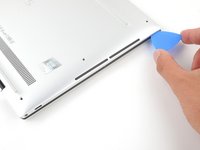
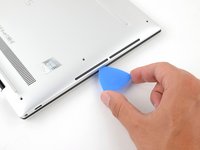
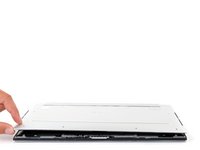
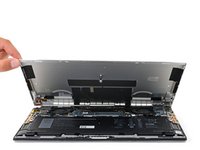
    • Continue sliding the opening pick along the perimeter of the lower case to release the remaining clips.

  5. Dell XPS 13 9310 SSD Replacement: passo 5, immagine 1 di 3 Dell XPS 13 9310 SSD Replacement: passo 5, immagine 2 di 3 Dell XPS 13 9310 SSD Replacement: passo 5, immagine 3 di 3
    • Lift the lower case from the chassis and remove it.

    • During reassembly, this is a good point to power on your laptop and test all functions before sealing it up. Be sure to power your laptop back down before you continue working.

  6. Dell XPS 13 9310 SSD Replacement, Disconnect the battery: passo 6, immagine 1 di 3 Dell XPS 13 9310 SSD Replacement, Disconnect the battery: passo 6, immagine 2 di 3 Dell XPS 13 9310 SSD Replacement, Disconnect the battery: passo 6, immagine 3 di 3
    • Grip the pull tab on the battery connector with your fingers and gently pull away from the socket to disconnect it.

    • After you disconnect the battery, some of your laptop's startup (BIOS) settings will revert to their defaults.

    • You may need to run BIOS setup to reset the system clock as well as any specialized disk settings before you can boot up your XPS.

  7. Dell XPS 13 9310 SSD Replacement, Loosen the antenna wire: passo 7, immagine 1 di 3 Dell XPS 13 9310 SSD Replacement, Loosen the antenna wire: passo 7, immagine 2 di 3 Dell XPS 13 9310 SSD Replacement, Loosen the antenna wire: passo 7, immagine 3 di 3
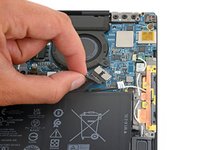
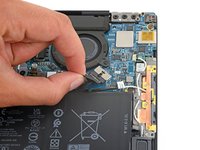
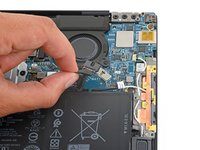
    • Use the flat end of a spudger to pry up and loosen the antenna wire from the SSD cover.

    • Repeat this process along the entire edge of the SSD cover.

  8. Dell XPS 13 9310 SSD Replacement, Unfasten the SSD cover: passo 8, immagine 1 di 2 Dell XPS 13 9310 SSD Replacement, Unfasten the SSD cover: passo 8, immagine 2 di 2
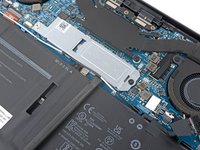
    • Use a Phillips screwdriver to remove the 3.6 mm screw securing the SSD cover

  9. Dell XPS 13 9310 SSD Replacement, Remove the SSD cover: passo 9, immagine 1 di 3 Dell XPS 13 9310 SSD Replacement, Remove the SSD cover: passo 9, immagine 2 di 3 Dell XPS 13 9310 SSD Replacement, Remove the SSD cover: passo 9, immagine 3 di 3
    • Pull the SSD cover away from its fastener to remove it.

  10. Dell XPS 13 9310 SSD Replacement, Remove the SSD: passo 10, immagine 1 di 3 Dell XPS 13 9310 SSD Replacement, Remove the SSD: passo 10, immagine 2 di 3 Dell XPS 13 9310 SSD Replacement, Remove the SSD: passo 10, immagine 3 di 3
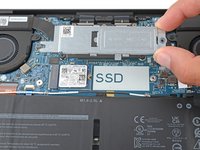
    • Pull the SSD out of its socket and remove it. Keep the SSD as parallel to the motherboard as possible when pulling on it.

    • Do not pull up at a sharp angle, as this could damage the SSD and the socket.

  11. Dell XPS 13 9310 SSD Replacement, Reassembly notes: passo 11, immagine 1 di 1
Conclusione

To reassemble your device, follow these instructions in reverse order.

Take your e-waste to an R2 or e-stewards certified recycler.

Repair didn't go as planned? Try some basic troubleshooting, or ask our Dell XPS answers community for help.

Un'altra persona ha completato questa guida.

Spencer Day

Membro da: 09/14/22

95.018 Reputazione

662 Guide realizzate

Team

iFixit Membro di iFixit

Staff

118 Membri

19.455 Guide realizzate

Un commento

Please keep in mind to take out any sd card. I permanently have an sd card in the slot, and because it totally disappears inside, i didn't think about removing it. I can tell you it completely ruins both your sd card and the sd card reader

matthias de bruijne - Replica

Aggiungi Commento

Visualizza Statistiche:

Ultime 24 Ore: 3

Ultimi 7 Giorni: 33

Ultimi 30 Giorni: 146

Tutti i Tempi: 5,018