Questa traduzione è stata generata automaticamente e non è stata ancora revisionata da una persona. Parli questa lingua? Dai un’occhiata.
Introduzione
In questa guida imparerai a sostituire i pulsanti danneggiati sul pannello posteriore della tua Canon PowerShot ELPH 300HS. La sostituzione di questi pulsanti è solitamente un'alternativa semplice ed economica rispetto alla riparazione della fotocamera presso un centro assistenza o alla sua sostituzione.
Cosa ti serve
-
-
-
Spegni la fotocamera.
-
Rimuovi la batteria per evitare il rischio di scosse elettriche.
 Chiedi a FixBot
-
-
-
Spegni la fotocamera premendo il pulsante di accensione, situato nella parte centrale superiore del dispositivo.
-
Individua lo sportello della batteria nell'area in basso a destra del case della fotocamera.
-
Appoggia il dito con decisione sul cuscinetto in gomma nera dello sportello della batteria e fai scorrere lo sportello verso destra per aprirlo.
-
Individua il pulsante arancione di rilascio della batteria sotto lo sportello della batteria.
-
Fai scorrere il pulsante di rilascio della batteria verso il basso per sbloccare la batteria.
-
-
-
Rimuovi le due viti situate sul lato sinistro del case della fotocamera, usando il cacciavite a croce Phillips #00 (2,0 mm).
-
-
-
-
Rimuovi le due viti nella parte inferiore della fotocamera situate vicino allo sportello della batteria (cacciavite a croce Phillips #00) (4,0 mm).
-
-
-
Rimuovi la vite situata sul lato inferiore destro della copertura della fotocamera (cacciavite a croce Phillips #00) (4,0 mm).
-
Rimuovi la copertura della porta HDMI A/V out situata sul lato superiore destro della fotocamera.
-
Rimuovi la vite situata appena sotto la copertura della porta rimossa nel passaggio 2 (cacciavite a croce Phillips #00) (2,0 mm).
-
-
-
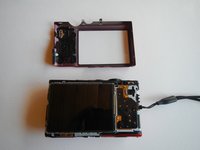
Rimuovi la parte posteriore del case della fotocamera per rivelare la vite situata sulla parte superiore del case.
-
Rimuovi la vite dalla parte superiore del case della fotocamera, situata accanto al pulsante di scatto (cacciavite a croce Phillips #00) (1,5 mm).
-
-
-
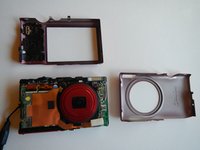
Fai leva con cura per separare la cover lungo la giuntura, usando le dita.
-
-
-
-
-
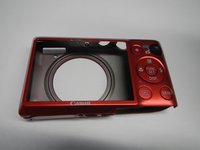
Ora che hai seguito i passaggi per rimuovere il case, puoi rimuovere il pannello posteriore della tua fotocamera e sostituirlo con il tuo nuovo pannello.
-
-
-
Ora che hai sostituito i pulsanti del pannello posteriore, puoi rimontare il dispositivo seguendo le istruzioni al contrario della guida Sostituzione della custodia della fotocamera.
-
-




Per rimontare il dispositivo, segui queste istruzioni in ordine inverso.
Annulla: non ho completato questa guida.
Un'altra persona ha completato questa guida.

Team

Michigan Tech, Team 5-6, Lauer Spring 2014 Membro di Michigan Tech, Team 5-6, Lauer Spring 2014
MTU-LAUER-S14S5G6
3 Membri
72 guide realizzate
